replace ec2 ssh key

By Brian Fitzgerald

Introduction

The employee with the ec2-user secret ssh key left the company.

Now what?

Procedure

identify a key

Use an exiting ssh key pair or create a new one with a command such as:

ssh-keygen -m -f magic

Files magic and magic.pub get created as a result, in this example.

stop the ec2 instance

edit the user data

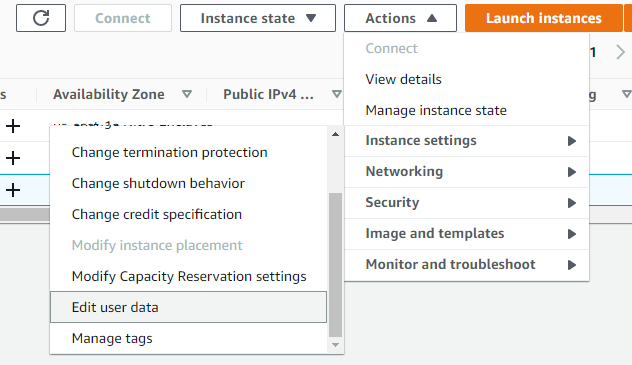
Select your ec2 instance. Select actions->Edit user data.

Paste a script such as this one, substituting the contents of your actual magic.pub:

Content-Type: multipart/mixed; boundary="=+"
MIME-Version: 1.0

--=+
Content-Type: text/cloud-config; charset="us-ascii"
MIME-Version: 1.0
Content-Transfer-Encoding: 7bit
Content-Disposition: attachment; filename="cloud-config.txt"

cloud_final_modules:
- [scripts-user, always]

--=+
Content-Type: text/x-shellscript; charset="us-ascii"
MIME-Version: 1.0
Content-Transfer-Encoding: 7bit
Content-Disposition: attachment; filename="replace-ssh-key.bash"

#!/bin/bash

cat > /home/ec2-user/.ssh/authorized_keys <<-EOF
ssh-rsa AAAAB3NzaC1yc2EAAAADAQABAAABgQC1pY+ct6N1DosG1qTSvbTVByY8CUilyn0ZVexISyBd+a4SPXbjgOKsRv4wiAYNHkMD29zFkvGXUgg8mB6UaOD7OeoI4opHpGNVYKGx4Sf+frvOzMuS7Z/VCrT+MtRc0GFI57K4aHNIVtJ6TxS1aq79eaD1ORG7TlgdqbBuR49KD1CemCZB/NdzPoo5D2oZTbr3yvrDXzRApzRX++DK3EZyNSrma8p1NUxB3H8JcNj7fmnDehrrAqoe9HctwJidc9/n/5c2AN3WV59SZLX4GhDRiKXIxOAq7pG0CWAUotlvRGhNRch87KzueLmQ/i5RsAKrx/B3dOAhlI6IF54HC8cdO6gjpjjfLxBCpireLHxNjNtBQCchMnHzGShGH3QEB1wHTZIa0ezN2kvjelC7hAB6UR/Klt6DD0lO4yBVGraahlUNFffLPHCf+Jym9Ppp2aXa0qzJIoRGFxpyC4KZDU1kzdWb3/Nou9qamyUbe4NBRLBc76L9sdD2Iz1SoolYm4E= brian@RWMZLB
EOF
--=+

start the ec2 instance

ssh using the new key

ssh -i magic ec2-user@your-host

Conclusion

Done!

curl on el5 with TLS 1.2

By Brian Fitzgerald

Background

We needed a curl that supportsTLS 1.2 to be working on Red Hat el5 in order to migrate off el5. The default curl does not support TLS 1.2
Solution: download and compile curl on el5

Test case

Download Oracle patch p6880880_200000_Linux-x86-64.zip from MOS.
Steps:
Store the URL, the file name, and your cookies in files url.txt, filename.txt , and cook.txt, respectively. For instructions on getting your browser cookies, please refer to Oracle binaries or patch download from Linux command line.

Symptom

$ uname -r
2.6.18-426.el5
$ which curl
/usr/bin/curl
$ curl -b cook.txt  -o "` cat filename.txt `" -L "` cat url.txt `"
curl: (35) error:14077410:SSL routines:SSL23_GET_SERVER_HELLO:sslv3 alert handshake failure

Prerequisites to compiling curl

perl 

Install Perl v5.10.0 minimum
unset LD_LIBRARY_PATH
cd /u02/sw/perl/src/perl-5.30.2
./Configure -de -Dprefix=/u02/sw
make
make install

openssl

cd /u02/sw/openssl/src/openssl-1.1.1g
export PATH=/u02/sw/bin:/bin:/usr/bin
./config --prefix=/u02/sw enable-egd  
make
make install

openldap

cd /u02/sw/openldap/src/openldap-2.4.56
export PATH=/bin:/usr/bin
export LD_FLAGS=-L/u02/sw/lib
export CPPFLAGS=-I/u02/sw/include
./configure --prefix=/u02/sw --with-ssl=/u02/sw
make
make install

sasl

cd /u02/sw/cyrus-sasl/src/cyrus-sasl-2.1.27
./configure --prefix=/u02/sw --with-openssl=/u02/sw/ssl
make
make install
ln -s libsasl2.so /u02/sw/lib/libsasl2.so.2

Compile curl

cd /u02/sw/curl/src/curl-7.73.0
./configure --prefix=/u02/sw --with-ssl=/u02/sw
make
make install
unset LD_FLAGS

Tests

el5

$ ./test.u02.curl.bash
2.6.18-426.el5
  % Total    % Received % Xferd  Average Speed   Time    Time     Time  Current
                                 Dload  Upload   Total   Spent    Left  Speed
  0     0    0     0    0     0      0      0 --:--:-- --:--:-- --:--:--     0
100  116M  100  116M    0     0  9357k      0  0:00:12  0:00:12 --:--:-- 17.3M

el6

$ ./test.u02.curl.bash
2.6.32-754.31.1.el6.x86_64
  % Total    % Received % Xferd  Average Speed   Time    Time     Time  Current
                                 Dload  Upload   Total   Spent    Left  Speed
  0     0    0     0    0     0      0      0 --:--:-- --:--:-- --:--:--     0
100  116M  100  116M    0     0  4132k      0  0:00:28  0:00:28 --:--:-- 4184k

el7

$ ./test.u02.curl.bash
3.10.0-1062.el7.x86_64
  % Total    % Received % Xferd  Average Speed   Time    Time     Time  Current
                                 Dload  Upload   Total   Spent    Left  Speed
  0     0    0     0    0     0      0      0 --:--:-- --:--:-- --:--:--     0
100  116M  100  116M    0     0  42.3M      0  0:00:02  0:00:02 --:--:-- 51.8M

Actual TLS version

Verbose output shows:
$ curl -v -b cook.txt -o “` cat filename.txt `” -L “` cat url.txt `”
 . .
* SSL connection using TLSv1.3 / TLS_AES_256_GCM_SHA384
* ALPN, server accepted to use http/1.1

Conclusion

A locally-compiled curl runs on Red Hat el5, el6, el7

OUI on AIX Power in IBM cloud via SSH tunnel

By Brian Fitzgerald

Introduction

This is a worked example on how to Display Oracle Universal Server back to your Windows PC if you want to connect ssh through an additional server, such as a bastion. The destination operating system is AIX POWER in IBM Cloud. The tunnel host is Linux.

Pattern

The ssh tunnel connection follows this serverfault answer:

How to enable SSH X11 forwarding through additional server?

There are several ways to do this, the one I prefer is to forward the ssh port:

First, connect to machine B and forward [localPort] to C:22 through B

A$ ssh -L [localPort]:C:22 B

Next, connect to C from A through this newly-created tunnel using [localPort], forwarding X11

A$ ssh -X -p [localPort] localhost

Now we can run X11 programs on C and have them display on A

C$ xclock

[localPort] can be any port that you are not already listening to on A, I often use 2222 for simplicity.

Prerequisites

You should have a working ssh setup before beginning.  In this example, the private ssh key is saved on Windows as file “ibm_rsa”. Likewise, you will need a working X server, such a Xming.

In Oracle Cloud, create an AIX Power VM. Create a Linux VM to use as the intermediate host.

Tunnel account setup

On the Linux host:

[root@dal-vm ~]# groupadd tunl
[root@dal-vm ~]# useradd -g tunl tunl
[root@dal-vm ~]# cp -pr  ~/.ssh ~tunl/.ssh
[root@dal-vm ~]# chown -R tunl:tunl ~tunl/.ssh

Oracle account setup

On the AIX POWER host, enable X11 forwarding,

*******************************************************************************
*                                                                             *
*                                                                             *
*  Welcome to AIX Version 7.1!                                                *
*                                                                             *
*                                                                             *
*  Please see the README file in /usr/lpp/bos for information pertinent to    *
*  this release of the AIX Operating System.                                  *
*                                                                             *
*                                                                             *
*******************************************************************************
# bash
bash-4.3# ed /etc/ssh/sshd_config
3233
1,$s/#X11Forwarding no/X11Forwarding yes/g
w
3207
q
bash-4.3# stopsrc -s sshd
0513-044 The sshd Subsystem was requested to stop.
bash-4.3# startsrc -s sshd
0513-059 The sshd Subsystem has been started. Subsystem PID is 13107376.
bash-4.3#

Create the oracle account:

bash-4.3# mkgroup oinstall
bash-4.3# mkgroup dba
bash-4.3# useradd -g oinstall -G dba oracle
bash-4.3# mkdir ~oracle
bash-4.3# cp -pr ~/.ssh ~oracle/.ssh
bash-4.3# chown -R oracle:oinstall ~oracle
bash-4.3#

Create the tunnel

On Windows, connect to the Linux host with the needed tunneling arguments.

C:>ssh -i ibm_rsa -N -L 3333:52.117.58.66:22 tunl@169.61.227.202
The authenticity of host '169.61.227.202 (169.61.227.202)' can't be established.
ECDSA key fingerprint is SHA256:gCHZnnBtodihB75yPqIZ21Cbdq/+IAWbsCr4zRe5MTw.
Are you sure you want to continue connecting (yes/no)? yes
Warning: Permanently added '169.61.227.202' (ECDSA) to the list of known hosts.

Note that this is not an interactive session. No Linux prompt appears.

Log on to the AIX POWER oracle account

In Windows, set the DISPLAY variable. Log on to AIX as oracle via the local tunnel port:

C:>set DISPLAY=localhost:0.0

C:>ssh -i ibm_rsa -Y -p 3333 oracle@localhost
The authenticity of host '[localhost]:3333 ([::1]:3333)' can't be established.
RSA key fingerprint is SHA256:28Wh/Inx/YBDvPhIYN+VyEZ8b903cXtKzA83KEnv3bU.
Are you sure you want to continue connecting (yes/no)? yes
Warning: Permanently added '[localhost]:3333' (RSA) to the list of known hosts.
Warning: No xauth data; using fake authentication data for X11 forwarding.
Last login: Tue Nov 19 11:43:19 2019 on ssh from 169.61.227.202
*******************************************************************************
*                                                                             *
*                                                                             *
*  Welcome to AIX Version 7.1!                                                *
*                                                                             *
*                                                                             *
*  Please see the README file in /usr/lpp/bos for information pertinent to    *
*  this release of the AIX Operating System.                                  *
*                                                                             *
*                                                                             *
*******************************************************************************
1356-364 /usr/bin/X11/xauth:  creating new authority file /home/oracle/.Xauthority

In AIX,  set LC_ALL. Optionally, test xterm. Start Oracle Universal installer:

-bash-4.3$ export LC_ALL=C
-bash-4.3$ xterm
-bash-4.3$ cd /opt/app/oracle/product/19.3.0/dbhome_1/
-bash-4.3$ unzip -q /opt/app/download/AIX.PPC64_193000_db_home.zip
-bash-4.3$ ./runInstaller

********************************************************************************

Your platform requires the root user to perform certain pre-installation
OS preparation.  The root user should run the shell script 'rootpre.sh' before
you proceed with Oracle installation. The rootpre.sh script can be found at:
/opt/app/oracle/product/19.3.0/dbhome_1/clone/rootpre.sh

Answer 'y' if root has run 'rootpre.sh' so you can proceed with Oracle
installation.
Answer 'n' to abort installation and then ask root to run 'rootpre.sh'.

********************************************************************************

Has 'rootpre.sh' been run by root in this machine? [y/n] (n)
y
Launching Oracle Database Setup Wizard...

oem

Conclusion

This has been a complete, worked example of starting Oracle Universal Installer, an X-Windows client, on an AIX POWER virtual machine in the IBM Cloud. The ssh session was established via a tunnel on a Linux virtual machine.

Data Guard network in AWS

By Brian Fitzgerald

Introduction

This a cross-region Data Guard network in Amazon AWS. This article covers VPC, peering, and security groups.

VPC

We are starting with a default VPC at the primary with CIDR block 172.31.0.0/16. At the standby, in preparation for peering, we will create a new VPC with non-overlapping CIDR block 172.32.0.0/20.

cr.vpcEnable DNS hostnames, which is required for the Oracle grid setup.

vpc.enable.dns.hostnames2

We need to create at least one subnet.

cr.subnet

Optionally, you may create an internet gateway and route.

Peering

At the standby VPC, setup peering to the primary VPCs:

cr.peering

Note the acknowledgement:

conf.peering

At the primary, accept the request.

accept.peering

Press “Yes, Accept”

accept.peering.yes.png

Note the acknowledgement. Select “Modify my route tables now”:

will.modify.route

At the standby, add a route to the primary VPC.

edit.routes.sf

At the primary, add a route to the standby VPC.

edit.routes.va

Security Groups

Create primary, far sync, and standby EC2 instances. If you have Enterprise Manager set up already, you may consider it now. Assuming these IP addresses:

Description IP Address
primary 172.31.86.22
far sync 172.31.28.23
standby 172.32.10.34
Enterprise Manager 172.31.82.194

A minimalist security group arrangement involves just the database boxes. In that case, setup security groups such as the following. At the primary EC2 instance, accept incoming Oracle connections from the far sync and the standby. At all EC2 instances, accept incoming SSH and em agent connections.

sg.prim

At the far sync, accept Oracle connections from the primary and the standby.

sg.far

At the standby, accept Oracle connections from the primary and the far sync.

sg.stby

Suppose, however, that there are database application clients on subnets 172.32.0.0/20 and 172.31.80.0/20. In that case, at you could revise the primary and standby security groups as follows. At both the primary and the standby, accept Oracle connections from the primary and the standby subnets and from the far sync.

sg.app.prim

sg.app.stby

Instead of opening up incoming SSH to all hosts, you can create one or more bastion hosts, and you can restrict incoming SSH to only the bastion.

Conclusion

Using the AWS console, you can setup networking for a cross-region Data Guard network. At the VPC level, the first key point is to select non-overlapping IP address ranges with a view to establishing peering. For a smooth grid install, enable DNS hostnames. After your EC2 instances are created, you must configure security groups to accept incoming database, EM agent, and ssh connections. Security groups should be as restrictive as possible.

ssh to postgres issue solved

by Brian Fitzgerald

Scenario

You have double checked everything, but ssh to postgres does not work.

Conditions

  1. You did a postgres package install
  2. ssh to other accounts works
  3. ssh to postgres using a key does not work
  4. Directory .ssh mode is 700
  5. File authorized_keys mode is 600

Selinux

Check whether selinux is enforcing acccess controls.

[postgres@test ~]$ getenforce
Enforcing

Note in /var/log/audit/audit.log, “avc: denied…scontext…sshd…tcontext…postressql_db_t”

type=AVC msg=audit(1562467696.927:316): avc:  denied  { read } for  pid=2282 comm="sshd" name="authorized_keys" dev="sda2" ino=56806 scontext=system_u:system_r:sshd_t:s0-s0:c0.c1023 tcontext=unconfined_u:object_r:postgresql_db_t:s0 tclass=file permissive=0

Note that the inode is 56806. Check ls -i:

[postgres@test ~]$ cd .ssh

[postgres@test .ssh]$ ls -i authorized_keys
56806 authorized_keys

Check the authorized_keys selinux type:

[postgres@test .ssh]$ ls -Z authorized_keys
-rw-------. postgres postgres unconfined_u:object_r:postgresql_db_t:s0 authorized_keys

The type is “postgresql_db_t”. In order for ssh to work, the type needs to be “ssh_home_t”.

Solution

Issue restorecon -R .ssh

[postgres@test ~]$ restorecon -R .ssh
[postgres@test ~]$ ls -RZ .ssh
.ssh:
-rw-------. postgres postgres unconfined_u:object_r:ssh_home_t:s0 authorized_keys

Check:

[postgres@pgstby .ssh]$ ssh test date
Sun Jul  7 02:57:21 UTC 2019

ssh works!

Note that new files created under directory .ssh will inherit the necessary ssh_home_t type.

chcon

If the home directory is an incompatible subtype then restorecon will not work. In that case, run chcon. i.e.:

[postgres@test ~]$ chcon -R unconfined_u:object_r:ssh_home_t:s0 ~/.ssh

or

[postgres@test ~]$ chcon -R system_u:object_r:usr_t:s0 ~/.ssh

semamage

If restorecon did not work, you can configure it to work in the future:

[root@test ~]# semanage fcontext -a -t ssh_home_t ~postgres/'.ssh(/.+)?'

Cause

The linux system was built from Azure image Redhat Enterprise Linux 7.6, which has selinux enabled by default.

Postgres was installed from package rh-postgresql10 created the user postgres, and then set the selinux type of most files and directories to postressql_db_t.

The .ssh directory inherited its type from its parent.

Normal home directory

The normal type of a home directory is user_home_dir_t. Subdirectory .ssh gets created as type ssh_home_t

[normal@test ~]$ ls -dZ
drwx------. normal normal unconfined_u:object_r:user_home_dir_t:s0 .
[normal@test ~]$ mkdir .ssh
[normal@test ~]$ ls -dZ .ssh
drwxrwxr-x. normal normal unconfined_u:object_r:ssh_home_t:s0 .ssh

Affected systems

In this example, the system was Redhat Linux on Azure, but it can happen on any system running selinux. The issue was noticed after a PostgreSQL package install. The same problem could appear with other package installs that create home directories.

Recommended practice

On selinux-enabled systems, create the .ssh directory this way:

[postgres@test ~]$ mkdir .ssh
[postgres@test ~]$ chmod 700 .ssh
[postgres@test ~]$ restorecon -R .ssh