About Brian Fitzgerald

Database administrator

Handshake failure after JDK upgrade

by Brian Fitzgerald

Introduction

After upgrading to JDK 8u481, 11.0.30, 17.0.18, 21.0.10, or 25.0.2 or later, this error appears:

java.sql.SQLRecoverableException: IO Error: IO Error (handshake_failure)
Received fatal alert: handshake_failure, Authentication lapse

The correct solution preserves forward secrecy.

Scenario

Your JDBC connection to Oracle Database using SSL (TLS) has been working for a long time. Your JVM runs with -Djavax.net.ssl.trustStore, and your database connection string is “jdbc:oracle:thin:@tcps://..” or “jdbc:oracle:thin:@(..(PROTOCOL=TCPS)..)”.

In this example, let us assume that you upgraded JDK from version 17.0.17 to 17.0.19. You are now getting the handshake error mentioned earlier.

Triage

You can rule out a certificate issue. This type of handshake error happens before the certificate check. This will be clearer in the trace analysis in the next section.

Diagnosis

Trace your java program

java -Djavax.net.debug=ssl:handshake ...

Trace the old and new JDKs.

Look for ClientHello. Look for the list of client cipher suites

"ClientHello": {
...
"cipher suites" : "[
    TLS_AES_256_GCM_SHA384(0x1302), 
    TLS_AES_128_GCM_SHA256(0x1301), 
...
    TLS_EMPTY_RENEGOTIATION_INFO_SCSV(0x00FF) (disregard this one)
]" ,

some 30 cipher suites in this example. Next, look at the list of server cipher suites. In the RDS option group, option SSL. Here is an example:

    "OptionName": "SSL",
    "OptionSettings": [
        ...
        {
            "Name": "SQLNET.CIPHER_SUITE",
            "Value": "SSL_RSA_WITH_AES_256_CBC_SHA"
        },

Perform this comparison mentally, or by saving the outputs above as two lists. For apples to apples comparison, strip the codes and the commas from ClientHello. In the option group, map prefix “SSL_” to “TLS_”, Strip the quotes and commas. Compare the lists and notice that no cipher suite is common to both lists.

In the trace of the old (working) JDK, also look for ServerHello. For example:

ServerHello.java:883|Consuming ServerHello handshake message (
"ServerHello": {
  "server version"      : "TLSv1.2",
  ... 
 "cipher suite"        : "TLS_RSA_WITH_AES_256_CBC_SHA(0x0035)",
  ...
 }
)

In this example, the server only allows cipher suite TLS_RSA_WITH_AES_256_CBC_SHA.

Note that the server returns the certificate only after a successful cipher suite negotiation.

$ egrep -n 'ServerHello' debug.old.output.txt | head -1
6973:javax.net.ssl|DEBUG|E5|C3P0PooledConnectionPoolManager[..]-HelperThread-#0|2026-07-28 02:16:22.119 UTC|ServerHello.java:883|Consuming ServerHello handshake message (
$ egrep -n 'Consuming server Certificate handshake message' debug.old.output.txt | head -1
7104:javax.net.ssl|DEBUG|F5|C3P0PooledConnectionPoolManager[..]-HelperThread-#1|2026-07-28 02:16:22.126 UTC|CertificateMessage.java:366|Consuming server Certificate handshake message (

In the failed case, there was no ServerHello or server certificate return. This trace analysis reinforces the previous claim that no certificate issue played a role in the handshake error.

What happened?

You didn’t do anything wrong. When you set up the SSL option, the ECDHE suites did not exist in RDS. AWS added them to the SSL option on February 3, 2023. If your instance predates that, static RSA suites were the only ones on the menu.

Times have changed.

Cipher suites named like “SSL_RSA_” are static key exchange cipher suites and lack forward secrecy. The cipher suites in JDK 17.0.18+ that are allowed by default preserve forward secrecy. In fact, all cipher suites that are allowed by default in JDK version 8u481, 11.0.30, 17.0.18, 21.0.10, or 25.0.2, or later preserve forward secrecy. These versions were released in the January 2026 Oracle Critical Patch Update. This year’s shift to forward secrecy has led to a new manifestation of the handshake error.

If you check AWS now, you will find that a few of the JDK 17.0.18+ suites are available in the AWS RDS SSL option.

Solution

Your task is to extend your cipher suite list with at least one JDK 17.0.18+ cipher suite. I picked TLS_ECDHE_RSA_WITH_AES_256_GCM_SHA384.

Implementation

You can make this change on the fly. No db instance restart required.

options="$(cat $json_file)" 
aws rds add-option-to-option-group 
  --no-cli-pager 
  --apply-immediately 
  --options "$options" 
  --option-group-name $option_group_name

where json_file points to a file containing:

[
    {
        "OptionName": "SSL",
        "VpcSecurityGroupMemberships": [
            "sg-0a567891234"
        ],
        "Port": 2484,
        "OptionSettings": [
            {
                "Name": "FIPS.SSLFIPS_140",
                "Value": "FALSE"
            },
            {
                "Name": "SQLNET.CIPHER_SUITE",
                "Value": "SSL_RSA_WITH_AES_256_CBC_SHA,TLS_ECDHE_RSA_WITH_AES_256_GCM_SHA384"
            },
            {
                "Name": "SQLNET.SSL_VERSION",
                "Value": "1.2"
            }
        ]
    }
]

Notice that you must fully specify the option, including port, security group, and non-default options. Be sure to specify version “1.2”, not “1.0” or “1.0,1.2”.

Validation

openssl s_client -connect hostname:2484 -tls1_2 -cipher ECDHE-RSA-AES256-GCM-SHA384 </dev/null
...
New, TLSv1.2, Cipher is ECDHE-RSA-AES256-GCM-SHA384
...

The choice of TLS_ECDHE_RSA_WITH_AES_256_GCM_SHA384

If the provided script solved your problem, then this section is optional reading.

Find out the cipher suites that are available in RDS.

$ aws rds describe-option-group-options --engine-name oracle-ee   --major-engine-version 19 --query "OptionGroupOptions[?Name=='SSL']" | jq '.[].OptionGroupOptionSettings[] | select (.SettingName == "SQLNET.CIPHER_SUITE")'
{
  "SettingName": "SQLNET.CIPHER_SUITE",
  "SettingDescription": "Specifies the desired SSL cipher suite",
  "DefaultValue": "SSL_RSA_WITH_AES_256_CBC_SHA",
  "ApplyType": "STATIC",
  "AllowedValues": "SSL_RSA_WITH_AES_256_CBC_SHA,..
  "IsModifiable": true,
  "IsRequired": false,
  "MinimumEngineVersionPerAllowedValue": []
}

Despite “ApplyType”: “STATIC”, experience shows that no RDS db instance restart is required.

The available cipher suites in RDS are, in 19c, as of today:

SSL_RSA_WITH_AES_256_CBC_SHA
SSL_RSA_WITH_AES_256_CBC_SHA256
SSL_RSA_WITH_AES_256_GCM_SHA384
TLS_ECDHE_ECDSA_WITH_AES_256_CBC_SHA384
TLS_ECDHE_ECDSA_WITH_AES_256_GCM_SHA384
TLS_ECDHE_RSA_WITH_AES_128_CBC_SHA
TLS_ECDHE_RSA_WITH_AES_128_CBC_SHA256
TLS_ECDHE_RSA_WITH_AES_128_GCM_SHA256
TLS_ECDHE_RSA_WITH_AES_256_CBC_SHA
TLS_ECDHE_RSA_WITH_AES_256_CBC_SHA384
TLS_ECDHE_RSA_WITH_AES_256_GCM_SHA384

Choosing the cipher suite

We can choose our cipher suite by process of elimination.

Let’s eliminate “SSL_RSA_*” (the static key exchange suites).

Given that AES 256 is available in JDK 17.0.18+, rule out AES 128.

SHA 384 is available, so rule out SHA and SHA 256.

Look in the trace of the old JVM.

javax.net.ssl...CertificateMessage.java:366
|Consuming server Certificate handshake message (...
"signature algorithm": "SHA256withRSA",
"issuer" : "L=Seattle, CN=Amazon RDS us-east-1 Subordinate CA RSA2048 G1.A.4, 
ST=WA, OU=Amazon RDS, O="Amazon Web Services, Inc.", C=US",
...
"subject public key" : "RSA",

The certificate “subject public key” is RSA and will not work with ECDSA – rule out.

CBC — cipher block chaining. Encrypted data can be tampered with undetected unless a separate integrity step is added. Flaws in that arrangement have been exploited.

GCM — Galois/Counter Mode. Encrypts and verifies integrity together. No such flaw, and faster.

Our final choice: TLS_ECDHE_RSA_WITH_AES_256_GCM_SHA384

Not recommended: re-enabling static key exchange

The correct solution is to use cipher suites that preserve forward secrecy. Instead of using static key exchange, use cipher suites that implement ephemeral key agreement. Make this change on the server side.

On the client side, in file conf/security/java.security, this section can be modified:

jdk.tls.disabledAlgorithms=SSLv3, TLSv1, TLSv1.1, DTLSv1.0, RC4, DES, \
    MD5withRSA, DH keySize < 1024, EC keySize < 224, 3DES_EDE_CBC, anon, NULL, \
    ECDH, TLS_RSA_*, rsa_pkcs1_sha1 usage HandshakeSignature, \
    ecdsa_sha1 usage HandshakeSignature, dsa_sha1 usage HandshakeSignature

If you delete ECDH or TLS_RSA_*, you will stop the error message, but you will re-enable cipher suites that do not preserve forward secrecy.

Conclusion

Oracle DBAs can contribute to application security in an RDS environment by updating their DB option group’s SSL option to use the most secure available cipher suites. You can make this change behind the scenes without requiring any application-side changes. No database downtime is required.

Appendices

A. diff and comm

This appendix compares and contrasts the Linux diff and comm commands and shows how to use comm to reconcile lists.

Use of diff

For side by side comparison, you can do:

$ diff --side-by-side ./17.0.17/ClientHello.l ./17.0.19/ClientHello.l
TLS_AES_128_GCM_SHA256                                          TLS_AES_128_GCM_SHA256
TLS_AES_256_GCM_SHA384                                          TLS_AES_256_GCM_SHA384
TLS_CHACHA20_POLY1305_SHA256                                    TLS_CHACHA20_POLY1305_SHA256
TLS_DHE_DSS_WITH_AES_128_CBC_SHA                                TLS_DHE_DSS_WITH_AES_128_CBC_SHA
TLS_DHE_DSS_WITH_AES_128_CBC_SHA256                             TLS_DHE_DSS_WITH_AES_128_CBC_SHA256
TLS_DHE_DSS_WITH_AES_128_GCM_SHA256                             TLS_DHE_DSS_WITH_AES_128_GCM_SHA256
TLS_DHE_DSS_WITH_AES_256_CBC_SHA                                TLS_DHE_DSS_WITH_AES_256_CBC_SHA
TLS_DHE_DSS_WITH_AES_256_CBC_SHA256                             TLS_DHE_DSS_WITH_AES_256_CBC_SHA256
TLS_DHE_DSS_WITH_AES_256_GCM_SHA384                             TLS_DHE_DSS_WITH_AES_256_GCM_SHA384
TLS_DHE_RSA_WITH_AES_128_CBC_SHA                                TLS_DHE_RSA_WITH_AES_128_CBC_SHA
TLS_DHE_RSA_WITH_AES_128_CBC_SHA256                             TLS_DHE_RSA_WITH_AES_128_CBC_SHA256
TLS_DHE_RSA_WITH_AES_128_GCM_SHA256                             TLS_DHE_RSA_WITH_AES_128_GCM_SHA256
TLS_DHE_RSA_WITH_AES_256_CBC_SHA                                TLS_DHE_RSA_WITH_AES_256_CBC_SHA
TLS_DHE_RSA_WITH_AES_256_CBC_SHA256                             TLS_DHE_RSA_WITH_AES_256_CBC_SHA256
TLS_DHE_RSA_WITH_AES_256_GCM_SHA384                             TLS_DHE_RSA_WITH_AES_256_GCM_SHA384
TLS_DHE_RSA_WITH_CHACHA20_POLY1305_SHA256                       TLS_DHE_RSA_WITH_CHACHA20_POLY1305_SHA256
TLS_ECDHE_ECDSA_WITH_AES_128_CBC_SHA                            TLS_ECDHE_ECDSA_WITH_AES_128_CBC_SHA
TLS_ECDHE_ECDSA_WITH_AES_128_CBC_SHA256                         TLS_ECDHE_ECDSA_WITH_AES_128_CBC_SHA256
TLS_ECDHE_ECDSA_WITH_AES_128_GCM_SHA256                         TLS_ECDHE_ECDSA_WITH_AES_128_GCM_SHA256
TLS_ECDHE_ECDSA_WITH_AES_256_CBC_SHA                            TLS_ECDHE_ECDSA_WITH_AES_256_CBC_SHA
TLS_ECDHE_ECDSA_WITH_AES_256_CBC_SHA384                         TLS_ECDHE_ECDSA_WITH_AES_256_CBC_SHA384
TLS_ECDHE_ECDSA_WITH_AES_256_GCM_SHA384                         TLS_ECDHE_ECDSA_WITH_AES_256_GCM_SHA384
TLS_ECDHE_ECDSA_WITH_CHACHA20_POLY1305_SHA256                   TLS_ECDHE_ECDSA_WITH_CHACHA20_POLY1305_SHA256
TLS_ECDHE_RSA_WITH_AES_128_CBC_SHA                              TLS_ECDHE_RSA_WITH_AES_128_CBC_SHA
TLS_ECDHE_RSA_WITH_AES_128_CBC_SHA256                           TLS_ECDHE_RSA_WITH_AES_128_CBC_SHA256
TLS_ECDHE_RSA_WITH_AES_128_GCM_SHA256                           TLS_ECDHE_RSA_WITH_AES_128_GCM_SHA256
TLS_ECDHE_RSA_WITH_AES_256_CBC_SHA                              TLS_ECDHE_RSA_WITH_AES_256_CBC_SHA
TLS_ECDHE_RSA_WITH_AES_256_CBC_SHA384                           TLS_ECDHE_RSA_WITH_AES_256_CBC_SHA384
TLS_ECDHE_RSA_WITH_AES_256_GCM_SHA384                           TLS_ECDHE_RSA_WITH_AES_256_GCM_SHA384
TLS_ECDHE_RSA_WITH_CHACHA20_POLY1305_SHA256                     TLS_ECDHE_RSA_WITH_CHACHA20_POLY1305_SHA256
TLS_EMPTY_RENEGOTIATION_INFO_SCSV                               TLS_EMPTY_RENEGOTIATION_INFO_SCSV
TLS_RSA_WITH_AES_128_CBC_SHA                                  <
TLS_RSA_WITH_AES_128_CBC_SHA256                               <
TLS_RSA_WITH_AES_128_GCM_SHA256                               <
TLS_RSA_WITH_AES_256_CBC_SHA                                  <
TLS_RSA_WITH_AES_256_CBC_SHA256                               <
TLS_RSA_WITH_AES_256_GCM_SHA384                               <

However, if you want a neater list, use comm.

Use of comm

Given two sorted list files, use comm to get the items common to both lists, or items that are only in one list or the other.

Use comm -23 to get the items only in the first list.  For the cipher suites allowed by default in version 17.0.17 but not in 17.0.19, run:

$ comm -23 ./17.0.17/ClientHello.l ./17.0.19/ClientHello.l
TLS_RSA_WITH_AES_128_CBC_SHA
TLS_RSA_WITH_AES_128_CBC_SHA256
TLS_RSA_WITH_AES_128_GCM_SHA256
TLS_RSA_WITH_AES_256_CBC_SHA
TLS_RSA_WITH_AES_256_CBC_SHA256
TLS_RSA_WITH_AES_256_GCM_SHA384

Use comm -12 to show the cipher suites that are allowed by default in JDK 17.0.18+ and are available in RDS:

$ comm -12 jdk/17.0.19/ClientHello.l  <(sed 's/^SSL_/TLS_/' oracle-ee.19.SSL.cipher-suites.l | sort)
TLS_ECDHE_ECDSA_WITH_AES_256_CBC_SHA384
TLS_ECDHE_ECDSA_WITH_AES_256_GCM_SHA384
TLS_ECDHE_RSA_WITH_AES_128_CBC_SHA
TLS_ECDHE_RSA_WITH_AES_128_CBC_SHA256
TLS_ECDHE_RSA_WITH_AES_128_GCM_SHA256
TLS_ECDHE_RSA_WITH_AES_256_CBC_SHA
TLS_ECDHE_RSA_WITH_AES_256_CBC_SHA384
TLS_ECDHE_RSA_WITH_AES_256_GCM_SHA384

Of the eight cipher suites in common between JDK and RDS, we ruled out ECDSA because of certificate incompatibility. We ruled out AES 128 in favor of AES 256, and we ruled out SHA and SHA 256 in favor of SHA 384. We ruled out CBC because of known flaws in that scheme. Decision: TLS_ECDHE_RSA_WITH_AES_256_GCM_SHA384.

B. Listing the default cipher suites

Even before setting up a client-server connection, you can check the cipher suites that are allowed by default:

import java.util.Arrays;
import javax.net.ssl.SSLContext;

public class DefaultCipherSuites {
    public static void main(String[] args) throws Exception {
        String[] suites = SSLContext.getDefault()
                                    .getDefaultSSLParameters()
                                    .getCipherSuites();
        Arrays.sort(suites);
        for (String s : suites) {
            System.out.println(s);
        }
    }
}
$ ./jdk1.8.0_501/bin/javac DefaultCipherSuites.java
$ ./jdk1.8.0_501/bin/java DefaultCipherSuites
TLS_AES_128_GCM_SHA256
TLS_AES_256_GCM_SHA384
...
$ ./jdk-25.0.4/bin/javac DefaultCipherSuites.java
$ ./jdk-25.0.4/bin/java DefaultCipherSuites
TLS_AES_128_GCM_SHA256
TLS_AES_256_GCM_SHA384
...

[INS-30515] Insufficient space available in the selected disks

by Brian Fitzgerald

Introduction

This article covers “[INS-30515] Insufficient space available in the selected disks” during grid launch.

System

Installing Oracle Clusterware 19c on top of Red Hat Linux.

Installation notes

In this article, the grid owner is oracle, group dba. The grid home is /u01/app/oracle_grid/product/1930/grid. Oracle base is /u01/app/oracle

The error

You run gridSetup.sh as oracle and you see this error:

Launching Oracle Grid Infrastructure Setup Wizard... 
[FATAL] [INS-30508] Invalid ASM disks. 
 CAUSE: The disks [ORCL:ORA_ASM_GRID1_03, ORCL:ORA_ASM_GRID1_02, ORCL:ORA_ASM_GRID1_01] were not valid. 
 ACTION: Please choose or enter valid ASM disks. 
 [FATAL] [INS-30515] Insufficient space available in the selected disks. 
 CAUSE: Insufficient space available in the selected Disks. At least, 8 MB of free space is required. 
 ACTION: Choose additional disks such that the total size should be at least 8 MB.

The cause is almost never insufficient space. Read on.

Logs

In /u01/app/oracle_grid/product/1930/grid/cfgtoollogs/oui/GridSetupActions2026-07-28_03-40-30PM:

... Executing ... kfod ...
INFO: [Jul 28, 2026 3:40:33 PM] Parsing Error 49802 initializing ADR at /u01/app/oracle 
INFO: [Jul 28, 2026 3:40:33 PM] Parsing ERROR!!! could not initialize the diag context

The cause

A tool can’t run under the oracle account because the log directory is owned by root.

drwxr-x---. 3 root root 27 Jul 29 20:05 /u01/app/oracle/diag/kfod

The log directory is owned by root because the tool previously ran as root and created a root-owned log directory. kfod ran during troubleshooting or a previous gridSetup attempt.

Later, gridSetup.sh ran as oracle. gridSetup.sh called kfod, which failed because it could not create a log file.

The fix

chown -R oracle:dba /u01/app/oracle/diag

gridSetup.sh ran fine immediately after this fix.

Not the cause

None of these was the cause here; any of them can be:

  • Disks too small
  • Disk ownership
  • Disk not initialized
  • Re-used disk. Disk not clean.
  • ASM search string
  • asmlib filtering
  • selinux
  • udev rules
  • kfod reset disk ownership
  • /tmp mounted noexec
  • NAS files not zero-padded
  • multipath setup

Research

If you reached this article by searching for “[INS-30515] Insufficient space available in the selected disks”, consider that there are over 15 articles that address this message. Few of those articles reach a conclusion.

The reason for the proliferation of articles is the prevalence of the failure itself. The reason why few articles document a solution is, first, the difficulty of finding one, and second, the needlessness of the knowledge: Once solved, the knowledge is needless to the discoverer. The article is for the next person.

Error handling

In many Oracle software modules, the error message matches the purpose of the module. If the purpose is to check disk space, then for any failure, the message says the same thing about disk space.  “[INS-30515] Insufficient space available in the selected disks”.

When I write code, I handle errors differently. In fact, I rarely handle errors at all. I simply make sure that any failure causes the script to stop and display its error message unfiltered. I rarely write try – catch blocks. My functions do not return null; they throw an exception (which, as I said, I don’t catch).

I get a lot of pushback on this. The counterargument goes that if there is an error, it is imperative that we write code that handles it. The problem is that people sometimes write only the catching part and save the correct handling part for later. If later never arrives, the error gets absorbed. In gridSetup.sh, the coder put “try” around everything and wrote one error message.

“try – catch” is meant in the figurative sense: the implementation depends on the language. Code intercepts a useful error message and replaces it with an unhelpful one.

The Unix Philosophy

The Unix Philosophy states principles of clean, capable software design. Among those principles is the Rule of Repair: “Repair what you can — but when you must fail, fail noisily and as soon as possible.” Code should fail in a manner that is easy to localize and diagnose. Refer to The Art of Unix Programming (2003) by Eric Raymond.

If you are not sold on the Unix philosophy, consider that the writer of gridSetup.sh was not sold on it either.

Conclusion

Oracle software error handling follows a defective pattern: gridSetup.sh is not the only example. Oracle software prints a misleading error message. Pertinent facts are in the logs, GridSetupActions.log in this case.

“Successful discovery of 0 disks” during Oracle cluster launch

by Brian Fitzgerald

Introduction

This article covers “Successful discovery of 0 disks” errors during grid launch. I know of three fixes.

System

Installing Oracle Clusterware 19c on top of ASMLIB 3.0 on Red Hat Linux.

Installation notes

In this article, the grid owner is oracle, group dba. The ASM disks are named ORA_ASM_GRID1_01, and so on, and you can refer to them that way:

/dev/disk/by-label/ORA_ASM_GRID1_01

and so on.

The error

After running gridSetup.sh as the grid owner, the DBA runs root.sh. On the first node, the error happens in step 16 of 19: ‘InitConfig’. On the second node, the failure appears at step 17 of 19: ‘StartCluster’. root.sh runs for 10 minutes and fails.

The root.sh refers to a log such as $ORACLE_HOME/install/root_$(hostname)$(date…).log, which begins:

Performing root user operation.

On the first node, the error is:

[FATAL] [DBT-30002] Disk group GRID1 creation failed.
ORA-15018: diskgroup cannot be created
ORA-15031: disk specification 'ORCL:ORA_ASM_GRID1_01' matches no disks
ORA-15031: disk specification 'ORCL:ORA_ASM_GRID1_02' matches no disks
ORA-15031: disk specification 'ORCL:ORA_ASM_GRID1_03' matches no disks

And on the second, you will find:

CRS-1705: Found 0 configured voting files but 1 voting files are required, terminating to ensure data integrity; details at (:CSSNM00065:) in /u01/app/oracle/diag/crs/<hostname>/crs/trace/ocssd.trc
CRS-2883: Resource 'ora.cssd' failed during Clusterware stack start.

ocssd.trc shows this message repeating for 10 minutes:

2026-07-15 10:23:54.351 : CSSD:1956423232: [ INFO] clssnmvDiskVerify: Successful discovery of 0 disks
2026-07-15 10:23:54.351 : CSSD:1956423232: [ INFO] clssnmCompleteInitVFDiscovery: Completing initial voting file discovery
2026-07-15 10:23:54.351 : CSSD:1956423232: [ INFO] clssnmvFindInitialConfigs: No voting files found
2026-07-15 10:23:54.353 : CSSD:1956423232: [ INFO] (:CSSNM00070:)clssnmCompleteInitVFDiscovery: Voting file not found. Retrying discovery in 15 seconds

Cause

The error appears if you have disabled asmlib filtering. Linux tends to change disk device ownership to root. Disabling filtering breaks a handler that tends to change disk device ownership back to oracle.

Oracle ships a per-event ownership handler (/usr/lib/oracleasm/iofilter-asm-disk-addmap, invoked by udev). When filtering is disabled, the handler exits before reaching its chown. With no rule asserting ownership, udev’s defaults set devices to root:disk whenever device nodes are reprocessed or recreated.

1. Workaround while root.sh is running

While root.sh is running, you have plenty of time to correct the underlying issue. Run:

ls -Ll /dev/disk/by-label/ORA_ASM_GRID1_0?

If you see root ownership

brw-rw----. 1 root   disk 8, 193 Jul 26 12:52 /dev/disk/by-label/ORA_ASM_GRID1_01

and so on, then simply run

chown oracle:dba /dev/disk/by-label/ORA_ASM_GRID1_0?

root.sh will resume and run to successful completion. Finish the gridSetup.sh installation. Chances are, the system will give you no trouble after that, even if you reboot the cluster.

2. Enable filtering

crsctl stop crs
or
crsctl stop has
oracleasm configure -f y
Configuration changes only come into effect after the 
Oracle ASM system service is restarted. 
Please run 'systemctl restart oracleasm' after making changes.
systemctl restart oracleasm
crsctl start crs
or
crsctl start has

Caution: my own testing shows unless you restart ASM, filtering will not protect your data as it is designed to.

3. udev rule

If you have decided not to implement filtering, then install this file at /etc/udev/rules.d/99-oracle-asm.rules. That way, whenever something else changes device ownership to root, the rule will change it back. “Something else” is any non-Oracle tool, such as partprobe.

# Brian Fitzgerald
# 2026-07-22

# RHEL 9 / ASMLIB 3 / grid 19c workaround for gridSetup.sh, root.sh
# failing on node a, step 16 'InitConfig', and on node b, step 17, 'StartCluster'.
# ocssd.trc was showing "clssnmvDiskVerify: Successful discovery of 0 disks"
#
# The rule fires whenever a disk is discovered, or is written to and closed.
#
# Firing condition:
# 1. block device
# 2. labeled with oracleasm createdisk

# Action:
# 1. Change the ownership to oracle:dba
# 2. Change the mode to 0660

SUBSYSTEM=="block", ENV{ID_FS_TYPE}=="oracleasm", OWNER="oracle", GROUP="dba", MODE="0660"

Run:

udevadm control --reload-rules
udevadm trigger --subsystem-match=block

Conclusion

The launch failure is a configuration interaction, and any of the three fixes above closes it permanently.

Patching Copy Fail (CVE-2026-31431) on Red Hat Linux

by Brian Fitzgerald

Executive summary

Copy Fail (CVE-2026-31431) is a Linux kernel local privilege escalation that lets an unprivileged user become root with a single deterministic exploit. It is dangerous mainly in combination with remote vulnerabilities: any foothold that runs code as a non-root user — a compromised web service, a container — chains into root on the host. The fix is to install the patched kernel and reboot. Two things are easy to miss: instances launched from older AMIs, and instances restored from pre-patch snapshots, are vulnerable until they too are patched and rebooted. For hosts that can’t be patched immediately, blacklisting algif_aead via the kernel command line is an effective interim mitigation.

Introduction

Copy Fail (CVE-2026-31431) is a local privilege escalation (LPE) vulnerability in the Linux kernel’s algif_aead module, the AEAD interface of the kernel’s user-space crypto API (AF_ALG). It was disclosed publicly on April 29, 2026, and it affects essentially every mainline Linux kernel released since 2017 — across Ubuntu, RHEL, Amazon Linux, SUSE, Debian, and others. Its CVSS 3.1 score is 7.8 (High).

The bug is, on its own, only a local privilege elevation: the attacker must already have unprivileged host access. The danger is in what this vulnerability can be paired with. Any remote vulnerability becomes a path to root on the host. That combination — a remote foothold plus a reliable, deterministic LPE — is what makes Copy Fail a priority to address.

The fix is a kernel update. Three operational details are worth keeping in mind:

  1. Patched hosts must be rebooted. The fixed kernel does not take effect until it is the running kernel.
  2. Newly launched EC2 instances must be patched too, even if the AMI was current as of last week. Any AMI built before the fix landed in the vendor’s repos ships a vulnerable kernel.
  3. Instances restored from snapshots inherit the kernel of whatever was running when the snapshot was taken. A snapshot from before the patch is a vulnerable host, regardless of how recently it was restored.

This article walks through patching a single RHEL 10 EC2 instance on my personal AWS account and confirming, with a public proof-of-concept, that the patched kernel is no longer exploitable. It also revisits the questions and workarounds that came up in the days between disclosure and the kernel patch becoming available.

Demonstrate the bug

The instance is running RHEL 10.1 with the pre-patch kernel. Logged in as the unprivileged ec2-user, running the public proof-of-concept yields a root shell:

[ec2-user@ip-10-2-0-34 ~]$ python3.12 copy_fail_exp.py
[root@ip-10-2-0-34 ec2-user]# whoami
root
[root@ip-10-2-0-34 ec2-user]# id -u
0

No password prompt, no SSH key, no sudo — the exploit runs from a normal user shell and the next prompt is root. This is the deterministic behavior the vulnerability is known for: no race condition, no offsets, no retries.

The exploit script targets a setuid-root binary — /usr/bin/su — and on the unpatched kernel it tampers with that binary’s in-memory pages so that invoking it yields a root shell.

Day 0: can I just uninstall the affected piece?

On the day of disclosure, before any vendor guidance was out, the natural first question was whether the vulnerable subsystem could simply be removed — uninstall aead, uninstall authencesn, uninstall AF_ALG. The answer is no. There’s no algif-aead package, no af-alg package, no authencesn package. The vulnerable subsystem is part of the kernel image itself — built in on the affected distributions, not shipped as a separately installable or removable component. There is nothing to uninstall. The only way to change the code in question through the package manager is to replace the kernel, and on day 0 there was no fixed kernel to replace it with.

That left waiting for vendor guidance.

Day 1: blacklist algif_aead with grubby

The first official mitigation, ahead of the patched kernel, was to blacklist the algif_aead initcall on the kernel command line via grubby and restart:

[root@ip-10-2-0-34 ~]# grubby --update-kernel=ALL --args="initcall_blacklist=algif_aead_init"

After the restart, the AEAD interface of AF_ALG is never registered. The exploit script doesn’t get as far as the page-cache write that fails on the patched kernel — it fails earlier, at the system calls that set up the AF_ALG socket. With algif_aead blacklisted, bind() fails with FileNotFoundError. If AF_ALG is blacklisted entirely, socket() fails first, with EAFNOSUPPORT. Either way, the exploit doesn’t run.

Patch the kernel

The fix is delivered through the standard kernel package. On RHEL 10:

[root@ip-10-2-0-34 ~]# dnf update kernel

and so on …

Installing:
kernel x86_64 6.12.0-124.55.1.el10_1 rhel-10-baseos-rhui-rpms 1.4 M

… and so on

Installed:
kernel-6.12.0-124.55.1.el10_1.x86_64 kernel-core-6.12.0-124.55.1.el10_1.x86_64 kernel-modules-6.12.0-124.55.1.el10_1.x86_64 kernel-modules-core-6.12.0-124.55.1.el10_1.x86_64
Complete!

Restart the host

I restarted the EC2 instance from the AWS console. You can also issue reboot.

Demonstrate that the bug is patched

[root@ip-10-2-0-34 ~]# uname -r
6.12.0-124.55.1.el10_1.x86_64
[root@ip-10-2-0-34 ~]# exit
[ec2-user@ip-10-2-0-34 ~]$ python3.12 copy_fail_exp.py
Password:

On the patched kernel the tampering step does not happen, so /usr/bin/su runs normally and prompts for a password, which is exactly what an unprivileged user trying to become root should encounter.

Once the kernel is patched, the aead blacklist can be removed. Legitimate code can resume using the kernel’s user-space crypto interface.

What’s interesting about the chain

What stands out about Copy Fail is how unremarkable each step of the exploit is on its own. Reading a file as an unprivileged user is allowed. The kernel’s page cache is unified, so the pages a read brought in are the same pages a later execution would run from — that’s a feature, not a bug, and it’s what makes cache-warming tricks work. Opening a socket — including the user-space crypto sockets the AEAD interface provides — is allowed. Splicing data between file descriptors is allowed. None of these steps requires elevated privileges, and none of them looks suspicious in isolation. The exploit is a sequence of ordinary, sanctioned operations strung together so that a kernel weakness at one step lands a specially crafted change in a place that affects what the next setuid execution does. That’s what makes a local privilege elevation worth taking seriously even when the immediate prerequisite is “any unprivileged code execution on the host” — the building blocks are everywhere.

What this means going forward

Copy Fail is unlikely to be the last bug of this shape. About a week after Copy Fail was disclosed, a second LPE was disclosed under the name Dirty Frag (CVE-2026-43284 and CVE-2026-43500). Different kernel subsystems — xfrm-ESP and RxRPC — and different code paths, but the same underlying pattern: an in-place operation writing into page-cache pages that aren’t privately owned by the kernel.

The page cache is a large, well-trafficked piece of kernel infrastructure, and the in-place-optimization pattern that Copy Fail and Dirty Frag both exploit shows up in more than a few places. It would be surprising if the next several months didn’t bring more bugs in this family.

Two things about how these bugs are being found and disclosed are worth flagging. First, AI-assisted code analysis is now a real factor in kernel vulnerability discovery. Copy Fail was found that way — the researchers who disclosed it have said so explicitly — and the fact that the underlying weakness had been sitting in the kernel since 2017, through nine years of human review, suggests the new tooling is reaching code paths and combinations that didn’t get attention before. The same is likely true of Dirty Frag, where the older of the two bugs also dates to 2017. The economics of this kind of analysis are different from a human researcher’s: it scales, it doesn’t get bored, and it can re-examine entire subsystems whenever a new pattern is identified. The pace of discoveries should be expected to follow.

Second, the window between disclosure and a working public exploit is shrinking. Copy Fail had a working PoC out the day of disclosure. Dirty Frag was disclosed ahead of schedule because a third party broke the coordinated embargo, and a working PoC was public before any distribution had a patched kernel ready to ship. “Patch as soon as the vendor ships” is still the right answer, but it presupposes a vendor patch is available. When the disclosure outruns the patch, the question on the table is what the fleet does in the interim — which mitigation, applied through which mechanism, tracked how, removed when. That used to be an exceptional case; it is becoming an ordinary one.

The combination — more bugs, found faster, disclosed with less runway — argues for a fleet posture that can move quickly through several states. A known patching path for when patches exist. A known mitigation path for the gap before they do. A way to know, for any given host, which state it’s in. The specific bugs will change. The shape of the response is what’s worth investing in.

Conclusion

On its own, Copy Fail is a local privilege elevation — it requires the attacker to already have code execution on the host. In a cloud environment, that prerequisite is met by a wide range of common scenarios. Any remote bug in a public-facing service, any compromised CI runner, any malicious dependency that runs during a build, any container that can be coerced into executing attacker-supplied code, is enough of a foothold to chain into root on the host. The LPE is what turns a low-impact remote bug into a host compromise.

Patching the kernel and restarting the instance is the fix. Two operational notes worth keeping in mind:

  • New instances need to be patched, too. An AMI that was current last month is not current now. Any instance launched from a pre-patch image needs dnf update kernel (or the equivalent) and a restart before it should be considered safe.
  • Snapshots carry the kernel that was running when they were taken. Restoring a snapshot from before the fix produces a vulnerable host, even if the restore happened five minutes ago. The same patch-and-restart step applies.

Each host should land in one of two states: a patched kernel verified by uname -r, or the vulnerable code path made unreachable through a tracked mitigation such as the initcall_blacklist boot argument. Hosts in neither bucket are still exposed.

ASMLib on Red Hat 9

by Brian Fitzgerald

Introduction

Oracle has desupported ASM filter driver (AFD) 2806979.1. DBAs looking to support RAC need to look elsewhere for ASM management software. The updated asmlib release fills the bill and is available on Red Hat Linux, but finding the downloads is not straightforward.

Download

On RHEL 9, you will need these downloads:

oracleasm-support

https://yum.oracle.com/repo/OracleLinux/OL9/addons/x86_64/

oracleasm-support-3.1.0-10.el9.x86_64.rpm

oracleasmlib

https://www.oracle.com/linux/downloads/linux-asmlib-v9-downloads.html

oracleasmlib-3.1.0-6.el9.x86_64.rpm

Uninstall AFD

# /u01/app/oracle_grid/product/1930/grid/bin/afdroot uninstall

Install and start

# uname -r
5.14.0-427.42.1.el9_4.x86_64
# rpm -ihv oracleasm-support-3.1.0-10.el9.x86_64.rpm
# rpm -ihv oracleasmlib-3.1.0-6.el9.x86_64.rpm
# systemctl start oracleasm.service
# oracleasm scandisks
# oracleasm listdisks
ORA_ASM_GRID1_01
ORA_ASM_GRID1_02
ORA_ASM_GRID1_03

Conclusion

asmlib is a convenient drop-in replacement for afd. asmlib protects your ASM disks from illegal writers, just as AFD did. The downloads can be found off the beaten track.

Individual Responsibility

Quote

Admiral Rickover commented on individual responsibility at the joint hearings on the Thresher disaster. His remarks follow:

– Brian Fitzgerald

Hearings Before the
Joint Committee on Atomic Energy
Congress of the United States
Eighty-Eighth Congress
on
The Loss of the U.S.S. “Thresher”
Tuesday, July 23, 1963
Washington, D.C.

CHET HOLIFIELD, California, Vice Chairman
HENRY M. JACKSON, Washington
WILLIAM H. BATES, Massachusetts
CLINTON P. ANDERSON, New Mexico
THOMAS G. MORRIS, New Mexico
Rickover, Vice Adm. Hyman G., Assistant Chief, Bureau of Ships (Nuclear Propulsion)

Admiral RICKOVER. Much of the effort of the court was directed to finding out who was responsible for the design of the Thresher- who made the fundamental technical decisions, who authorized deviations from plans, and who authorized deviations from the specifications. The inadequate ballast tank blowing system is a case in point: Who is responsible? With the present Navy system, this is an almost impossible question to answer. The nearest you can come is to say that “The Navy is responsible.” In other words all you can do is to point to a collectivity. In my own area, for example, when the adequacy of a scram procedure is questioned—”It is Rickover’s procedure.” And this is as it should be. In this connection, I believe you will be interested in the following testimony I gave this committee on June 15, 1961:

Senator JACKSON. * * * One of the problems concerning the committee is the pinpointing of responsibility in the event of nuclear accidents. We had the one at Arco, the SL-1. How can the Joint Committee ascertain what individual or individuals are responsible for a specific project?

Admiral RICKOVER. * * * Responsibility is a unique concept: it can only reside and inhere in a single individual. You may share it with others, but your portion is not diminished. You may delegate it, but it is still with you. You may disclaim it, but you cannot divest yourself of it. Even if you do not recognize it or admit its presence, you cannot escape it. If responsibility is rightfully yours, no evasion, or ignorance, or passing the blame can shift the burden to someone else. Unless you can point your finger at the man who is responsible when something goes wrong, then you have never had anyone really responsible * * *.

Representative BATES. Did you say that “off the cuff”?

Admiral RICKOVER. Most of it, yes.

Representative BATES. That is pretty well said.

Senator ANDERSON. I think you did say it all “off the cuff.”

Admiral RICKOVER. I don’t remember whether I did or not. 1 think you were there, sir. I think that last sentence:

Unless you can point your finger at the man who is responsible when something goes wrong, then you have never had anyone really responsible—

expresses the real dilemma and it is not going to be changed by the military services. Of that, I can assure you. It will only be changed by Congress.

Congress, after all, does share this responsibility. You have a concurrent responsibility. Your responsibility doesn’t end once you have appropriated the money.

Representative MORRIS. I am glad you brought that out, Admiral.

Representative HOLIFIELD. I believe this is true.

Representative MORRIS. Not only with respect to the military but with the civilian agencies also. With civilian agencies, you may waste money, but with the military, you may waste the country’s life.

ASMCMD-9520: AFD is not Loaded after Red Hat update

by Brian Fitzgerald

Introduction

Your Red Hat kernel got upgraded and now AFD does not load. Solution: run “grubby –set-default”. This article applies to Oracle Database 19c on Red Hat Enterprise Linux 9 on-premises.

Background

ASM filter driver (AFD) requires loading kernel module oracleafd.ko. The kernel modules are distributed in release updates and are installed in $ORACLE_HOME/usm/install/Oracle. AFD kernel modules are tied to a specific sub-version of Red Hat EL 9, and Oracle’s distribution of new AFD kernel modules may lag the Red Hat release by 6 months. For example, rhel9_4 was released on April 30, 2024, but Oracle did not release the compatible AFD kernel module until RU 19.25 of October 15, 2024. If you issued “dnf update” or “yum update” after April 30, but before installing RU 19.25, then AFD has stopped working. You must downgrade your kernel. Refer to ACFS and AFD Support On OS Platforms (Certification Matrix). (Doc ID 1369107.1) for up-to-date AFD kernel driver release information.

rhel9_5 was released on November 13, 2024. If you issued “dnf update,” then AFD has stopped working. As of this writing, Oracle has not released an rhel9_5 AFD kernel module, so you must downgrade your kernel.

Don’t do it!

Don’t run “dnf update”!

Oh no, you did it!

“dnf update” got run and now AFD does not load. Your Oracle database is down!

Fix it!

Fix this issue simply by identifying your previous kernel file and running “grubby –set-default”. Reboot.

Yay, it’s fixed!

Notice that filtering is not supported on Red Hat 9. Be careful not to overwrite your ASM device!

No filtering in RHEL9

ASM filter driver is designed to block IO from programs except for Oracle binaries. Filtering works in rhel7. You can’t overwrite an oracle device with dd, for example:

Refer to Oracle Automatic Storage Management Filter Driver (ASMFD) (Doc ID 2806979.1) for news about AFD filtering. Exercise care when handling Oracle devices. For example:

dd overwrote /dev/nvme3n1. Your data is wiped out. The ironically named “ASM Filter Driver” did not filter the non-Oracle I/O.

Common SA commands such as parted could corrupt your disk:

Be careful!

Red Hat release

Notice that the kernel is at rhel9_4, but the operating system is at rhel9_5.

Conclusion

We covered these points:

  • Oracle AFD depends on a kernel module.
  • In Red Hat 9, the AFD kernel module is tied to a specific sub-version.
  • Oracle will release the needed AFD module after each Red Hat 9 sub-version release.
  • Depending on what Oracle RU you have installed, dnf update may install a kernel that is incompatible with your AFD module.
  • You can fix your problem by running “grubby –set-default”
  • You can upgrade to a specific kernel version.
  • ASM filter driver no longer filters.
  • Administrative commands could wipe out your disks.
  • Exercise greater care without filtering present.

Uncontrolled RDS Timezone File Auto-Upgrade

By Brian Fitzgerald

Summary

Oracle databases require consistent timezone file versions between the source and target databases during imports. If the source database has a higher timezone file version than the target, the target’s version must be upgraded. In Oracle on-premises environments, this requires direct OS access, which is not available in AWS RDS.

AWS provides the TIMEZONE_FILE_AUTOUPGRADE option to manage this automatically, but it can cause unexpected disruptions due to undocumented behaviors. Understanding these behaviors and managing them carefully is necessary to prevent unexpected DB instance reboots.

Background

Timezone rules change in response to societal preferences and political changes. These changes can include the timezone offset from UTC, daylight saving time (DST) start and end dates, adoption or repeal of DST, timezone names and abbreviations, and more.

Oracle Database uses the timezone file to interpret the timezone stored with timestamps in the timestamp with time zone data type. For example, in the following SQL command:

SELECT TO_TIMESTAMP_TZ('July 19, 1969 9:32 AM EDT',
'Month dd, yyyy hh:mi AM
tzd’) liftoff FROM dual;

Oracle determines that Eastern Daylight Time was 4 hours behind UTC in July 1969.

Ittoqqortoormiit, Greenland

When timezone rules change, the timezone file is updated to reflect the change and its effective date. For example, on March 31, 2024, Ittoqqortoormiit, Greenland, changed its timezone rules. Timestamps before this date are interpreted differently than those after it.

Oracle includes timezone file updates with quarterly patch release updates (RUs) if an updated file is available. Some RUs have no timezone file update. However, in Q1 2023, Oracle issued two RUs, each with a new timezone file update.

To upgrade the timezone file on-premises, download and run the MOS script upg_tzv_apply.sql, which starts your database in upgrade mode and runs the dbms_dst package.

The active timezone file version can be found by running:

select version
from v$timezone_file

AWS does not permit customers to directly start an RDS Oracle database in upgrade mode, so it offers the TIMEZONE_FILE_AUTOUPGRADE option. You can enable this option for one or more databases by adding it to the databases’ option group, or by switching a database to an option group with this option. Note that an option group applies to a single account, region, engine, and Virtual Private Cloud (VPC).

AWS states, “When the option group attached to your RDS for Oracle DB instance includes the TIMEZONE_FILE_AUTOUPGRADE option, RDS updates your time zone files automatically.” This statement hides undocumented behavior that first-time users may find counterintuitive.

Behavior

Once the TIMEZONE_FILE_AUTOUPGRADE option is enabled for a database, two conditions must be understood.

Whether the timezone file will be upgraded

You can determine if a timezone file will be upgraded by comparing the active version from v$timezone_file to the version found in the Amazon RDS for Oracle Release Notes. For instance, if your timezone file version is 42 and your engine version is 19.0.0.0.ru-2024-07.rur-2024-07.r1, RU 2024-07.ru did not change the timezone file version. However, the previous version, 19.0.0.0.ru-2024-04.rur-2024-04.r1, included “DSTV43”.

Conclusion: If TIMEZONE_FILE_AUTOUPGRADE is enabled, your DB engine version is 19.0.0.0.ru-2024-07.rur-2024-07.r1, and your timezone file version is 42, the file will be automatically upgraded. Identifying the highest available version requires reviewing the documentation.

When the timezone file will be upgraded

If the timezone file will be upgraded. the upgrade occurs:

  1. During the next maintenance window, or
  2. Immediately, if any immediate change is made to the DB instance.

The immediate upgrade is undocumented and can cause unexpected behavior. The database will reboot and upgrade the timezone file if you make any immediate changes, such as changing:

  1. Maintenance window
  2. Backup window
  3. Deletion protection
  4. IOPS or storage throughput
  5. CA Certificate identifier
  6. Auto minor version upgrade
  7. Master user password

Example scenario

Suppose you had created an Oracle EE RDS DB instance in 2022 with the following settings:

  1. DB Engine version:19.0.0.0.ru-2022-01.rur-2022-01.r1
  2. Timezone file version: 37
  3. Preferred maintenance window: Saturday 06:00 to 07:00
  4. Auto minor version upgrade: Enabled

By 2024, the DB Engine version is 19.0.0.0.ru-2024-04.rur-2024-04.r1 and timezone file version 43 is available.

If, say, on June 5, 2024, you add the TIMEZONE_FILE_AUTOUPGRADE option, no “pending” changes appear in the AWS console. However, if on June 17, you change storage throughput, the DB instance will reboot and apply the timezone file version change.

Immediate upgrade behavior only happens if the active timezone file version is less than the available version.

Discussion

Most RDS DB instance attributes can be checked and modified by running describe-db-instances and modify-db-instance. Other modifications can be made using option groups, parameter groups, or maintenance actions. However, controlling the timezone file version differs.

To check for a pending timezone file upgrade, examine v$timezone_file and your DB engine version documentation. There is no direct indication of an upgrade pending.

You cannot issue a command that directly upgrades a timezone file version. The TIMEZONE_FILE_AUTOUPGRADE and database upgrades must be implemented carefully, as many unrelated commands can inadvertently trigger an immediate upgrade and reboot.

Internal Process

If TIMEZONE_FILE_AUTOUPGRADE is enabled, any immediate or scheduled DB instance change prompts the hypervisor to connect via cloud-init and compare active and available timezone file versions. If a newer version is available, cloud-init restarts the database in upgrade mode and runs dbms_dst to upgrade the file version.

Documentation

The apparent spontaneous reboot behavior is not documented.

Workaround

One workaround is to not use the TIMEZONE_FILE_AUTOUPGRADE option. However, this choice limits flexibility across imports. A better option is to keep the option enabled, ensuring timezone files are updated with DB instance upgrades.

If implementing TIMEZONE_FILE_AUTOUPGRADEon an existing DB instance, do so just before the next version upgrade and avoid further modifications until the upgrade is complete.

“Master Arm is On”

One minute before liftoff from the Moon in the Apollo 11 Lunar Module ascent stage, Neil Armstrong activated the Master Arm switch. When the countdown clock reached zero, a complex sequence of events unfolded: pyrotechnics separated the ascent stage electrically and mechanically from the descent stage and opened explosive helium pressurization valves to prepare for ascent stage engine ignition. The purpose of the “arming switch” is, therefore, to enable an intentional, automatic, sequenced operation of circuits, actuators, and firing of pyrotechnics in the ascent stage launch sequence. Apollo 11 Lunar Module ascent stage

The TIMEZONE_FILE_AUTOUPGRADE option functions like an arming switch. Once set, the timezone file upgrade is “armed”. The normal actuating trigger is a DB instance engine upgrade. However, any DB instance change will also trigger the timezone file upgrade.

Our DBA team enabled TIMEZONE_FILE_AUTOUPGRADE on a Friday morning, with a minor version upgrade scheduled for the following maintenance window. We adopted the custom of announcing, “Master Arm is On,” indicating team members should refrain from ad-hoc, immediate changes until after the engine and timezone file upgrade.

During the maintenance window, both the DB engine and timezone file versions were upgraded. The TIMEZONE_FILE_AUTOUPGRADE option remained enabled for future updates.

We experienced no issues or surprises in production, development, or QA environments. All abnormal behavior was identified during testing, and implementation was coordinated to avoid adverse effects.

Conclusion

Maintaining synchronization of the timezone file version is crucial for import flexibility. The TIMEZONE_FILE_AUTOUPGRADE option automates upgrades but requires careful handling to avoid unexpected outages.

How to find which processes are using the most swap

by Brian Fitzgerald

Procedure

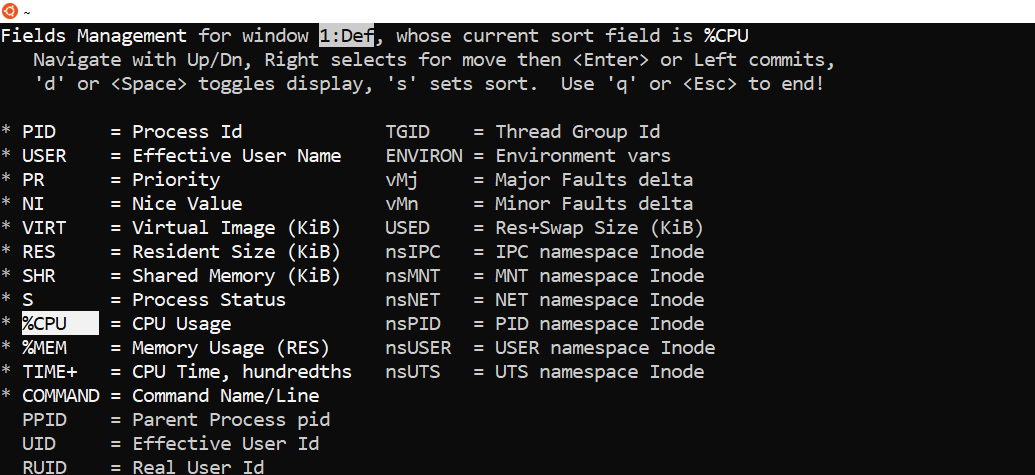
Start top

Press ‘f” (fields)

Press the down-arrow and stop at “SWAP”

This next step is for aesthetics only:

Press right-arrow to start moving the selection. Press up-arrow and stop between “%MEM” and “TIME+”. Press enter.

Press spacebar and note that “*” appears at left. Press “s” and note that “sort field is SWAP” appears at upper right.

Press “q”.

Voilà!

Whoops: data file in dbs

By Brian Fitzgerald

Environment

2-node RAC on ASM on Linux. New tablespace MYAPP had just been created.

The error

A user reported:

ORA-01157: cannot identify/lock data file 7 - see DBWR trace file 
ORA-01110: data file 7: '/u01/app/oracle/product/1930/db_1/dbs/myapp.dbf'
Failed SQL stmt:  INSERT INTO PS_...

We have an oracle file in dbs, which is local, and therefore not shared across RAC nodes. ORA-01157 appears when inserts run on the second instance.

The cause

A review of the alert log shows that the DBA had run:

CREATE TABLESPACE MYAPP DATAFILE 'myapp.dbf'

“DATAFILE ‘myapp.dbf'” should not be specified in ASM.

The fix

By the time the user had reported the error, new tables had already been setup in MYAPP. There was interest in keeping the tablespace, if possible.

The following remedial statements were run:

sqlplus

alter database datafile 7 offline;

rman:

recover datafile 7;
backup as copy datafile 7 format '+DATA1';
switch datafile 7 to copy;

sqlplus:

alter database datafile 7 online;

The fix can be run in as few as three minutes.

rman output (edited)

starting media recovery
media recovery complete, elapsed time: 00:00:05
Finished recover at 2024-03-05 16:17:03
channel ORA_DISK_1: starting datafile copy
input datafile file number=00007 name=/u01/app/oracle/product/1930/db_1/dbs/myapp.dbf
output file name=+DATA1/ORCL/DATAFILE/myapp.474.1162832655 tag=TAG20240305T170413 RECID=378134 STAMP=1162832655
channel ORA_DISK_1: datafile copy complete, elapsed time: 00:00:01
Finished backup at 2024-03-05 17:04:15
using target database control file instead of recovery catalog
datafile 7 switched to datafile copy "+DATA1/ORCL/DATAFILE/myapp.474.1162832655"

Cleanup

delete datafilecopy '/u01/app/oracle/product/1930/db_1/dbs/myapp.dbf';

commands that were not used

Some commands mentioned in documents such as “How to Move a Datafile from Filesystem to ASM Using ASMCMD CP Command. (Doc ID 1610615.1)” were not used.

alter system switch logfile
asmcmd cp
alter database rename file
set newname

Also, the five commands mentioned in “fix” above refer to the data file by number, not name. referring to the data files by name adds complexity and error-proneness. For example:

RMAN> BACKUP AS COPY DATAFILE "+DATA/orcl/datafile/users.261.689589837" FORMAT "+USERDATA";

Conclusion

If you accidentally create a tablespace in dbs, don’t panic. Take inputs from available sources, but filter out extraneous, inapplicable, or overly complex advice. Think through the simplest, safest recovery strategy for your situation.