About Brian Fitzgerald

Database administrator

Bug: trouble with pipe character in Oracle TDE keystore password

by Brian Fitzgerald

Introduction

Using the pipe character (“|”) in an Oracle TDE keystore password leads to an unrecoverable state. This, apparently, is an Oracle bug.

Demonstration

Version 19.22.0.0.0 on Linux. First:

administer key management 
alter keystore password 
force keystore 
identified by "asdf1234WXYZ$" 
set "qwer5678|" with backup;

keystore altered.

Next, try to use the password:

administer key management 
set keystore open force keystore 
identified by "qwer5678|";
*
ERROR at line 1:
ORA-28353: failed to open wallet

From here, you can’t change the password back to the original.

administer key management 
alter keystore password 
force keystore 
identified by "qwer5678|" 
set "asdf1234WXYZ$" with backup;
*
ERROR at line 1:
ORA-28353: failed to open wallet

No other printable ASCII characters give trouble, except that I did not test double quote, single quote, or ampersand. (“, ‘. &).

Solution attempt 1 re-point alias

The wallet is now inaccessible. The wallet with the known password should still be in ASM. In this example, the wallet was created on Nov 29.

$ asmcmd ls -l +DATA1/PTDE/tde
Type Redund Striped Time Sys Name
AUTOLOGIN_KEY_STORE UNPROT COARSE JAN 27 17:00:00 N cwallet.sso => +DATA1/PTDE/AUTOLOGIN_KEY_STORE/cwallet.287.1154126305
KEY_STORE UNPROT COARSE JAN 27 09:00:00 N ewallet.p12 => +DATA1/PTDE/KEY_STORE/ewallet.259.1154126305
KEY_STORE UNPROT COARSE NOV 28 22:00:00 N ewallet_2023112903382447.p12 => +DATA1/PTDE/KEY_STORE/ewallet.296.1154126307
KEY_STORE UNPROT COARSE JAN 27 08:00:00 N ewallet_2024012713401060.p12 => +DATA1/PTDE/KEY_STORE/ewallet.295.1159346411
KEY_STORE UNPROT COARSE JAN 27 08:00:00 N ewallet_2024012713542108.p12 => +DATA1/PTDE/KEY_STORE/ewallet.285.1159347261
etc.

Notice date “20231129” in the good wallet alias name. Make careful note of where that alias points to: +DATA1/PTDE/KEY_STORE/ewallet.296.1154126307

You can re-point ewallet.p12 to the good wallet:

$ asmcmd rmalias +DATA1/PTDE/tde/ewallet.p12
$ asmcmd rmalias +DATA1/PTDE/tde/ewallet_2023112903382447.p12
$ asmcmd mkalias +DATA1/PTDE/KEY_STORE/ewallet.296.1154126307 +DATA1/PTDE/tde/ewallet.p12

Check:

administer key management
2 set
3 keystore open
4 force keystore
5 identified by "old-password";

keystore altered.

Everything seems to work now. Opening the database, backup the keystore, Data Guard managed recovery.

Solution attempt 2 restore wallet

Suppose you have a good wallet backup in a folder created Nov 29th:

/u03/tde/lib/dba/backup/hostname/ptde/20231129.224025

SQL> shutdown abort
ORACLE instance shut down.
$ asmcmd rm -rf +DATA1/PTDE/KEY_STORE/
$ asmcmd rm -rf +DATA1/PTDE/AUTOLOGIN_KEY_STORE/
SQL> startup nomount
ORACLE instance started.

administer key management
create
keystore
identified by "old-password";

keystore altered.

administer key management
set keystore open
identified by "old-password";

keystore altered.

administer key management
merge keystore '/u03/tde/lib/dba/backup/hostname/ptde/20231129.224025'
identified by "old-password"
into existing
keystore '+DATA1/PTDE/tde'
identified by "old-password"
with backup;

keystore altered.

administer key management
create local auto_login keystore from
keystore identified by "old-password";

keystore altered.

SQL> alter database mount;

Database altered.

SQL> alter database open;

Database altered.

Unsuccessful

There are issues:

2024-01-28T11:31:30.934368-05:00
WARNING: the following master key for tablespace 4 (file # 7) does not exist in the current keystore.
Please check if the master key is successfully imported from the source keystore.
2024-01-28T11:31:30.934406-05:00
kcbtse_populate_tbske_pga: ena 4 flag 2f mkloc 1
encrypted key 7f54d9fb1f800a7a4b0b8b48e450a72149534caef97a161f3267094abf140ba2
mkid 2e30a453ade64f7cbfb326e680302282
SQL> create table ttde (n number) segment creation immediate tablespace USERS;
create table ttde (n number) segment creation immediate tablespace USERS
*
ERROR at line 1:
ORA-28374: typed master key not found in wallet
RMAN> backup tablespace users;

RMAN-03009: failure of backup command on ORA_DISK_1 channel at 01/28/2024 11:31:31
ORA-19914: unable to encrypt backup
ORA-28361: master key not yet set

The problem is that once the password was set with the pipe characater, the new master password in the database is out of sync with the wallet.

You could restore an earlier database and wallet backup.

Conclusion

Do not use “|” in an Oracle TDE keystore password.

Have a tde wallet recovery strategy.

How wallet locality is determined

By Brian Fitzgerald

Introduction

With orapki, you can create a local, auto-open wallet. The document states:

You cannot move local auto-login wallets to another computer. They must be used on the host on which they are created.

Questions arise:

  • How secure is the “local” feature?
  • How is “local” determined?
  • How could I open a wallet if it gets restored to a different host under unplanned circumstances?

This article sets out to answer these questions.

How to uniquely identify a host

There are multiple host attributes that one might use to uniquely identify a host, including:

  • hostname
  • IP address
  • hostid
  • MAC address

I tried two of these.

Setup

As root, create an auto-login local wallet

Check that the wallet does not require a password.

Test

As root, change the hostname. Retest the wallet. orapki prompts for a password, so the wallet is not auto-login anymore. That demonstrates that oracle checks the system hostname to determine whether the wallet is on the original host. We are done!

Before that, I tried changing hostid but found no effect on wallet locality.

Security implications

Oracle states “Local auto-login wallets are used for scenarios where additional security is required”. However, one can defeat the measure simply by issuing the “hostname” command. It is clear that local auto-login wallets offer little in the way of real security.

Conclusion

Oracle determines whether a local auto-login wallet is on the host where it was created by checking the system hostname. This feature is easy to spoof and does not substantially enhance security. In case of an unplanned restore to a different host, open the wallet by changing the new host’s hostname by issuing the hostname command as root.

10 things you didn’t know about tablespace quotas

10 things you didn’t know about tablespace quotas

by Brian Fitzgerald

Introduction

DBAs use tablespace quotas to limit where segments can be placed. Sometimes grant and revoke interact with quotas in surprising ways.

Setup

SQL*Plus: Release 19.0.0.0.0 - Production on Wed Aug 31 22:59:29 2022
Version 19.16.0.0.0

Copyright (c) 1982, 2022, Oracle. All rights reserved.


Connected to:
Oracle Database 19c Enterprise Edition Release 19.0.0.0.0 - Production
Version 19.16.0.0.0

SQL> set linesize 32767
SQL> set trimspool on
SQL> col segment_name format a30
SQL> col granted_role format a30
SQL> create user U identified by U default tablespace USERS;

User created.

1. When you grant role DBA to a user, unlimited tablespace gets granted.

Unlimited tablespace is a separate, special case side effect of granting DBA that is internal to oracle.

SQL> grant dba to U;

Grant succeeded.

SQL> select privilege from dba_sys_privs where grantee = ‘U’;

PRIVILEGE
—————————————-
UNLIMITED TABLESPACE

2. When you revoke DBA from a user, unlimited tablespace gets revoked.

Exercise care when tightening security. Before you revoke DBA from a user, check whether that user owns segments. Compensate by grant tablespace quotas. Failure to grant a tablespace quota will lead to a loss of ability to insert into tables owned by that user.

SQL> revoke dba from U;

Revoke succeeded.

SQL> select privilege from dba_sys_privs where grantee = 'U';

no rows selected

3. Unlimited tablespace gets revoked even if it had been granted separately.

SQL> grant dba to U;

Grant succeeded.

SQL> grant unlimited tablespace to U;

Grant succeeded.

SQL> revoke dba from U;

Revoke succeeded.

SQL> select privilege from dba_sys_privs where grantee = 'U';

no rows selected

4. If you revoke unlimited tablespace from a user with DBA role, that user keeps DBA role.

SQL> grant dba to U;

Grant succeeded.

SQL> revoke unlimited tablespace from U;

Revoke succeeded.

SQL> select granted_role from dba_role_privs where grantee = 'U';

GRANTED_ROLE
------------------------------
DBA

5. You cannot grant unlimited tablespace privilege to a role.

SQL> create role R;

Role created.

SQL> grant unlimited tablespace to R;
grant unlimited tablespace to R
*
ERROR at line 1:
ORA-01931: cannot grant UNLIMITED TABLESPACE to a role

No role has unlimited tablespace privilege, not even DBA.

6. You can revoke a quota from that a segment needs the quota.

This is seldom done intentionally. If you do, the segment cannot extend.

SQL> alter user U quota unlimited on USERS;

User altered.

SQL> create table U.T ( N number) segment creation immediate;

Table created.

SQL>
SQL> select grantee, privilege from dba_sys_privs
2 where grantee = 'U' and privilege = 'UNLIMITED TABLESPACE';

no rows selected

SQL>
SQL> select segment_name, bytes, extents from dba_segments 
2 where owner = 'U'
3 and segment_name = 'T'
4 and segment_type = 'TABLE';

SEGMENT_NAME BYTES EXTENTS
------------------------------ ---------- ----------
T 65536 1

SQL> alter user U quota 0 on USERS;

User altered.

SQL> insert into U.T select level from dual connect by level <= 1;

1 row created.

SQL> insert into U.T select level from dual connect by level <= 1000000;
insert into U.T select level from dual connect by level <= 1000000
*
ERROR at line 1:
ORA-01536: space quota exceeded for tablespace 'USERS'

7. Without a quota, you cannot move a table.

Moving a table can save space, but with an insufficient quota, you can’t do it

SQL> alter table U.T move;
alter table U.T move
*
ERROR at line 1:
ORA-01536: space quota exceeded for tablespace 'USERS'

8. When you revoke unlimited tablespace you also revoke all limited quotas.

SQL> grant unlimited tablespace to U;

Grant succeeded.

SQL> alter user U quota 10g on USERS;

User altered.

SQL> create tablespace U2;

Tablespace created.

SQL> alter user U quota unlimited on U2;

User altered.

SQL>
SQL> select username, tablespace_name, max_blocks
2 from dba_ts_quotas where username = 'U';

U TABLESPACE_NAME MAX_BLOCKS
- ------------------------------ ----------
U USERS 1310720
U U2 -1

SQL>
SQL> revoke unlimited tablespace from U;

Revoke succeeded.

SQL>
SQL> select username, tablespace_name, max_blocks
2 from dba_ts_quotas where username = 'U';

U TABLESPACE_NAME MAX_BLOCKS
- ------------------------------ ----------
U U2 -1

Notice that the limited quota on USERS got revoked, but the unlimited quota on U2 remains. That’s not exactly what the manual says: “If you later revoke the privilege, then you must explicitly grant quotas to individual tablespaces.”

Because revoking DBA revokes unlimited tablespace, it follows that revoking DBA revokes limited (finite) quotas.

9. You can grant a quota greater than 2 TB.

SQL> alter user U quota 10T on U2;

User altered.

The manual says “The maximum amount of space that you can assign for a tablespace is 2 TB.”

10. A quota could exceed the tablespace’s maximum size

SQL> select username, tablespace_name, max_blocks
2 from dba_ts_quotas where username = 'U';

U TABLESPACE_NAME MAX_BLOCKS
- ------------------------------ ----------
U U2 1342177280

SQL> select sum(maxblocks) from dba_data_files
2 where tablespace_name = 'U2';

SUM(MAXBLOCKS)
--------------
4194302

So here are 10 things you did not know about tablespace quotas. Here is one more:

Bonus: A user running import does not require a quota.

The owner of the segment needs the quota, not the user running import. That’s how it works. If you pre-create the user, you must grant the quota ahead of time. If the segment owner has no quota, then you will get ORA-01950: no privileges on tablespace.

SQL> create user U identified by U default tablespace USERS;

User created.

SQL> alter user U quota unlimited on USERS;

User altered.

SQL> create table U.T ( N number) segment creation immediate;

Table created.

$ cat exp.u.par
directory=d
dumpfile=exp.u.t.dmp
logfile=exp.u.t.log
reuse_dumpfiles=true
tables=
u.t

$ expdp "'/ as sysdba'" parfile=exp.u.par

Export: Release 19.0.0.0.0 - Production on Thu Sep 1 00:16:02 2022
Version 19.16.0.0.0

Copyright (c) 1982, 2019, Oracle and/or its affiliates. All rights reserved.

Connected to: Oracle Database 19c Enterprise Edition Release 19.0.0.0.0 - Production
Starting "SYS"."SYS_EXPORT_TABLE_01": "/******** AS SYSDBA" parfile=exp.u.par
Processing object type TABLE_EXPORT/TABLE/TABLE_DATA
Processing object type TABLE_EXPORT/TABLE/STATISTICS/TABLE_STATISTICS
Processing object type TABLE_EXPORT/TABLE/TABLE
. . exported "U"."T" 0 KB 0 rows
Master table "SYS"."SYS_EXPORT_TABLE_01" successfully loaded/unloaded
******************************************************************************
Dump file set for SYS.SYS_EXPORT_TABLE_01 is:
/u99/exp/d/exp.u.t.dmp
Job "SYS"."SYS_EXPORT_TABLE_01" successfully completed at Thu Sep 1 00:19:07 2022 elapsed 0 00:03:05

SQL> drop user U cascade;

User dropped.

SQL> create user U identified by U default tablespace USERS;

User created.

$ cat imp.u.par
directory=d
dumpfile=exp.u.t.dmp
logfile=imp.u.t.log

$ impdp "'/ as sysdba'" parfile=imp.u.par

Import: Release 19.0.0.0.0 - Production on Thu Sep 1 00:24:48 2022
Version 19.16.0.0.0

Copyright (c) 1982, 2019, Oracle and/or its affiliates. All rights reserved.

Connected to: Oracle Database 19c Enterprise Edition Release 19.0.0.0.0 - Production
Master table "SYS"."SYS_IMPORT_FULL_01" successfully loaded/unloaded
Starting "SYS"."SYS_IMPORT_FULL_01": "/******** AS SYSDBA" parfile=imp.u.par
Processing object type TABLE_EXPORT/TABLE/TABLE
ORA-39083: Object type TABLE:"U"."T" failed to create with error:
ORA-01950: no privileges on tablespace 'USERS'

Failing sql is:
CREATE TABLE "U"."T" ("N" NUMBER) SEGMENT CREATION IMMEDIATE PCTFREE 10 
PCTUSED 40 INITRANS 1 MAXTRANS 255 NOCOMPRESS LOGGING STORAGE(INITIAL 65536 
NEXT 1048576 MINEXTENTS 1 MAXEXTENTS 2147483645 PCTINCREASE 0 FREELISTS 1 
FREELIST GROUPS 1 BUFFER_POOL DEFAULT FLASH_CACHE DEFAULT 
CELL_FLASH_CACHE DEFAULT)
 TABLESPACE "USERS"

Processing object type TABLE_EXPORT/TABLE/TABLE_DATA
Processing object type TABLE_EXPORT/TABLE/STATISTICS/TABLE_STATISTICS
Job "SYS"."SYS_IMPORT_FULL_01" completed with 1 error(s) at Thu Sep 1 
00:24:57 2022 elapsed 0 00:00:08

Cleanup

SQL> drop user U cascade;

User dropped.

SQL> drop role R;

Role dropped.

SQL> drop tablespace U2 including contents and datafiles;

Tablespace dropped.

Conclusion

Exercise care when revoking DBA or unlimited tablespace. Be sure to compensate by issuing needed quotas. Otherwise, users or applications will get ORA-01536: space quota exceeded.

Trace only one logon on AWS RDS Oracle

By Brian Fitzgerald

Introduction

Given an Oracle RDS database, multiple application servers and multiple connections, the task at hand is to

  • Create a logon trigger that will …
  • Run when the first connection arrives and not again after that, and …
  • Run trace 10046 …
  • Up to 10 MB only.
  • Identify the trace file
  • Download the trace file
  • Run tkprof

Background

  • A logon trigger fires for every login that matches the firing condition. If we trace every session, we could file the file system. We only want one example trace file.
  • In RDS, you do not have direct access to the operating system. You must somehow copy out the trace file.

Let’s go!

Grant

The first thing you need to get right is the grant. Trace requires “alter session” rights, which must be granted directly, not through a role. Suppose the user is “inuser”

grant alter session to inuser;

Create a sequence

create sequence inuser.user_trace_trg_seq;

Create the trigger

The trigger must be owned by the user that needs to be traced.

create or replace trigger inuser.user_trace_trg
after logon on database
when ( user = 'INUSER' )
declare
  l_val number;
begin
  l_val := inuser.user_trace_trg_seq.nextval;
  if l_val = 1
  then
    execute immediate
    q'{alter session set max_dump_file_size = '10m'}';
    execute immediate
    q'{alter session set tracefile_identifier = '}'||user||q'{_user_trace_trg'}';
    execute immediate
    q'{alter session set events '10046 trace name context forever, level 12'}';
  end if;
end;
/

Now wait for the user to login. The first the trigger fires time, nextval equals 1, so the trigger body runs. After that, the trigger body does not run.

Identify the trace file

select * from table(
  rdsadmin.rds_file_util.listdir('BDUMP')
)
where filename like '%INUSER_user_trace_trg.trc'
order by mtime;
FILENAME TYPE FILESIZE MTIME
ORCL_ora_9022_INUSER_user_trace_trg.trc file 10485856 2022-04-17 00:17:04

“Download” the trace file

You could transfer the file from rds to s3, and then from s3 to a local system. The other way is:

select text from table(
  rdsadmin.rds_file_util.read_text_file(
   :dir,
   :filename
  )
)

Using sqlalchemy and boto3, I have integrated this statement with AWS secrets manager in a convenient python script

$ download-rds-ora-dir-files.py --secret-id $sec --dir BDUMP --pat ORCL_ora_9022_INUSER_user_trace_trg.trc
number of files: 1

You could also run sqlplus and spool the output to a file.

set feedback off
set linesize 32767
set trimspool on
set pagesize 0

set termout off
spool ORCL_ora_9022_INUSER_user_trace_trg.trc

select text from table(
    rdsadmin.rds_file_util.read_text_file(
        'BDUMP',
        'ORCL_ora_9022_INUSER_user_trace_trg.trc'
    )
)
;

Run tkprof

tkprof ORCL_ora_9022_INUSER_user_trace_trg.trc ORCL_ora_9022_INUSER_user_trace_trg.tkp

Done!

Conclusion

The following concepts were covered

  • How to make a logon trigger body that runs only once.
  • Permissions and object ownership for a logon trigger.
  • How to download a trace file from RDS.

Session objects in python APIs

By Brian Fitzgerald

Introduction

Database administrators understand “session” to mean an established database connection. It may come as a surprise that “session”, in several database-related libraries, refers to a data structure in the absence of any established connection.

Database session

A database session is an instance memory structure that holds an established connection’s state. The session contains facts such as a unique session id and the user name. The database session exists only after the transport (network connection) is established, the user has authenticated, and the memory structures have been allocated. The client application uses an API which holds a handle to the server side session. Application code uses the database API handle to issue commands and to receive responses and query results. The API is layered on top of a database driver, which associates the API handle with an operating system or network connection. In this way, client application to a server session via an API and a database driver. In databases, then, a client “handle” connects to a server “session”.

Other meanings of “session”

DBAs work with software APIs, such as python libraries, that do not establish a connection while allocating what they call a “session”. I will mention three APIs: requests, sqlalchemy, and boto3, in which “session” refers to a data structure that is not always associated with a connection.

Requests

Requests is a python HTTP library. HTTP is a connectionless protocol. Each request to the HTTP server can be implemented by a separate, new network connection that is disconnected after each call. In the following example, the call makes a TCP connection to the server, sends a request, receives a response, and closes the connection.

>>> import requests
>>> from json import loads
>>> r = requests.get('https://httpbin.org/get?q=Hello')
>>> type(r)
<class 'requests.models.Response'>

Let’s verify that no connection remains. Suspend your python repl by pressing ctrl-Z.

>>>
[1]+ Stopped python3
$

Is requests still connected?

$ lsof -n -p $(pgrep python3) | grep https

No output here means that requests is no longer connected.

Requests offers an advanced option that preserves state and a connection across calls.

>>> from requests import Session
>>> ses = Session()
>>> type(ses)
<class 'requests.sessions.Session'>
>>> ses.get('https://httpbin.org/get?q=Hello')
<Response [200]>

Is ses still connected? Let’s see.

$ lsof -n -p $(pgrep python3) | grep https
python3 3387 bf2190 3u IPv4 125425570 0t0 TCP 10.130.99.84:36878->52.86.136.68:https (ESTABLISHED)

Yes. The Session is connected to the https server. If you make another call within a short time, requests will make that call on the same socket. If the connection is idle for approximately 2.5 minutes, then requests will close the connection. If you make another call after that, requests will open a new socket.

To summarize, a requests Session is a client side handle that is not connected when it is created, but gets connected on first use. The session remains connected during use, and disconnects after an idle timeout.

SQL Alchemy

SQL Alchemy is a python SQL toolkit and object relational mapper. Two objects used for establishing a connection are the Engine and the Session. The Engine contains information about the driver and the connection string.

from sqlalchemy import create_engine

eng = create_engine(
    connection_string,
    max_identifier_length=128
)
print(type(eng))
<class 'sqlalchemy.engine.base.Engine'>

The Session is an object that will eventually hold an established connection.

from sqlalchemy.orm import sessionmaker
db_sess = sessionmaker(bind=eng)()
print(type(db_sess))
<class 'sqlalchemy.orm.session.Session'>

So far, the Session is not connected, but will be after a call to connection()

conn = db_sess.connection()
print(type(conn))
<class 'sqlalchemy.engine.base.Connection'>

conn holds an established connection. The other way to connect is to simply use the session.

for row in db_sess.execute(text('select dummy from dual')):
    print('%s' % row['dummy'])
X

Now db_sess holds an established connection. In conclusion, the SQLAlchemy Session is an object that is not initially connected. The Session connects by a call to connection() or on first use.

boto3

boto3 is the AWS python library. It is used to manage AWS services. One such service is Relational Database Service (RDS). In boto3, you make API calls to manage your environment. For example, you can list all RDS db instance details by calling describe_db_instances. To make a call, you must first allocate a boto3 client. The constructor for the RDS service is client(‘rds’). You can call the constructor and run describe directly like so:

>>> from boto3 import client
>>> len(client('rds').describe_db_instances()['DBInstances'])
30

The output from describe_db_instances is verbose, but the results are not needed for this example, so len is used here to summarize the result (30 db instances). Because describe was called directly from the constructor, the client object goes out of scope immediately, and the connection is dropped:

>>> 
[1]+ Stopped python3 
$ lsof -n -p $(pgrep python3) | grep https 
$

In the next example, the boto3 client is saved to variable rds

>>> from boto3 import client
>>> rds = client('rds')
>>> type(rds)
<class 'botocore.client.RDS'>
>>> len(rds.describe_db_instances()['DBInstances'])
30
>>>
[1]+ Stopped python3
$ lsof -n -p $(pgrep python3) | grep https
python3 7128 bf2190 3u IPv4 125436458 0t0 TCP 10.130.99.84:60276->52.46.159.85:https (ESTABLISHED)

In this case, the client remains connected after the results are returned. After approximately 2 minutes of idle time, boto3 closes the connection. If you make another call after that, boto3 opens a new connection. In the next case, the client is within the scope of a function. When the function returns, the client does out of scope, and the connection gets dropped.

>>> from boto3 import client
>>>
>>> def desc():
... rds = client('rds')
... rds.describe_db_instances()['DBInstances']
...
>>> desc()
>>>
[1]+ Stopped python3
$ lsof -n -p $(pgrep python3) | grep https
$
In the final example, client rds is set outside the scope. When the function returns, the client remains in scope and connected to the AWS server.
>>> from boto3 import client
>>>
>>> rds = client('rds')
>>> def desc():
... rds.describe_db_instances()['DBInstances']
...
>>> desc()
>>>
[1]+ Stopped python3
$ lsof -n -p $(pgrep python3) | grep https
python3 7631 bf2190 3u IPv4 125437676 0t0 TCP 10.130.99.84:42598->54.239.31.3:https (ESTABLISHED)

The boto3 session

The boto3 Session is not a connection at all. It is an object that holds access credentials. The Session creates objects that connect to AWS, particularly the Client. You can use the session to manage across multiple regions in an account, multiple accounts, multiple users, multiple roles, or across tokens acquired at different times. You can use the session to override the access keys in your profile, in your environment, or in your service account.
In this example, we loop over two regions and count the number of option groups. We allocate a list of sessions
>>> from boto3.session import Session
>>>
>>> AWS_ACCESS_KEY_ID="ASIAW3NNBKAMBK2CUGNE"
>>> AWS_SECRET_ACCESS_KEY="8V7Qaama1Yvl6ADRfrFI0vNTegx+V56S3sY5/uX0"
>>> AWS_SESSION_TOKEN="IQoJb3JpZ2luX2VjENz//////////wEaCXVzLWVhc3QtMSJIMEYCIQDOnKeV4UGWCVxuSvmD+O1FPUJHbxZOCPa/njhGlxBo1gIhAIRky8kx0jUNl40dg0NKGHjn1aOjYKe9Hdhs6msAlmq7KokDCFQQARoMNDcxMTk4NjgzMTYwIgzXqUo5F7yN89PdSxkq5gL1HhFXOOjVa8Irz8fVwUazE4VAKVtYthND8bXkqTLm1BE3x0hbD54rzpae80UxmcCnPv2Ec3WH8L6N2a7AvqSfhAJa34pzqJ+AcLy4blcdlbwE8I7d8ds/rvoNFiowEf5EhOaP41ZOdtngzdIUN1byE01Vsij8l9Ai74iE5DUnFqmIajtbr2T0Ah9a5ovQmBBB5nyjhY0DBcV9Bj0B6R8swoDnd6NBDcdcxQNvPqzJfwHsqrOYNJVzn1/FQLj86sgwTumHa1WyEugKWO3tlgEuOb+4Y3SqaMQ/vgC7OV+cdKfRzCrK/H/XYkWliVt7Ct1fQ8sGkEyxBlxyemgfvXybJnrXmEx5YisIO4LFMAkpzqsKYNTNybEwDKZmOAN3geP2c2QxoGNGHZ0NcT9nXDmtwHFuO0x2OlPf/qYmdZmlFKIRqBbGNCOPaJ5YgwjuGtx0TqULwKpNlYuF9WkZz5VGvFo6C1MSMLnpupEGOqUBmaqzHmvTykPbaH03SR5J1pKIvHI/XVMcvaThT2UEl7xQhwY0OE/AwAgP0+dtm0G6Mt7I6F2oZ5x6S2gnFHlxb5ctrgC8CRavVkks+ehHM8iAeBIm8CMk4Cb9jFBWj6jXldhHZDOCnOaqVAFSOlTaqXD3ZPlSRW1iyN1vOrmHIMJsGKeb6PiaGz0a9omCE/HCewQkcqYJXBhaTHSRUF1oJL/+GCvw"
>>>
>>>
>>> sess = []
>>> for region in 'us-east-1 us-west-1'.split():
... ses = Session(
... aws_access_key_id=AWS_ACCESS_KEY_ID,
... aws_secret_access_key=AWS_SECRET_ACCESS_KEY,
... aws_session_token=AWS_SESSION_TOKEN,
... region_name=region
... )
... print(type(ses))
... sess.append(ses)
...
<class 'boto3.session.Session'>

next we loop over the sessions, and run describe in a function.

>>> for ses in sess:
... res = ses.client('rds').describe_option_groups()['OptionGroupsList']
... print(len(res)).
File "<stdin>", line 3
print(len(res)).
^
SyntaxError: invalid syntax
>>> for ses in sess:
... res = ses.client('rds').describe_option_groups()['OptionGroupsList']
... print(len(res))
...
4
0
>>>
[1]+ Stopped python3
$ cat ../pgrep.bash
#!/bin/bash
lsof -n -p $(pgrep python3) | grep https
$ ../pgrep.bash
$

There are 4 option groups in us-east-1 and 0 in us-west-1. The describe ran directly off the client constructor. The client went out of scope once the describe finished. No connection remains connected. Instead, let’s allocate a list of clients.

>>> from boto3.session import Session
>>>
>>> AWS_ACCESS_KEY_ID="ASIAW3NNBKAMBK2CUGNE"
>>> AWS_SECRET_ACCESS_KEY="8V7Qaama1Yvl6ADRfrFI0vNTegx+V56S3sY5/uX0"
>>> AWS_SESSION_TOKEN="IQoJb3JpZ2luX2VjENz//////////wEaCXVzLWVhc3QtMSJIMEYCIQDOnKeV4UGWCVxuSvmD+O1FPUJHbxZOCPa/njhGlxBo1gIhAIRky8kx0jUNl40dg0NKGHjn1aOjYKe9Hdhs6msAlmq7KokDCFQQARoMNDcxMTk4NjgzMTYwIgzXqUo5F7yN89PdSxkq5gL1HhFXOOjVa8Irz8fVwUazE4VAKVtYthND8bXkqTLm1BE3x0hbD54rzpae80UxmcCnPv2Ec3WH8L6N2a7AvqSfhAJa34pzqJ+AcLy4blcdlbwE8I7d8ds/rvoNFiowEf5EhOaP41ZOdtngzdIUN1byE01Vsij8l9Ai74iE5DUnFqmIajtbr2T0Ah9a5ovQmBBB5nyjhY0DBcV9Bj0B6R8swoDnd6NBDcdcxQNvPqzJfwHsqrOYNJVzn1/FQLj86sgwTumHa1WyEugKWO3tlgEuOb+4Y3SqaMQ/vgC7OV+cdKfRzCrK/H/XYkWliVt7Ct1fQ8sGkEyxBlxyemgfvXybJnrXmEx5YisIO4LFMAkpzqsKYNTNybEwDKZmOAN3geP2c2QxoGNGHZ0NcT9nXDmtwHFuO0x2OlPf/qYmdZmlFKIRqBbGNCOPaJ5YgwjuGtx0TqULwKpNlYuF9WkZz5VGvFo6C1MSMLnpupEGOqUBmaqzHmvTykPbaH03SR5J1pKIvHI/XVMcvaThT2UEl7xQhwY0OE/AwAgP0+dtm0G6Mt7I6F2oZ5x6S2gnFHlxb5ctrgC8CRavVkks+ehHM8iAeBIm8CMk4Cb9jFBWj6jXldhHZDOCnOaqVAFSOlTaqXD3ZPlSRW1iyN1vOrmHIMJsGKeb6PiaGz0a9omCE/HCewQkcqYJXBhaTHSRUF1oJL/+GCvw"
>>>
>>> rdss = []
>>> for region in 'us-east-1 us-west-1'.split():
... rds = Session(
... aws_access_key_id=AWS_ACCESS_KEY_ID,
... aws_secret_access_key=AWS_SECRET_ACCESS_KEY,
... aws_session_token=AWS_SESSION_TOKEN,
... region_name=region
... ).client('rds')
... rdss.append(rds)
...

Now loop over the clients.

>>> for rds in rdss:
... res = rds.describe_option_groups()['OptionGroupsList']
... print(len(res))
...
4
0
>>>
[1]+ Stopped python3
$ ../pgrep.bash
python3 6587 ec2-user 3u IPv4 26002 0t0 TCP 10.0.16.52:40794->52.119.197.147:https (ESTABLISHED)
python3 6587 ec2-user 4u IPv4 26004 0t0 TCP 10.0.16.52:39852->176.32.118.192:https (ESTABLISHED)
Because the list is in the outer scope, the clients remain in place after the describe finishes and the clients remain connected to the AWS server.
One session maps to one account and region, but that Session can create multiple Clients, where each Client can connect to AWS. In conclusion, the boto3 Session is an object containing tokens that are needed create session objects that can connect to AWS. The boto3 Session itself does not connect to the AWS server.

Conclusion

When I started applying python to my database administration job, I ran across various APIs that used the a “session” that was not a connection to the server. In the three APIs mentioned here, requests, SQL Alchemy, and boto3, the Session is not itself a connection, but it can connect and remain connected for a time. The SQL Alchemy session can be used create a connection to a database. The boto3 Session can create a client that connects to the AWS server.

Elastic Block Store throughput testing with Orion

By Brian Fitzgerald

Introduction

ORacle I/O Numbers (Orion) results for EBS volumes are presented here. Multiple configurations of EC2 instance type, number of devices, IOPS configuration, and throughput configuration are tested. The objective is to identify the best performing and most economical system for use in Oracle Automatic Storage Management (ASM).

Amazon AWS EC2 EBS

AWS EC2 offers I/O capacity for a price. You get a slice of the underlying hardware’s full bandwidth depending on how much you pay. The actual throughput depends on the EC2 instance’s device controller and the underlying volume. EC2 device controller capacity depends on instance class (m5, r5b, etc.), and size (large, 4xlarge, etc.). EBS volume capacity depends on volume type (gp3, io2, etc.) and configuration (throughput and IOPS). Maximum I/O capacity will be the lesser of EC2 capacity and EBS volume capacity, provided that you get the layout right.

The I/O capabilities of the EBS volume types that were tested are summarized here:

Type gp3 gp2 st1 io2
Purpose General General Low cost High IOPs, low latency
Medium ssd ssd magnetic ssd
Configurable throughput Yes No No No
Maximum throughput configuration (Mbps) 1000 – – –
Configurable IOPS Yes Yes
Max IOPS configuration 160000 256,000

The EBS test volumes were not encrypted.

This article places emphasis on optimizing throughput, but some IOPS and latency observations are presented here as well. As a limiting case, we are interested in 100% write I/O throughput capacity.

I/O throughput rating on EC2

We are mainly concerned with the modern, Nitro EC2 m5, c5, r5, and r5b instance types. Throughput is defined as the rate, in Mbps for large (128 KiB) I/O, and could refer to a read, write, or mixed (read-write) workload.

EC2 throughput rating can be found by running “aws ec2 describe-instance-types”, and is divided into two ranges, according to instance size, as shown in the following figure. The number of CPUs in EC2 maps to instance size thus:

Number of CPUs Instance size
2 large
4 xlarge
8 2xlarge
16 4xlarge
32 8xlarge
48 12xlarge
64 16xlarge
96 24xlarge

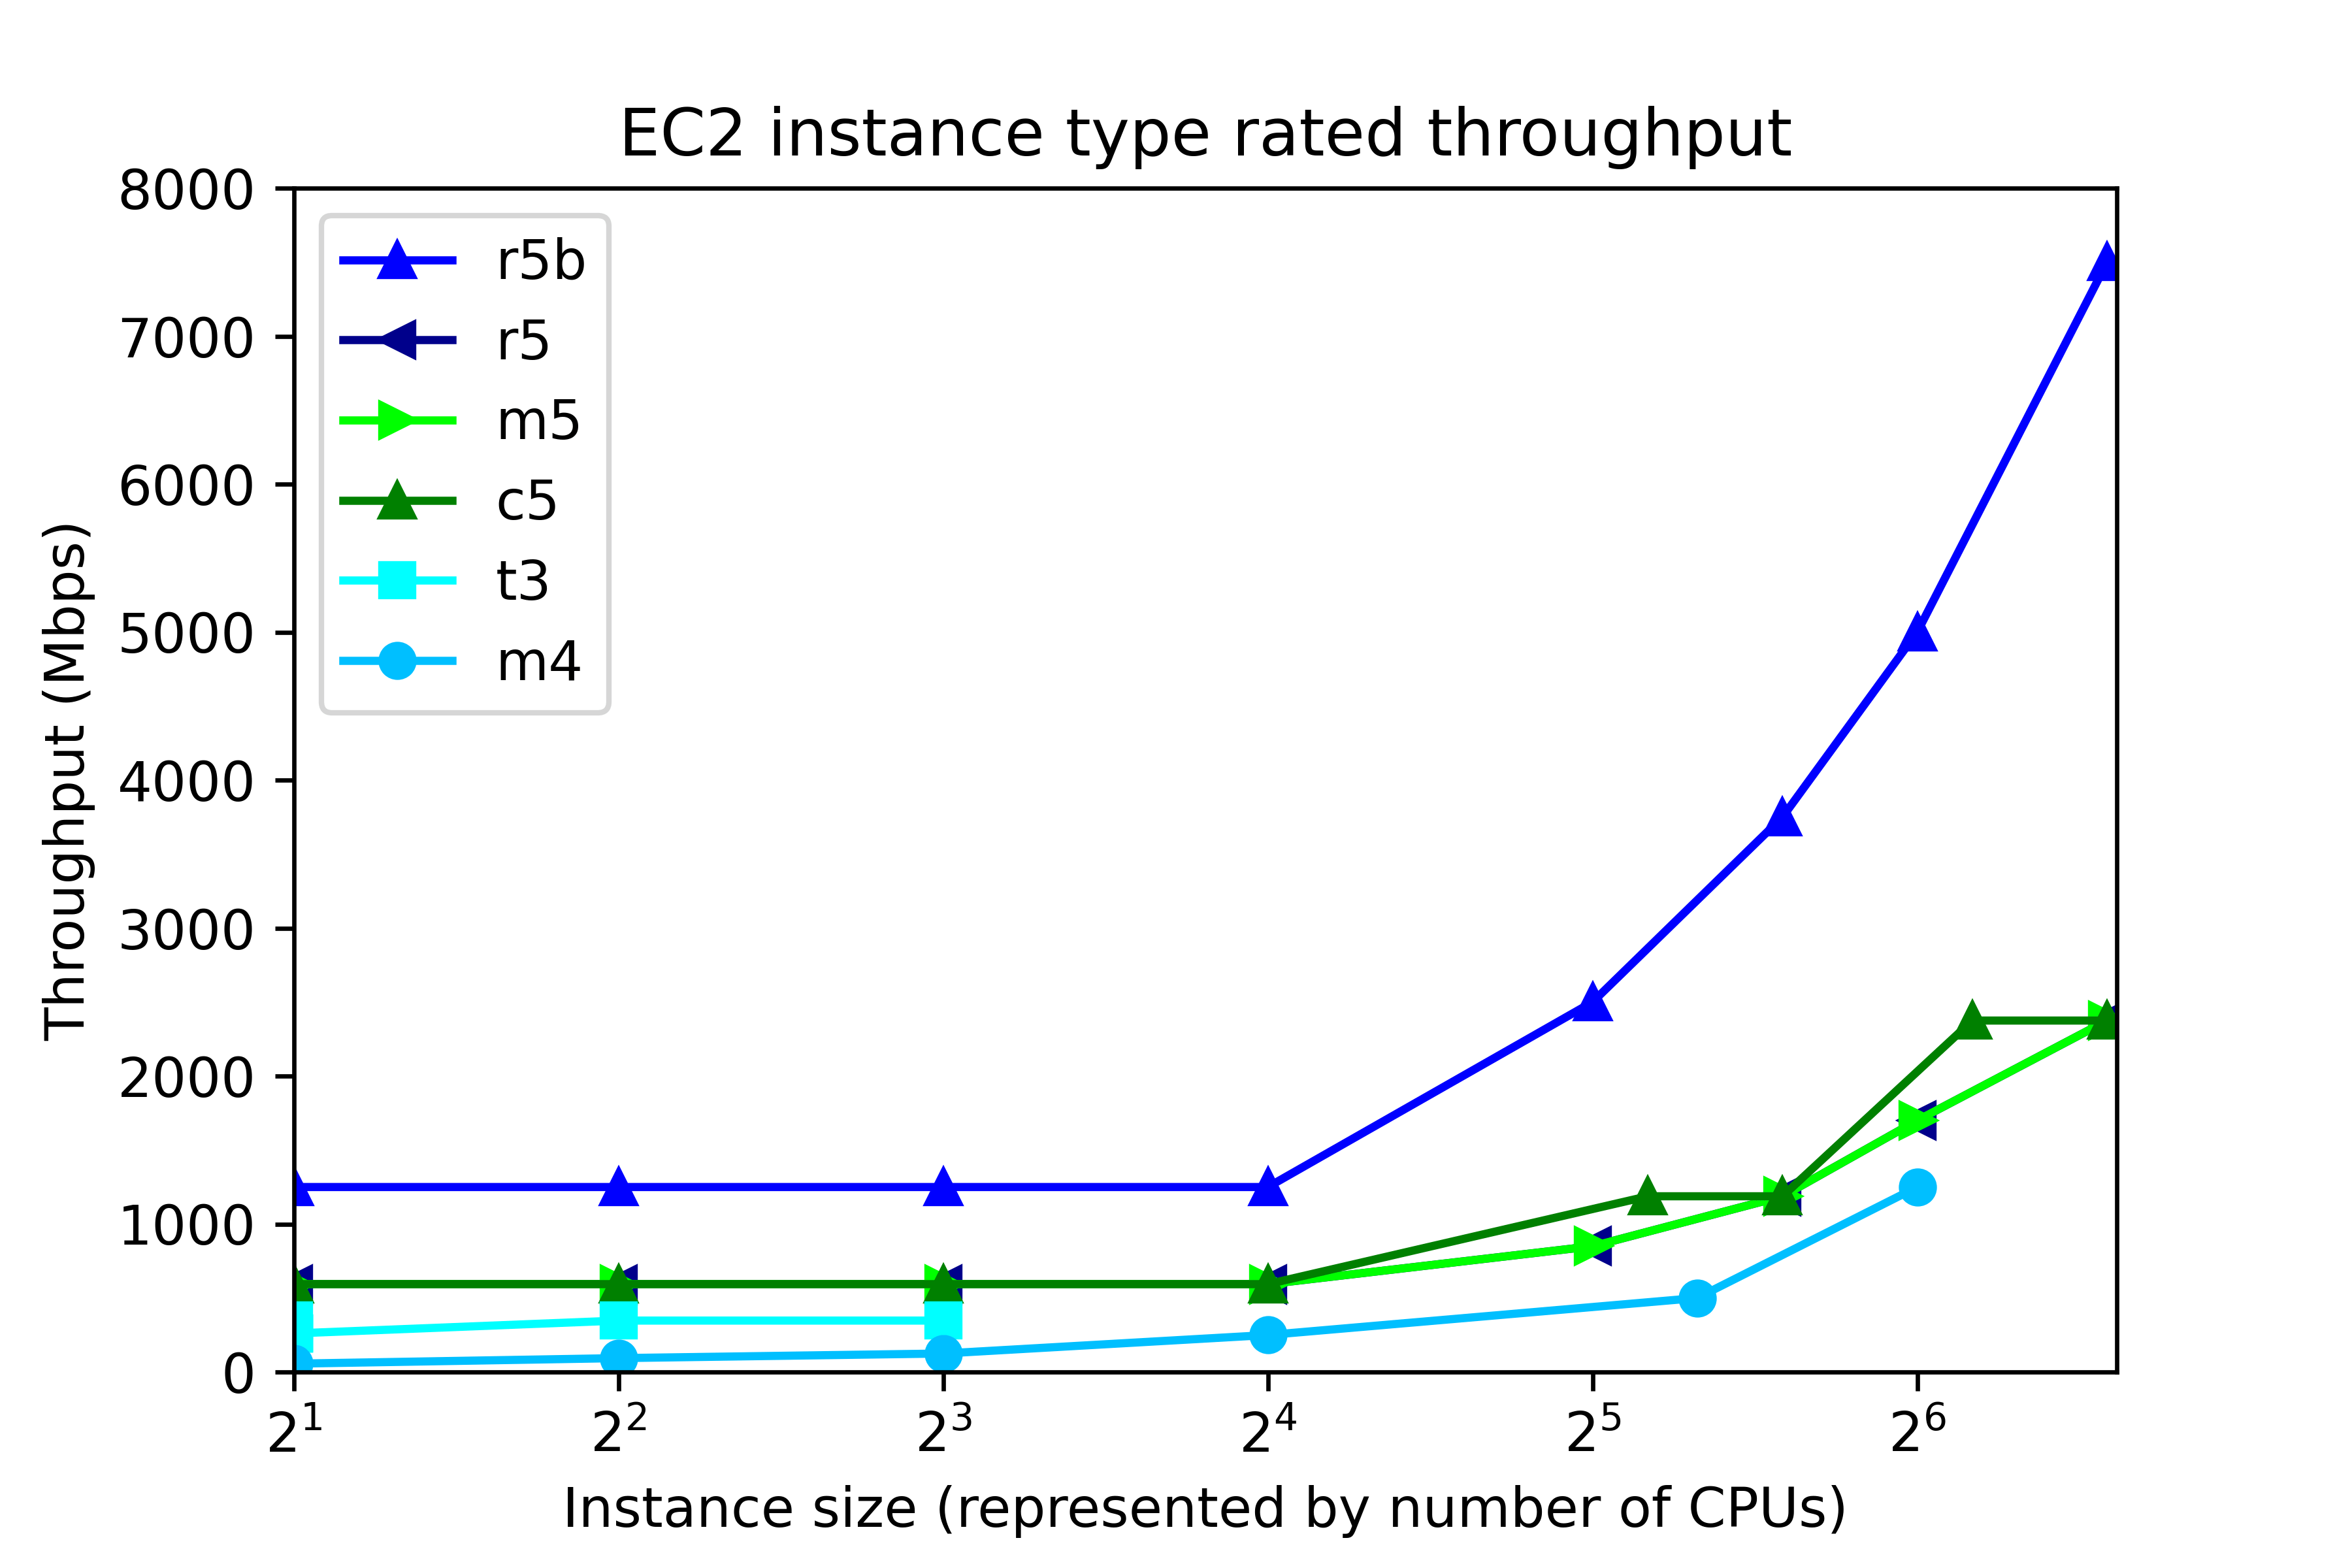
At the low end, up to 4xlarge, throughput is capped at a single value, regardless of instance size. That cap depends on instance class. In r5b, the cap is 1250 Mbps, but for c5, m5, and r5, throughput is capped at 593.75 Mbps. Other instance classes have lower throughput caps. At the high end, 8xlarge and up, throughput depends on the instance size. The r5b instance class tops out at 7500 Mbps. m5, c5, and r5 classes have throughput that ranges from 850 Mbps to 2375 Mbps, depending on instance type.

By now we have described the available volume types and instance types. So let’s pose this question. If we configure 8 gp3 volumes at 1000 Mbps each, then the system should deliver 8000 Mbps throughput, right?

Wrong.

No EC2-EBS-Linux system today delivers 8000 Mbps throughput. You will get, at best, the throughput offered by the EC2 instance type. For example, if you build an m5.4xlarge instance, then the highest possible throughput will be 593.75 Mbps, as I mentioned. Also, 593.75 Mbps is the most you will get. Actually achieving that requires configuring multiple volumes.

Operating system description

The test system is an Amazon AWS EC2 instance running Red Hat Linux 7.9. The test software is orion, which is found in the Oracle home. The number of CPUs, the amount of memory, and the device controller interface depend on the EC2 instance type. For example, the m5.xlarge has 4 CPUs, 16 GB RAM, and a non-volatile memory express (NVMe) device controller interface.

Test description

100% write I/O was tested with orion. General purpose volumes (gp2 and gp3), and the lower cost st1 storage were tested with large writes. I/O optimized storage (io2) was tested at small I/O. Each test ran from 4 to 20 minutes, depending on the number of volumes. For the throughput tests, “Maximum Large MBPS” was extracted from the summary.txt file. In the small I/O tests, “Maximum Small IOPS” and “Minimum Small Latency” were extracted.

Instance type and volume type

In this section, the influence of instance type and volume type in investigated. The new I/O-optimized r5b instance type was tested with gp3 storage. General purpose m5 instance class was tested with gp2, gp3, and io2 storage. Additionally, the lower cost, burstable t3 instance class, and the previous generation m4 instance class were tested. The number of CPUs ranged from 2 to 96. As a rule of thumb, the amount of memory for the m5, t3, and m4 instance classes, in GB, is four times the number of CPU. Eight 125-GB volumes were tested in every run. In all, there were 31 test runs.

Throughput testing

General  purpose storage was tested for throughput. gp3 storage was configured for 1000 Mbps throughput per volume (the maximum) and 4000 IOPS The results are displayed here.Each point represents the maximum throughput obtained in a single test. The dark blue line, for example, displays Orion throughput results for 6 tests on r5b.large, r5b.4xlarge, r5b.8xlarge, r5b.12xlarge, r5b.16xlarge, r5b.24xlarge, The test points above 24 are results of separate tests on r5b.4xlarge, m5.4xlarge on gp3 volume type, m5.4xlarge on gp2 volume type, t3.4xlarge, m4.4xlarge, and m5.4xlarge on st1 volume type. Again, each point is a separate test, not Orion data points from a single test.

The figure shows actual system throughput for 8 volumes. We already said that just because you configure 8 1000 Mbps volumes does not mean that the observed throughput will be 8000 Mbps. Instead, the throughput is limited by the instance type.

The key points to notice in the throughput testing are:

  • The observed throughput is level across instance types up to 4xlarge (24 CPUs), just like the documentation says.
  • Starting at 8xlarge, (25 CPUs), gp3 throughput scales up with the instance size, reaching 7330 Mbps on the r5b.24xlarge instance type, and 2330 Mbps on m5.24xlarge, again, just like the documentation says.
  • Like gp3 on the m5, gp2 throughput is level at 580 Mbps for instances up to 4xlarge.
  • From 12xlarge and up, gp2 throughput is level at 1015 MPBs.
  • For t3.xlarge and up, throughput plateaus at 335 Mbps.
  • In older instance class m4, throughput ranges from 55 Mbps to 240 Mbps.

Notice that in high-end instance types, r5b throughput is better than 3x the m5 throughput. This is one example where actual observations match the marketing materials: New – Amazon EC2 R5b Instances Provide 3x Higher EBS Performance

By using the number of CPUs on the horizontal axis, we do not mean to imply that CPUs have a significant influence on system throughput in EC2. In fact, during ORION testing, CPU workload tends be low, and the same can be said for memory footprint. Plotting vs “Number of CPUs” is just meant to be a convenient method for having plotting I/O numbers vs instance size. AWS throttles throughput depending on instance type and size, separately from the number of CPUs.

IOPS testing

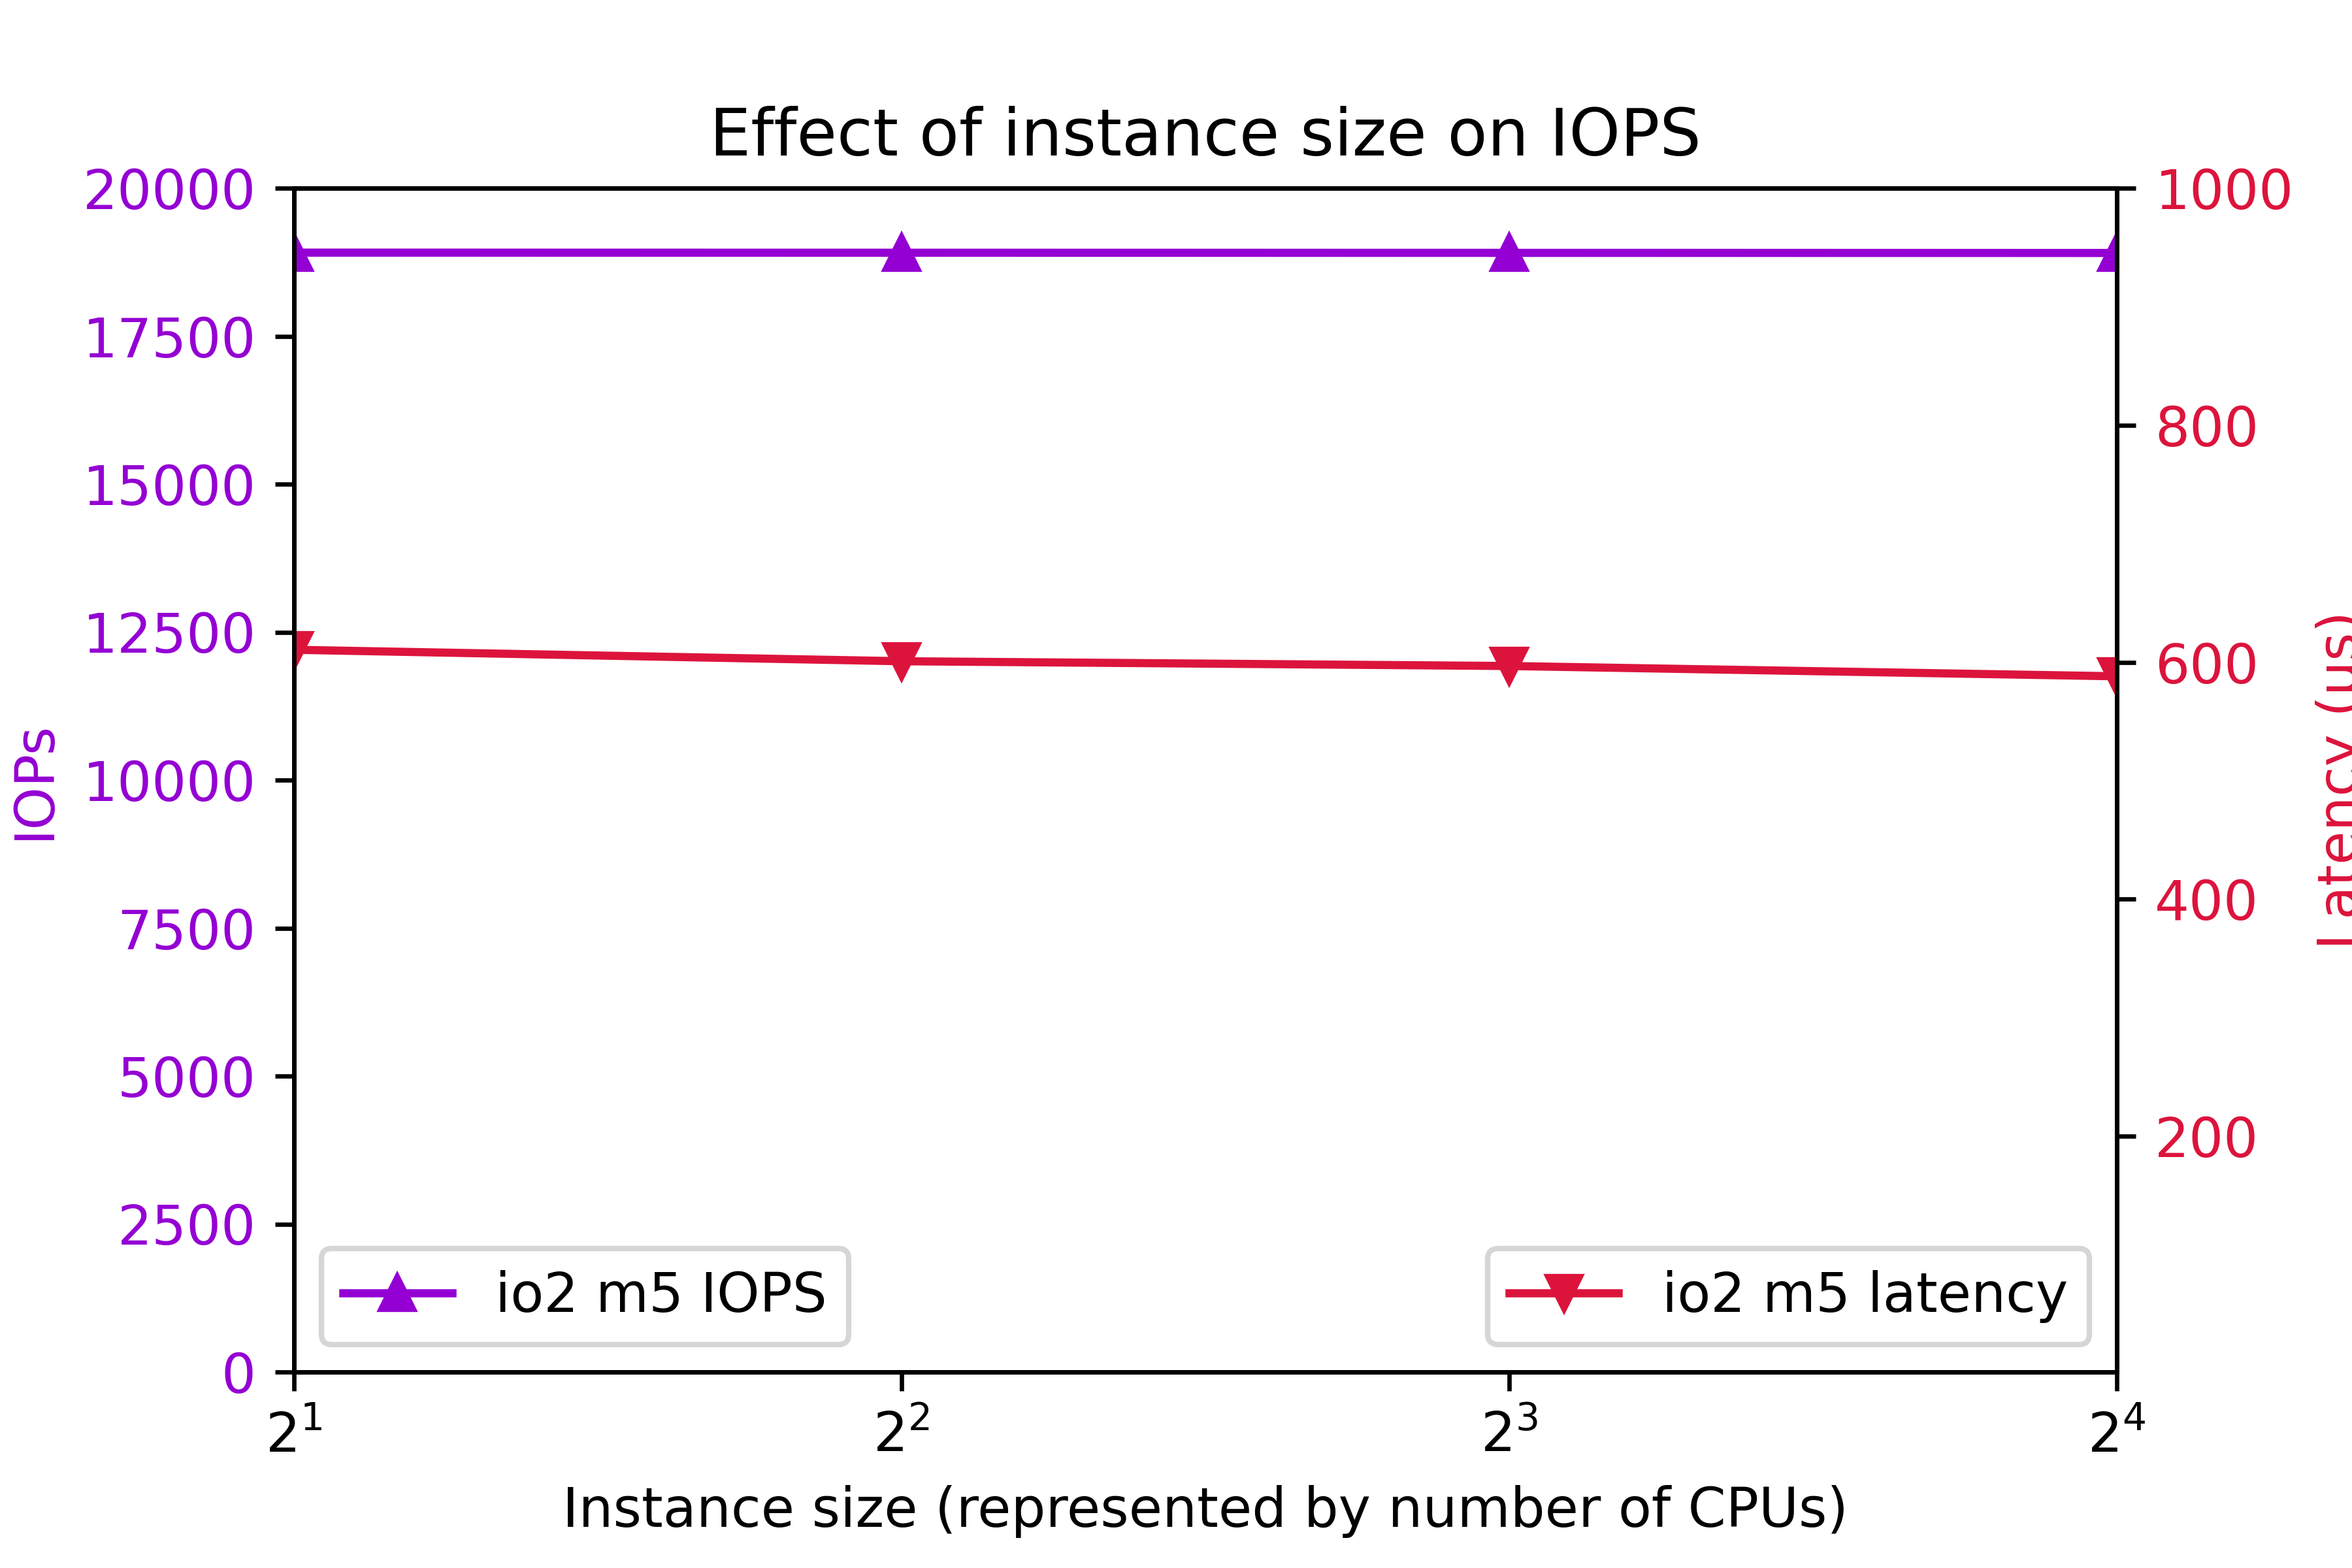
I/O Optimized storage io2 configured for 7000 IOPS per volume on the m5 class was also tested. 8 volumes were tested.Again, to clarify, configured IOPS for each volume was 7000. You might think that configuring 8 volumes are 7000 IOPS per volume should deliver 56000 IOPS. As you can see, actual IOPS is less.

The key IOPS testing observations are:

  • IOPs is flat at 18905.
  • Latency is flat at 600ms.

Conclusion

  • r5b throughput outperforms m5 by better than 3x.
  • I/O performance is level up to 4xlarge.
  • Starting at 8xlarge, throughput ramps up with instance class.
  • 24xlarge delivers the highest throughput.
  • t3 write throughput lags m5, and m4 write throughput lags t3.
  • The observed system I/O rate is much less than you would expect if you calculated I/O rate based on the volume configuration.

This section was an overview of the capabilities of various EC2 instance types and volume types with eight volumes. As we are about to see, tuning the number of volumes is crucial to optimizing instance performance.

Number of volumes

The influence of the number of volumes on I/O was tested for various instance types. The number of volumes ranged from 1 to 16. Throughput was tested on general purpose volume types gp2 and gp3. The gp3 storage was configured for 1000 Mbps and 4000 IOPs per volume. The results are shown in the following figure:Additionally, IOPS was measured on on I/O optimized volume type io2. IOPS was set at 7000 per volume. The results are shows here:The key findings are

  • For improved throughput, I/O should be distributed across multiple volumes.
  • In r5b.24xlarge, throughput increases all the way out to 7300 Mbps at 16 volumes.
  • In r5b8xlarge and m5.24xlarge, throughput levels off around 2400 Mbps at 8 volumes.
  • On m5.large, gp2 and gp3 throughput levels off at 580 Mbps at four volumes.
  • On m5.large, io2 IOPs plateaus at 18905 IOPs at four volumes.
  • io2 latency tends to remain below 625ms.

Be aware that the EC2 device attachment limit is 28, including the network adapter and up to 27 volumes, including the system disk. A practical Oracle ASM system could consist of two diskgroups and four or more disks per group.

In conclusion, one can expect improve I/O by implementing four volumes. In high end systems, configuring eight or more volumes is beneficial. Exercise prudence on the number of volumes, because throughput and IOPS charges are per-volume.

Configured volume throughput

So far, we have tested volumes that are over-provisioned, meaning that measured throughput turned out to be much less than rated throughput. You don’t get what you pay for. So how much throughput should you actually be configuring?

In this section, we investigate the effect of configured throughput versus actual throughput on gp3 volumes. gp3 volumes were configured at 3000 IOPs and a throughput range from 125 Mbps to 1000 Mbps. Various m5 and r5b instance types were tested. The results are shown here.In the m5.large, m5.24xlarge, and r5b.8xlarge cases, setting volume throughput to 375 Mbps achieves the maximum possible system throughput. Setting volume throughput higher than that leads to no further gains in performance. In r5b.12xlarge and r5b.24xlarge, performance can be maximized by setting throughput to 500 Mbps. In conclusion, although gp3 throughput can be adjusted to 1000 Mbps, there is no benefit to setting gp3 throughput above 500 Mbps, and only in rare cases is it beneficial to set gp3 throughput above 375 Mbps.

Intel vs. AMD

AWS offers a choice of Intel or AMD processor on Red Hat EC2. AMD EC2 prices are 10% lower than Intel. Rated EBS throughput on the AMD systems is less than on Intel.

AMD
Intel
instance type throughput (Mbps) instance type throughput (Mbps)
t3a.medium t3.medium
m5a.large 2880 m5.large 4750
m5a.24xlarge 13570 m5.24xlarge 19000

The test system configurations were:

Instance type CPUs Volumes Storage Throughput IOPS
t3[a].medium 2 4 st1 –
m5[a].large 2 8 gp3 375 3000
m5[a].24xlarge 96 8 gp3 375 3000

“t3[a].medium” refers to a comparison of a t3a.medium (AMD) system to a t3.medium (Intel) system, and so on, for m5[a].large and m5[a].24xlarge.At the low end instance types, AMD and Intel performed equally. At the high end, Intel edged AMD.

Systems for different purposes

Recommendations for three different type of systems are presented here. The target system is Oracle Database on top of Grid Infrastructure on Red Hat. Only systems with at least 2 CPUs and 4 GB RAM are considered. A “system” could refer to an ASM diskgroup, such as DATA, RECO, or REDO.

Low cost

You might need a low cost system for light development, well-tuned reports, archiving, etc. Use the t3a instance class and st1 storage.

General purpose

For general purpose production systems, use the m5 class. If you want to halve the memory, substitute c5 and save 9% to 11%. To double the system memory, use r5 and pay 24% to 30% more. Configure four or more gp3 volumes per ASM diskgroup at 125 Mbps to 375 Mbps throughput and 3000 IOPS.

High throughput

For highest large write throughput on EBS, use r5b.24xlarge, and at 16 gp3 volumes configured at 500 Mbps.

Example systems and cost

Example of the three types of system are presented in this table. This time, we present CPU and storage cost, assuming Red Hat Linux and on demand pricing in region us-east-1, as of 7/24/2021.

Purpose Instance Type Vol type Num CPU Vol Size Num Vols Thr IOPS Actual Mbps EC2 EBS Total
Low cost t3a.medium st1 2 125 8 – – 245 $71 $45 $116
General purpose m5.large gp3 2 250 4 125 3000 497 $114 $80 $194
High throughput r5b.24xlarge gp3 96 1000 16 500 3000 7330 $5316 $1522 $6838

Do not waste money

Follow this guidance to avoid wasting money

  • Avoid io2 EBS for general purpose Oracle databases. The cost is prohibitive.
  • In gp3, configure throughput at 500 Mbps or less, and configure 3000 IOPS.
  • For good, economical performance, configure gp3 at 125 Mbps and 3000 IOPS.

Workload

This article offers guidance on configuring the AWS EBS at 100% write. The findings apply to any diskgroup, particularly to redo diskgroups and to databases with high throughput requirements, such as ETL systems. The information is among many factors to consider when specifying a practical database system. Orion is also capable of simulating a 100% read workload, and a mixed workload. Mixed workload Orion results could be used to look for further cost reductions. Actual database application performance depends not only on storage throughput, but also on processor design, amount and speed of memory, and table design.

ASM diskgroup layout

Oracle makes ASM diskgroup layout recommendations: RAC and Oracle Clusterware Best Practices and Starter Kit (Platform Independent) (Doc ID 810394.1).

Oracle recommends a minimum 4 disks per diskgroup:My own test results show that a minimum of 4 LUNs per diskgroup lead to optimal throughput. Configuring 4 or more LUNs per diskgroup is extremely important.

Oracle recommends no more than 2 ASM diskgroups:Benefits of no more than 2 ASM diskgroups:

  • Simplified administration.
  • High throughput in all diskgroups.
  • Avoid approaching the EC2 attachment limit.

If you configure more than 2 diskgroups, you could find yourself making design compromises at exactly the wrong places. For example, online redo logs are critical, high throughput components. If you configure separate REDO diskgroups in EC2, then you may find it difficult to keep to 4 disks per diskgroup, and still allow for expansion and remain within the attachment limit. Or you may find that so many diskgroups leads to a manageability issue.

Conclusion

The r5b instance class with gp3 storage delivers the highest performing I/O. m5, c5, and r5 instance classes make well-performing, general purpose systems with high throughput. The t3a instance class with st1 storage makes a fair-performing, low cost system. Each ASM disk groups should be configured with a minimum of 4 disks and more than 4 disks for high throughput r5b systems. For optimal throughput, gp3 EBS should be configured at 3000 IOPS and no more than 500 Mbps.

Create spfile in ASM

By Brian Fitzgerald

Problem

Question: How do you create a spfile in ASM? If you issue “create spfile” too early, you will not know the path, so you would have to search ASM for it. The situation could arise while you are setting up a standby database.

Solution

Register the database with CRS first. Then, as the manual mentions, the create spfile statement “automatically updates the SPFILE in the database resource.”

Register the db with CRS

$ srvctl add database -database orcl -role physical_standby -startoption MOUNT -stopoption ABORT -instance orcl -oraclehome /u01/app/oracle/product/1212/db_1 -diskgroup DATA1,RECO1,
REDO1,REDO2
$ srvctl start database -database orcl
$ srvctl config database -database orcl
Database unique name: orcl
Database name:
Oracle home: /u01/app/oracle/product/1212/db_1
Oracle user: oracle
Spfile:
Password file:
Start options: mount
Stop options: abort
Database role: PHYSICAL_STANDBY
Management policy: AUTOMATIC
Disk Groups: DATA1,RECO1,REDO1,REDO2
Services:
OSDBA group: dba
OSOPER group: dba
Database instance: orcl

Create a text file

You could create a pfile from memory, for example.

SQL> create pfile='initorcl.memory' from memory;
File created.

Edit the file

$ vi initorcl.memory

Delete extraneous underscore parameters.For example, here is a file with the basic parameters that you need for restoring and recovering a duplicate database:

audit_trail='DB'
cluster_database=FALSE
compatible='12.1.0.2.0'
control_files='+REDO1/ORCL/CONTROLFILE/current.258.1067960587'
control_files='+REDO2/ORCL/CONTROLFILE/current.258.1067960589' # Restore Controlfile
core_dump_dest='/u01/app/oracle/diag/rdbms/orcl/orcl/cdump'
db_cache_size=16G
db_create_file_dest='+DATA1'
db_create_online_log_dest_1='+REDO1'
db_create_online_log_dest_2='+REDO2'
db_files=1000
db_name='ORCL'
db_recovery_file_dest='+RECO1'
db_recovery_file_dest_size=1000G
db_unique_name='orcl'
local_listener='ORCL'
remote_login_passwordfile='EXCLUSIVE'
sga_max_size=31G # internally adjusted
sga_target=31G
use_large_pages='only'

Create the spfile

SQL> create spfile = '+DATA1' from pfile='initorcl.memory';

Check:

$ srvctl config database -database orcl
Database unique name: orcl
Database name:
Oracle home: /u01/app/oracle/product/1212/db_1
Oracle user: oracle
Spfile: +DATA1/ORCL/PARAMETERFILE/spfile.585.1068023283
Password file:
Start options: mount
Stop options: abort
Database role: PHYSICAL_STANDBY
Management policy: AUTOMATIC
Disk Groups: DATA1,RECO1,REDO1,REDO2
Services:
OSDBA group: dba
OSOPER group: dba
Database instance: orcl

Notice that there was no need to create an ASM alias or log in to ASM to search for the file.

Conclusion

Register your database in CRS first, then create your spfile.

Change Control

By Brian Fitzgerald

Introduction

This is the change control policy that I recommend for DBA organizations.

Change Policy

A production change requires these elements:

  1. Written implementation steps.
  2. Written validation steps.
  3. Written backout steps.
  4. Proof of prior testing of these steps.
  5. A risk analysis.
  6. Written approval.

Who, what, and when?

Implementation, validation, and backout instructions should identify the responsible person by name, the actual steps to be performed, and the allowable time window.

Approver

An approver is someone who can also disapprove.

Consequences

Not adhering to change control in critical systems will eventually will lead to serious negative consequences, such as loss of data, interruption of service, unwanted public attention, reputation damage, regulatory fines, and lawsuits.

Summary

This is my recommended change policy for organizations. Administrative details depend on the organization’s culture and the change control software.

replace ec2 ssh key

By Brian Fitzgerald

Introduction

The employee with the ec2-user secret ssh key left the company.

Now what?

Procedure

identify a key

Use an exiting ssh key pair or create a new one with a command such as:

ssh-keygen -m -f magic

Files magic and magic.pub get created as a result, in this example.

stop the ec2 instance

edit the user data

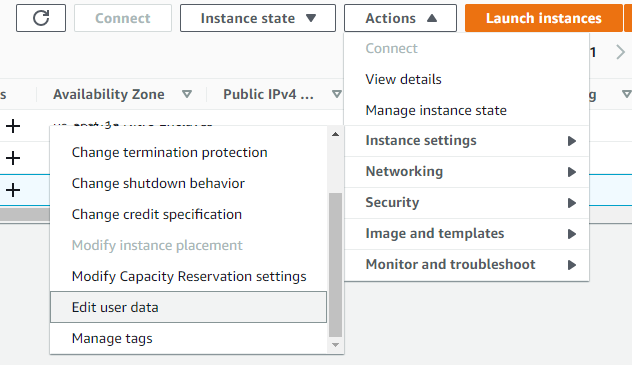
Select your ec2 instance. Select actions->Edit user data.

Paste a script such as this one, substituting the contents of your actual magic.pub:

Content-Type: multipart/mixed; boundary="=+"
MIME-Version: 1.0

--=+
Content-Type: text/cloud-config; charset="us-ascii"
MIME-Version: 1.0
Content-Transfer-Encoding: 7bit
Content-Disposition: attachment; filename="cloud-config.txt"

cloud_final_modules:
- [scripts-user, always]

--=+
Content-Type: text/x-shellscript; charset="us-ascii"
MIME-Version: 1.0
Content-Transfer-Encoding: 7bit
Content-Disposition: attachment; filename="replace-ssh-key.bash"

#!/bin/bash

cat > /home/ec2-user/.ssh/authorized_keys <<-EOF
ssh-rsa AAAAB3NzaC1yc2EAAAADAQABAAABgQC1pY+ct6N1DosG1qTSvbTVByY8CUilyn0ZVexISyBd+a4SPXbjgOKsRv4wiAYNHkMD29zFkvGXUgg8mB6UaOD7OeoI4opHpGNVYKGx4Sf+frvOzMuS7Z/VCrT+MtRc0GFI57K4aHNIVtJ6TxS1aq79eaD1ORG7TlgdqbBuR49KD1CemCZB/NdzPoo5D2oZTbr3yvrDXzRApzRX++DK3EZyNSrma8p1NUxB3H8JcNj7fmnDehrrAqoe9HctwJidc9/n/5c2AN3WV59SZLX4GhDRiKXIxOAq7pG0CWAUotlvRGhNRch87KzueLmQ/i5RsAKrx/B3dOAhlI6IF54HC8cdO6gjpjjfLxBCpireLHxNjNtBQCchMnHzGShGH3QEB1wHTZIa0ezN2kvjelC7hAB6UR/Klt6DD0lO4yBVGraahlUNFffLPHCf+Jym9Ppp2aXa0qzJIoRGFxpyC4KZDU1kzdWb3/Nou9qamyUbe4NBRLBc76L9sdD2Iz1SoolYm4E= brian@RWMZLB
EOF
--=+

start the ec2 instance

ssh using the new key

ssh -i magic ec2-user@your-host

Conclusion

Done!

No disk groups mounted after Grid 12.1 upgrade to 18c

Introduction

After an apparently successful upgrade from Grid 12.1 to 18c, the ASM disk groups failed to mount.

Scenario

An upgrade from Grid 12.1 to 18c happened. The DBA had used gridSetup.sh.

After the upgrade, no disk groups were found to be mounted. There had been no warnings before this happened.

Other application groups were waiting, so there was pressure to bring up the system.

Symptoms

  1. No disk groups got mounted.
  2. This error appears in the ASM alert log:
ORA-15032: not all alterations performed
ORA-59303: The attribute compatible.asm (11.2.0.0.0) of the diskgroup being mounted should be 11.2.0.2.0 or higher.

Notice that tools that refer to disk groups will not work

asmcmd lsdsk –discovery shows ASM disks, but no disk groups.

$ asmcmd lsdsk --discovery -g
Inst_ID  Path
      1  ORCL:ASM_DATA_VOL1
      1  ORCL:ASM_DATA_VOL2
      1  ORCL:ASM_DATA_VOL3
      1  ORCL:ASM_DATA_VOL4
      1  ORCL:ASM_DATA_VOL5
      1  ORCL:ASM_RECO_VOL1
      1  ORCL:ASM_REDO_VOL1

Mount with force option will not work. Ex:

asmcmd mount -f DATA1

This will not work:

SQL> ALTER DISKGROUP DATA1 SET ATTRIBUTE 'compatible.asm' ='11.2.0.2.0';
ALTER DISKGROUP DATA1 SET ATTRIBUTE 'compatible.asm' ='11.2.0.2.0'
*
ERROR at line 1:
ORA-15032: not all alterations performed
ORA-15001: diskgroup "DATA1" does not exist or is not mounted

This will not work:

SQL> alter diskgroup DATA1 mount;
alter diskgroup DATA1 mount
*
ERROR at line 1:
ORA-15032: not all alterations performed
ORA-59303: The attribute compatible.asm (11.2.0.0.0) of the diskgroup being
mounted should be 11.2.0.2.0 or higher.

Notice that the ASM disks are ok

asmlib:

$ oracleasm listdisks
ASM_DATA_VOL1
ASM_DATA_VOL2
ASM_DATA_VOL3
ASM_DATA_VOL4
ASM_DATA_VOL5
ASM_RECO_VOL1
ASM_REDO_VOL1

kfed:

$ kfed op=read dev=/dev/oracleasm/disks/ASM_DATA_VOL1
kfbh.endian:                          1 ; 0x000: 0x01
etc..
kfdhdb.dskname:           ASM_DATA_VOL1 ; 0x028: length=13
kfdhdb.grpname:                   DATA1 ; 0x048: length=5
etc.
kfdhdb.compat:                186646528 ; 0x020: 0x0b200000

The ASM disk and ASM group name look good.

Hex b refers to oracle version 11. The zeros following the 2 apparently mean that the disk group version is 11.2.0.0.0.

Cause

Oracle 12.2, 18c, and 19c binaries cannot mount a compatible 11.2.0.0.0 disk group. The manual states:

Starting with Oracle ASM version 12.2.0.1, the minimum and default settings for Oracle ASM disk group attributes are:

  • COMPATIBLE.ASM = 11.2.0.2

If you are reading the Oracle grid upgrade manual, you might not notice any checks that could prevent this mistake. The Oracle 19c Grid Upgrade manual checklist hints at the problem:

Our 18c gridSetup.sh as patched (18.3) does not check for this, and lets you start the upgrade, which leads to the problem.

Approach (with a downside)

Downgrade grid to the previous version (12.1).

In the 18c grid home, attempted this step from the 18c manual:

# cd crs/install
# ./rootcrs.sh -downgrade
Using configuration parameter file: /ora_local/apps/oracle_grid/product/18.0.0/grid_18c/crs/install/crsconfig_params
The log of current session can be found at:
  /ora_local/apps/oracle/crsdata/evp003-eldb/crsconfig/crsdowngrade_evp003-eldb_2021-01-20_10-48-42AM.log
2021/01/20 10:48:44 CLSRSC-457: Oracle Restart is currently configured and cannot be deconfigured using this Oracle Clusterware deconfiguration command.
Died at /ora_local/apps/oracle_grid/product/18.0.0/grid_18c/crs/install/crsdowngrade.pm line 260.
The command '/ora_local/apps/oracle_grid/product/18.0.0/grid_18c/perl/bin/perl -I/ora_local/apps/oracle_grid/product/18.0.0/grid_18c/perl/lib -I/ora_local/apps/oracle_grid/product/18.0.0/grid_18c/crs/install /ora_local/apps/oracle_grid/product/18.0.0/grid_18c/crs/install/rootcrs.pl -downgrade' execution failed

Did instead:

# cd crs/install
# ./roothas.sh -deconfig

This step wipes out ocr.

In the 12.1 grid home

# cd crs/install
# ./roothas.sh

Now grid is running on 12.1 with just the basics, but not cssd.

Downside

roothas deconfig wipes out your crs. You will have to manually start cssd and re-add your ASM and database resources.

Workaround

Start cssd, etc.

# crsctl start resource -all

Start ASM

To get things rolling, you could create an ASM pfile. Remember that ASM needs to know which disk groups to mount, so be sure to configure asm_diskgroups

init+ASM.20210120

large_pool_size          = 12M
instance_type            = "asm"
remote_login_passwordfile= "EXCLUSIVE"
asm_diskgroups =  DATA1,REDO1,RECOVERY1
asm_power_limit          = 1
diagnostic_dest          = "/ora_local/apps/oracle"

start

SQL> startup mount pfile='init+ASM.20210120'
ASM instance started

Total System Global Area 1136934472 bytes
Fixed Size                  8666696 bytes
Variable Size            1103101952 bytes
ASM Cache                  25165824 bytes
ASM diskgroups mounted
ASM diskgroups volume enabled

You can successfully create an spfile, with this error message:

SQL> create spfile='asmspfile.ora'  from pfile =  'init+ASM.20210120';
create spfile='asmspfile.ora'  from pfile =  'init+ASM.20210120'
*
ERROR at line 1:
ORA-29786: Oracle Restart attribute GET failed with error [Attribute 'SPFILE'
sts[200] lsts[0]]

Add asm to crs

$ srvctl add asm -spfile asmspfile.ora

Start databases. Details omitted for brevity. Start with sqlplus. configure in crs with srvctl add database.

Final state

  • Grid 12.1 is up
  • ASM is up with all disk groups mounted.
  • Databases up

Follow up steps

To reattempt the Grid 18c upgrade:

  • In all disk groups, change compatible.asm 11.2.0.2.0 or higher
  • Retry the Grid 18c upgrade

Conclusion

During an upgrade from Grid 12.1 to 18c, the step to upgrade the disk groups to compatible 11.2.0.2.0 got missed. As a result, the 18c software could not mount the disk groups. kfod revealed that the ASM disks were intact, though.

The downgrade step found in the manual, rootcrs.sh -downgrade, failed, so I ran roothas.sh -deconfig, followed by roothas.sh in the 12c grid home. That worked, but I had to start cssd manually, and register ASM and the databases.