ASMCMD-9520: AFD is not Loaded after Red Hat update

by Brian Fitzgerald

Introduction

Your Red Hat kernel got upgraded and now AFD does not load. Solution: run “grubby –set-default”. This article applies to Oracle Database 19c on Red Hat Enterprise Linux 9 on-premises.

Background

ASM filter driver (AFD) requires loading kernel module oracleafd.ko. The kernel modules are distributed in release updates and are installed in $ORACLE_HOME/usm/install/Oracle. AFD kernel modules are tied to a specific sub-version of Red Hat EL 9, and Oracle’s distribution of new AFD kernel modules may lag the Red Hat release by 6 months. For example, rhel9_4 was released on April 30, 2024, but Oracle did not release the compatible AFD kernel module until RU 19.25 of October 15, 2024. If you issued “dnf update” or “yum update” after April 30, but before installing RU 19.25, then AFD has stopped working. You must downgrade your kernel. Refer to ACFS and AFD Support On OS Platforms (Certification Matrix). (Doc ID 1369107.1) for up-to-date AFD kernel driver release information.

rhel9_5 was released on November 13, 2024. If you issued “dnf update,” then AFD has stopped working. As of this writing, Oracle has not released an rhel9_5 AFD kernel module, so you must downgrade your kernel.

Don’t do it!

Don’t run “dnf update”!

Oh no, you did it!

“dnf update” got run and now AFD does not load. Your Oracle database is down!

Fix it!

Fix this issue simply by identifying your previous kernel file and running “grubby –set-default”. Reboot.

Yay, it’s fixed!

Notice that filtering is not supported on Red Hat 9. Be careful not to overwrite your ASM device!

No filtering in RHEL9

ASM filter driver is designed to block IO from programs except for Oracle binaries. Filtering works in rhel7. You can’t overwrite an oracle device with dd, for example:

Refer to Oracle Automatic Storage Management Filter Driver (ASMFD) (Doc ID 2806979.1) for news about AFD filtering. Exercise care when handling Oracle devices. For example:

dd overwrote /dev/nvme3n1. Your data is wiped out. The ironically named “ASM Filter Driver” did not filter the non-Oracle I/O.

Common SA commands such as parted could corrupt your disk:

Be careful!

Red Hat release

Notice that the kernel is at rhel9_4, but the operating system is at rhel9_5.

Conclusion

We covered these points:

  • Oracle AFD depends on a kernel module.
  • In Red Hat 9, the AFD kernel module is tied to a specific sub-version.
  • Oracle will release the needed AFD module after each Red Hat 9 sub-version release.
  • Depending on what Oracle RU you have installed, dnf update may install a kernel that is incompatible with your AFD module.
  • You can fix your problem by running “grubby –set-default”
  • You can upgrade to a specific kernel version.
  • ASM filter driver no longer filters.
  • Administrative commands could wipe out your disks.
  • Exercise greater care without filtering present.

Uncontrolled RDS Timezone File Auto-Upgrade

By Brian Fitzgerald

Summary

Oracle databases require consistent timezone file versions between the source and target databases during imports. If the source database has a higher timezone file version than the target, the target’s version must be upgraded. In Oracle on-premises environments, this requires direct OS access, which is not available in AWS RDS.

AWS provides the TIMEZONE_FILE_AUTOUPGRADE option to manage this automatically, but it can cause unexpected disruptions due to undocumented behaviors. Understanding these behaviors and managing them carefully is necessary to prevent unexpected DB instance reboots.

Background

Timezone rules change in response to societal preferences and political changes. These changes can include the timezone offset from UTC, daylight saving time (DST) start and end dates, adoption or repeal of DST, timezone names and abbreviations, and more.

Oracle Database uses the timezone file to interpret the timezone stored with timestamps in the timestamp with time zone data type. For example, in the following SQL command:

SELECT TO_TIMESTAMP_TZ('July 19, 1969 9:32 AM EDT',
'Month dd, yyyy hh:mi AM
tzd’) liftoff FROM dual;

Oracle determines that Eastern Daylight Time was 4 hours behind UTC in July 1969.

Ittoqqortoormiit, Greenland

When timezone rules change, the timezone file is updated to reflect the change and its effective date. For example, on March 31, 2024, Ittoqqortoormiit, Greenland, changed its timezone rules. Timestamps before this date are interpreted differently than those after it.

Oracle includes timezone file updates with quarterly patch release updates (RUs) if an updated file is available. Some RUs have no timezone file update. However, in Q1 2023, Oracle issued two RUs, each with a new timezone file update.

To upgrade the timezone file on-premises, download and run the MOS script upg_tzv_apply.sql, which starts your database in upgrade mode and runs the dbms_dst package.

The active timezone file version can be found by running:

select version
from v$timezone_file

AWS does not permit customers to directly start an RDS Oracle database in upgrade mode, so it offers the TIMEZONE_FILE_AUTOUPGRADE option. You can enable this option for one or more databases by adding it to the databases’ option group, or by switching a database to an option group with this option. Note that an option group applies to a single account, region, engine, and Virtual Private Cloud (VPC).

AWS states, “When the option group attached to your RDS for Oracle DB instance includes the TIMEZONE_FILE_AUTOUPGRADE option, RDS updates your time zone files automatically.” This statement hides undocumented behavior that first-time users may find counterintuitive.

Behavior

Once the TIMEZONE_FILE_AUTOUPGRADE option is enabled for a database, two conditions must be understood.

Whether the timezone file will be upgraded

You can determine if a timezone file will be upgraded by comparing the active version from v$timezone_file to the version found in the Amazon RDS for Oracle Release Notes. For instance, if your timezone file version is 42 and your engine version is 19.0.0.0.ru-2024-07.rur-2024-07.r1, RU 2024-07.ru did not change the timezone file version. However, the previous version, 19.0.0.0.ru-2024-04.rur-2024-04.r1, included “DSTV43”.

Conclusion: If TIMEZONE_FILE_AUTOUPGRADE is enabled, your DB engine version is 19.0.0.0.ru-2024-07.rur-2024-07.r1, and your timezone file version is 42, the file will be automatically upgraded. Identifying the highest available version requires reviewing the documentation.

When the timezone file will be upgraded

If the timezone file will be upgraded. the upgrade occurs:

  1. During the next maintenance window, or
  2. Immediately, if any immediate change is made to the DB instance.

The immediate upgrade is undocumented and can cause unexpected behavior. The database will reboot and upgrade the timezone file if you make any immediate changes, such as changing:

  1. Maintenance window
  2. Backup window
  3. Deletion protection
  4. IOPS or storage throughput
  5. CA Certificate identifier
  6. Auto minor version upgrade
  7. Master user password

Example scenario

Suppose you had created an Oracle EE RDS DB instance in 2022 with the following settings:

  1. DB Engine version:19.0.0.0.ru-2022-01.rur-2022-01.r1
  2. Timezone file version: 37
  3. Preferred maintenance window: Saturday 06:00 to 07:00
  4. Auto minor version upgrade: Enabled

By 2024, the DB Engine version is 19.0.0.0.ru-2024-04.rur-2024-04.r1 and timezone file version 43 is available.

If, say, on June 5, 2024, you add the TIMEZONE_FILE_AUTOUPGRADE option, no “pending” changes appear in the AWS console. However, if on June 17, you change storage throughput, the DB instance will reboot and apply the timezone file version change.

Immediate upgrade behavior only happens if the active timezone file version is less than the available version.

Discussion

Most RDS DB instance attributes can be checked and modified by running describe-db-instances and modify-db-instance. Other modifications can be made using option groups, parameter groups, or maintenance actions. However, controlling the timezone file version differs.

To check for a pending timezone file upgrade, examine v$timezone_file and your DB engine version documentation. There is no direct indication of an upgrade pending.

You cannot issue a command that directly upgrades a timezone file version. The TIMEZONE_FILE_AUTOUPGRADE and database upgrades must be implemented carefully, as many unrelated commands can inadvertently trigger an immediate upgrade and reboot.

Internal Process

If TIMEZONE_FILE_AUTOUPGRADE is enabled, any immediate or scheduled DB instance change prompts the hypervisor to connect via cloud-init and compare active and available timezone file versions. If a newer version is available, cloud-init restarts the database in upgrade mode and runs dbms_dst to upgrade the file version.

Documentation

The apparent spontaneous reboot behavior is not documented.

Workaround

One workaround is to not use the TIMEZONE_FILE_AUTOUPGRADE option. However, this choice limits flexibility across imports. A better option is to keep the option enabled, ensuring timezone files are updated with DB instance upgrades.

If implementing TIMEZONE_FILE_AUTOUPGRADEon an existing DB instance, do so just before the next version upgrade and avoid further modifications until the upgrade is complete.

“Master Arm is On”

One minute before liftoff from the Moon in the Apollo 11 Lunar Module ascent stage, Neil Armstrong activated the Master Arm switch. When the countdown clock reached zero, a complex sequence of events unfolded: pyrotechnics separated the ascent stage electrically and mechanically from the descent stage and opened explosive helium pressurization valves to prepare for ascent stage engine ignition. The purpose of the “arming switch” is, therefore, to enable an intentional, automatic, sequenced operation of circuits, actuators, and firing of pyrotechnics in the ascent stage launch sequence. Apollo 11 Lunar Module ascent stage

The TIMEZONE_FILE_AUTOUPGRADE option functions like an arming switch. Once set, the timezone file upgrade is “armed”. The normal actuating trigger is a DB instance engine upgrade. However, any DB instance change will also trigger the timezone file upgrade.

Our DBA team enabled TIMEZONE_FILE_AUTOUPGRADE on a Friday morning, with a minor version upgrade scheduled for the following maintenance window. We adopted the custom of announcing, “Master Arm is On,” indicating team members should refrain from ad-hoc, immediate changes until after the engine and timezone file upgrade.

During the maintenance window, both the DB engine and timezone file versions were upgraded. The TIMEZONE_FILE_AUTOUPGRADE option remained enabled for future updates.

We experienced no issues or surprises in production, development, or QA environments. All abnormal behavior was identified during testing, and implementation was coordinated to avoid adverse effects.

Conclusion

Maintaining synchronization of the timezone file version is crucial for import flexibility. The TIMEZONE_FILE_AUTOUPGRADE option automates upgrades but requires careful handling to avoid unexpected outages.

Trace only one logon on AWS RDS Oracle

By Brian Fitzgerald

Introduction

Given an Oracle RDS database, multiple application servers and multiple connections, the task at hand is to

  • Create a logon trigger that will …
  • Run when the first connection arrives and not again after that, and …
  • Run trace 10046 …
  • Up to 10 MB only.
  • Identify the trace file
  • Download the trace file
  • Run tkprof

Background

  • A logon trigger fires for every login that matches the firing condition. If we trace every session, we could file the file system. We only want one example trace file.
  • In RDS, you do not have direct access to the operating system. You must somehow copy out the trace file.

Let’s go!

Grant

The first thing you need to get right is the grant. Trace requires “alter session” rights, which must be granted directly, not through a role. Suppose the user is “inuser”

grant alter session to inuser;

Create a sequence

create sequence inuser.user_trace_trg_seq;

Create the trigger

The trigger must be owned by the user that needs to be traced.

create or replace trigger inuser.user_trace_trg
after logon on database
when ( user = 'INUSER' )
declare
  l_val number;
begin
  l_val := inuser.user_trace_trg_seq.nextval;
  if l_val = 1
  then
    execute immediate
    q'{alter session set max_dump_file_size = '10m'}';
    execute immediate
    q'{alter session set tracefile_identifier = '}'||user||q'{_user_trace_trg'}';
    execute immediate
    q'{alter session set events '10046 trace name context forever, level 12'}';
  end if;
end;
/

Now wait for the user to login. The first the trigger fires time, nextval equals 1, so the trigger body runs. After that, the trigger body does not run.

Identify the trace file

select * from table(
  rdsadmin.rds_file_util.listdir('BDUMP')
)
where filename like '%INUSER_user_trace_trg.trc'
order by mtime;
FILENAME TYPE FILESIZE MTIME
ORCL_ora_9022_INUSER_user_trace_trg.trc file 10485856 2022-04-17 00:17:04

“Download” the trace file

You could transfer the file from rds to s3, and then from s3 to a local system. The other way is:

select text from table(
  rdsadmin.rds_file_util.read_text_file(
   :dir,
   :filename
  )
)

Using sqlalchemy and boto3, I have integrated this statement with AWS secrets manager in a convenient python script

$ download-rds-ora-dir-files.py --secret-id $sec --dir BDUMP --pat ORCL_ora_9022_INUSER_user_trace_trg.trc
number of files: 1

You could also run sqlplus and spool the output to a file.

set feedback off
set linesize 32767
set trimspool on
set pagesize 0

set termout off
spool ORCL_ora_9022_INUSER_user_trace_trg.trc

select text from table(
    rdsadmin.rds_file_util.read_text_file(
        'BDUMP',
        'ORCL_ora_9022_INUSER_user_trace_trg.trc'
    )
)
;

Run tkprof

tkprof ORCL_ora_9022_INUSER_user_trace_trg.trc ORCL_ora_9022_INUSER_user_trace_trg.tkp

Done!

Conclusion

The following concepts were covered

  • How to make a logon trigger body that runs only once.
  • Permissions and object ownership for a logon trigger.
  • How to download a trace file from RDS.

Session objects in python APIs

By Brian Fitzgerald

Introduction

Database administrators understand “session” to mean an established database connection. It may come as a surprise that “session”, in several database-related libraries, refers to a data structure in the absence of any established connection.

Database session

A database session is an instance memory structure that holds an established connection’s state. The session contains facts such as a unique session id and the user name. The database session exists only after the transport (network connection) is established, the user has authenticated, and the memory structures have been allocated. The client application uses an API which holds a handle to the server side session. Application code uses the database API handle to issue commands and to receive responses and query results. The API is layered on top of a database driver, which associates the API handle with an operating system or network connection. In this way, client application to a server session via an API and a database driver. In databases, then, a client “handle” connects to a server “session”.

Other meanings of “session”

DBAs work with software APIs, such as python libraries, that do not establish a connection while allocating what they call a “session”. I will mention three APIs: requests, sqlalchemy, and boto3, in which “session” refers to a data structure that is not always associated with a connection.

Requests

Requests is a python HTTP library. HTTP is a connectionless protocol. Each request to the HTTP server can be implemented by a separate, new network connection that is disconnected after each call. In the following example, the call makes a TCP connection to the server, sends a request, receives a response, and closes the connection.

>>> import requests
>>> from json import loads
>>> r = requests.get('https://httpbin.org/get?q=Hello')
>>> type(r)
<class 'requests.models.Response'>

Let’s verify that no connection remains. Suspend your python repl by pressing ctrl-Z.

>>>
[1]+ Stopped python3
$

Is requests still connected?

$ lsof -n -p $(pgrep python3) | grep https

No output here means that requests is no longer connected.

Requests offers an advanced option that preserves state and a connection across calls.

>>> from requests import Session
>>> ses = Session()
>>> type(ses)
<class 'requests.sessions.Session'>
>>> ses.get('https://httpbin.org/get?q=Hello')
<Response [200]>

Is ses still connected? Let’s see.

$ lsof -n -p $(pgrep python3) | grep https
python3 3387 bf2190 3u IPv4 125425570 0t0 TCP 10.130.99.84:36878->52.86.136.68:https (ESTABLISHED)

Yes. The Session is connected to the https server. If you make another call within a short time, requests will make that call on the same socket. If the connection is idle for approximately 2.5 minutes, then requests will close the connection. If you make another call after that, requests will open a new socket.

To summarize, a requests Session is a client side handle that is not connected when it is created, but gets connected on first use. The session remains connected during use, and disconnects after an idle timeout.

SQL Alchemy

SQL Alchemy is a python SQL toolkit and object relational mapper. Two objects used for establishing a connection are the Engine and the Session. The Engine contains information about the driver and the connection string.

from sqlalchemy import create_engine

eng = create_engine(
    connection_string,
    max_identifier_length=128
)
print(type(eng))
<class 'sqlalchemy.engine.base.Engine'>

The Session is an object that will eventually hold an established connection.

from sqlalchemy.orm import sessionmaker
db_sess = sessionmaker(bind=eng)()
print(type(db_sess))
<class 'sqlalchemy.orm.session.Session'>

So far, the Session is not connected, but will be after a call to connection()

conn = db_sess.connection()
print(type(conn))
<class 'sqlalchemy.engine.base.Connection'>

conn holds an established connection. The other way to connect is to simply use the session.

for row in db_sess.execute(text('select dummy from dual')):
    print('%s' % row['dummy'])
X

Now db_sess holds an established connection. In conclusion, the SQLAlchemy Session is an object that is not initially connected. The Session connects by a call to connection() or on first use.

boto3

boto3 is the AWS python library. It is used to manage AWS services. One such service is Relational Database Service (RDS). In boto3, you make API calls to manage your environment. For example, you can list all RDS db instance details by calling describe_db_instances. To make a call, you must first allocate a boto3 client. The constructor for the RDS service is client(‘rds’). You can call the constructor and run describe directly like so:

>>> from boto3 import client
>>> len(client('rds').describe_db_instances()['DBInstances'])
30

The output from describe_db_instances is verbose, but the results are not needed for this example, so len is used here to summarize the result (30 db instances). Because describe was called directly from the constructor, the client object goes out of scope immediately, and the connection is dropped:

>>> 
[1]+ Stopped python3 
$ lsof -n -p $(pgrep python3) | grep https 
$

In the next example, the boto3 client is saved to variable rds

>>> from boto3 import client
>>> rds = client('rds')
>>> type(rds)
<class 'botocore.client.RDS'>
>>> len(rds.describe_db_instances()['DBInstances'])
30
>>>
[1]+ Stopped python3
$ lsof -n -p $(pgrep python3) | grep https
python3 7128 bf2190 3u IPv4 125436458 0t0 TCP 10.130.99.84:60276->52.46.159.85:https (ESTABLISHED)

In this case, the client remains connected after the results are returned. After approximately 2 minutes of idle time, boto3 closes the connection. If you make another call after that, boto3 opens a new connection. In the next case, the client is within the scope of a function. When the function returns, the client does out of scope, and the connection gets dropped.

>>> from boto3 import client
>>>
>>> def desc():
... rds = client('rds')
... rds.describe_db_instances()['DBInstances']
...
>>> desc()
>>>
[1]+ Stopped python3
$ lsof -n -p $(pgrep python3) | grep https
$
In the final example, client rds is set outside the scope. When the function returns, the client remains in scope and connected to the AWS server.
>>> from boto3 import client
>>>
>>> rds = client('rds')
>>> def desc():
... rds.describe_db_instances()['DBInstances']
...
>>> desc()
>>>
[1]+ Stopped python3
$ lsof -n -p $(pgrep python3) | grep https
python3 7631 bf2190 3u IPv4 125437676 0t0 TCP 10.130.99.84:42598->54.239.31.3:https (ESTABLISHED)

The boto3 session

The boto3 Session is not a connection at all. It is an object that holds access credentials. The Session creates objects that connect to AWS, particularly the Client. You can use the session to manage across multiple regions in an account, multiple accounts, multiple users, multiple roles, or across tokens acquired at different times. You can use the session to override the access keys in your profile, in your environment, or in your service account.
In this example, we loop over two regions and count the number of option groups. We allocate a list of sessions
>>> from boto3.session import Session
>>>
>>> AWS_ACCESS_KEY_ID="ASIAW3NNBKAMBK2CUGNE"
>>> AWS_SECRET_ACCESS_KEY="8V7Qaama1Yvl6ADRfrFI0vNTegx+V56S3sY5/uX0"
>>> AWS_SESSION_TOKEN="IQoJb3JpZ2luX2VjENz//////////wEaCXVzLWVhc3QtMSJIMEYCIQDOnKeV4UGWCVxuSvmD+O1FPUJHbxZOCPa/njhGlxBo1gIhAIRky8kx0jUNl40dg0NKGHjn1aOjYKe9Hdhs6msAlmq7KokDCFQQARoMNDcxMTk4NjgzMTYwIgzXqUo5F7yN89PdSxkq5gL1HhFXOOjVa8Irz8fVwUazE4VAKVtYthND8bXkqTLm1BE3x0hbD54rzpae80UxmcCnPv2Ec3WH8L6N2a7AvqSfhAJa34pzqJ+AcLy4blcdlbwE8I7d8ds/rvoNFiowEf5EhOaP41ZOdtngzdIUN1byE01Vsij8l9Ai74iE5DUnFqmIajtbr2T0Ah9a5ovQmBBB5nyjhY0DBcV9Bj0B6R8swoDnd6NBDcdcxQNvPqzJfwHsqrOYNJVzn1/FQLj86sgwTumHa1WyEugKWO3tlgEuOb+4Y3SqaMQ/vgC7OV+cdKfRzCrK/H/XYkWliVt7Ct1fQ8sGkEyxBlxyemgfvXybJnrXmEx5YisIO4LFMAkpzqsKYNTNybEwDKZmOAN3geP2c2QxoGNGHZ0NcT9nXDmtwHFuO0x2OlPf/qYmdZmlFKIRqBbGNCOPaJ5YgwjuGtx0TqULwKpNlYuF9WkZz5VGvFo6C1MSMLnpupEGOqUBmaqzHmvTykPbaH03SR5J1pKIvHI/XVMcvaThT2UEl7xQhwY0OE/AwAgP0+dtm0G6Mt7I6F2oZ5x6S2gnFHlxb5ctrgC8CRavVkks+ehHM8iAeBIm8CMk4Cb9jFBWj6jXldhHZDOCnOaqVAFSOlTaqXD3ZPlSRW1iyN1vOrmHIMJsGKeb6PiaGz0a9omCE/HCewQkcqYJXBhaTHSRUF1oJL/+GCvw"
>>>
>>>
>>> sess = []
>>> for region in 'us-east-1 us-west-1'.split():
... ses = Session(
... aws_access_key_id=AWS_ACCESS_KEY_ID,
... aws_secret_access_key=AWS_SECRET_ACCESS_KEY,
... aws_session_token=AWS_SESSION_TOKEN,
... region_name=region
... )
... print(type(ses))
... sess.append(ses)
...
<class 'boto3.session.Session'>

next we loop over the sessions, and run describe in a function.

>>> for ses in sess:
... res = ses.client('rds').describe_option_groups()['OptionGroupsList']
... print(len(res)).
File "<stdin>", line 3
print(len(res)).
^
SyntaxError: invalid syntax
>>> for ses in sess:
... res = ses.client('rds').describe_option_groups()['OptionGroupsList']
... print(len(res))
...
4
0
>>>
[1]+ Stopped python3
$ cat ../pgrep.bash
#!/bin/bash
lsof -n -p $(pgrep python3) | grep https
$ ../pgrep.bash
$

There are 4 option groups in us-east-1 and 0 in us-west-1. The describe ran directly off the client constructor. The client went out of scope once the describe finished. No connection remains connected. Instead, let’s allocate a list of clients.

>>> from boto3.session import Session
>>>
>>> AWS_ACCESS_KEY_ID="ASIAW3NNBKAMBK2CUGNE"
>>> AWS_SECRET_ACCESS_KEY="8V7Qaama1Yvl6ADRfrFI0vNTegx+V56S3sY5/uX0"
>>> AWS_SESSION_TOKEN="IQoJb3JpZ2luX2VjENz//////////wEaCXVzLWVhc3QtMSJIMEYCIQDOnKeV4UGWCVxuSvmD+O1FPUJHbxZOCPa/njhGlxBo1gIhAIRky8kx0jUNl40dg0NKGHjn1aOjYKe9Hdhs6msAlmq7KokDCFQQARoMNDcxMTk4NjgzMTYwIgzXqUo5F7yN89PdSxkq5gL1HhFXOOjVa8Irz8fVwUazE4VAKVtYthND8bXkqTLm1BE3x0hbD54rzpae80UxmcCnPv2Ec3WH8L6N2a7AvqSfhAJa34pzqJ+AcLy4blcdlbwE8I7d8ds/rvoNFiowEf5EhOaP41ZOdtngzdIUN1byE01Vsij8l9Ai74iE5DUnFqmIajtbr2T0Ah9a5ovQmBBB5nyjhY0DBcV9Bj0B6R8swoDnd6NBDcdcxQNvPqzJfwHsqrOYNJVzn1/FQLj86sgwTumHa1WyEugKWO3tlgEuOb+4Y3SqaMQ/vgC7OV+cdKfRzCrK/H/XYkWliVt7Ct1fQ8sGkEyxBlxyemgfvXybJnrXmEx5YisIO4LFMAkpzqsKYNTNybEwDKZmOAN3geP2c2QxoGNGHZ0NcT9nXDmtwHFuO0x2OlPf/qYmdZmlFKIRqBbGNCOPaJ5YgwjuGtx0TqULwKpNlYuF9WkZz5VGvFo6C1MSMLnpupEGOqUBmaqzHmvTykPbaH03SR5J1pKIvHI/XVMcvaThT2UEl7xQhwY0OE/AwAgP0+dtm0G6Mt7I6F2oZ5x6S2gnFHlxb5ctrgC8CRavVkks+ehHM8iAeBIm8CMk4Cb9jFBWj6jXldhHZDOCnOaqVAFSOlTaqXD3ZPlSRW1iyN1vOrmHIMJsGKeb6PiaGz0a9omCE/HCewQkcqYJXBhaTHSRUF1oJL/+GCvw"
>>>
>>> rdss = []
>>> for region in 'us-east-1 us-west-1'.split():
... rds = Session(
... aws_access_key_id=AWS_ACCESS_KEY_ID,
... aws_secret_access_key=AWS_SECRET_ACCESS_KEY,
... aws_session_token=AWS_SESSION_TOKEN,
... region_name=region
... ).client('rds')
... rdss.append(rds)
...

Now loop over the clients.

>>> for rds in rdss:
... res = rds.describe_option_groups()['OptionGroupsList']
... print(len(res))
...
4
0
>>>
[1]+ Stopped python3
$ ../pgrep.bash
python3 6587 ec2-user 3u IPv4 26002 0t0 TCP 10.0.16.52:40794->52.119.197.147:https (ESTABLISHED)
python3 6587 ec2-user 4u IPv4 26004 0t0 TCP 10.0.16.52:39852->176.32.118.192:https (ESTABLISHED)
Because the list is in the outer scope, the clients remain in place after the describe finishes and the clients remain connected to the AWS server.
One session maps to one account and region, but that Session can create multiple Clients, where each Client can connect to AWS. In conclusion, the boto3 Session is an object containing tokens that are needed create session objects that can connect to AWS. The boto3 Session itself does not connect to the AWS server.

Conclusion

When I started applying python to my database administration job, I ran across various APIs that used the a “session” that was not a connection to the server. In the three APIs mentioned here, requests, SQL Alchemy, and boto3, the Session is not itself a connection, but it can connect and remain connected for a time. The SQL Alchemy session can be used create a connection to a database. The boto3 Session can create a client that connects to the AWS server.

Elastic Block Store throughput testing with Orion

By Brian Fitzgerald

Introduction

ORacle I/O Numbers (Orion) results for EBS volumes are presented here. Multiple configurations of EC2 instance type, number of devices, IOPS configuration, and throughput configuration are tested. The objective is to identify the best performing and most economical system for use in Oracle Automatic Storage Management (ASM).

Amazon AWS EC2 EBS

AWS EC2 offers I/O capacity for a price. You get a slice of the underlying hardware’s full bandwidth depending on how much you pay. The actual throughput depends on the EC2 instance’s device controller and the underlying volume. EC2 device controller capacity depends on instance class (m5, r5b, etc.), and size (large, 4xlarge, etc.). EBS volume capacity depends on volume type (gp3, io2, etc.) and configuration (throughput and IOPS). Maximum I/O capacity will be the lesser of EC2 capacity and EBS volume capacity, provided that you get the layout right.

The I/O capabilities of the EBS volume types that were tested are summarized here:

Type gp3 gp2 st1 io2
Purpose General General Low cost High IOPs, low latency
Medium ssd ssd magnetic ssd
Configurable throughput Yes No No No
Maximum throughput configuration (Mbps) 1000
Configurable IOPS Yes Yes
Max IOPS configuration 160000 256,000

The EBS test volumes were not encrypted.

This article places emphasis on optimizing throughput, but some IOPS and latency observations are presented here as well. As a limiting case, we are interested in 100% write I/O throughput capacity.

I/O throughput rating on EC2

We are mainly concerned with the modern, Nitro EC2 m5, c5, r5, and r5b instance types. Throughput is defined as the rate, in Mbps for large (128 KiB) I/O, and could refer to a read, write, or mixed (read-write) workload.

EC2 throughput rating can be found by running “aws ec2 describe-instance-types”, and is divided into two ranges, according to instance size, as shown in the following figure. The number of CPUs in EC2 maps to instance size thus:

Number of CPUs Instance size
2 large
4 xlarge
8 2xlarge
16 4xlarge
32 8xlarge
48 12xlarge
64 16xlarge
96 24xlarge

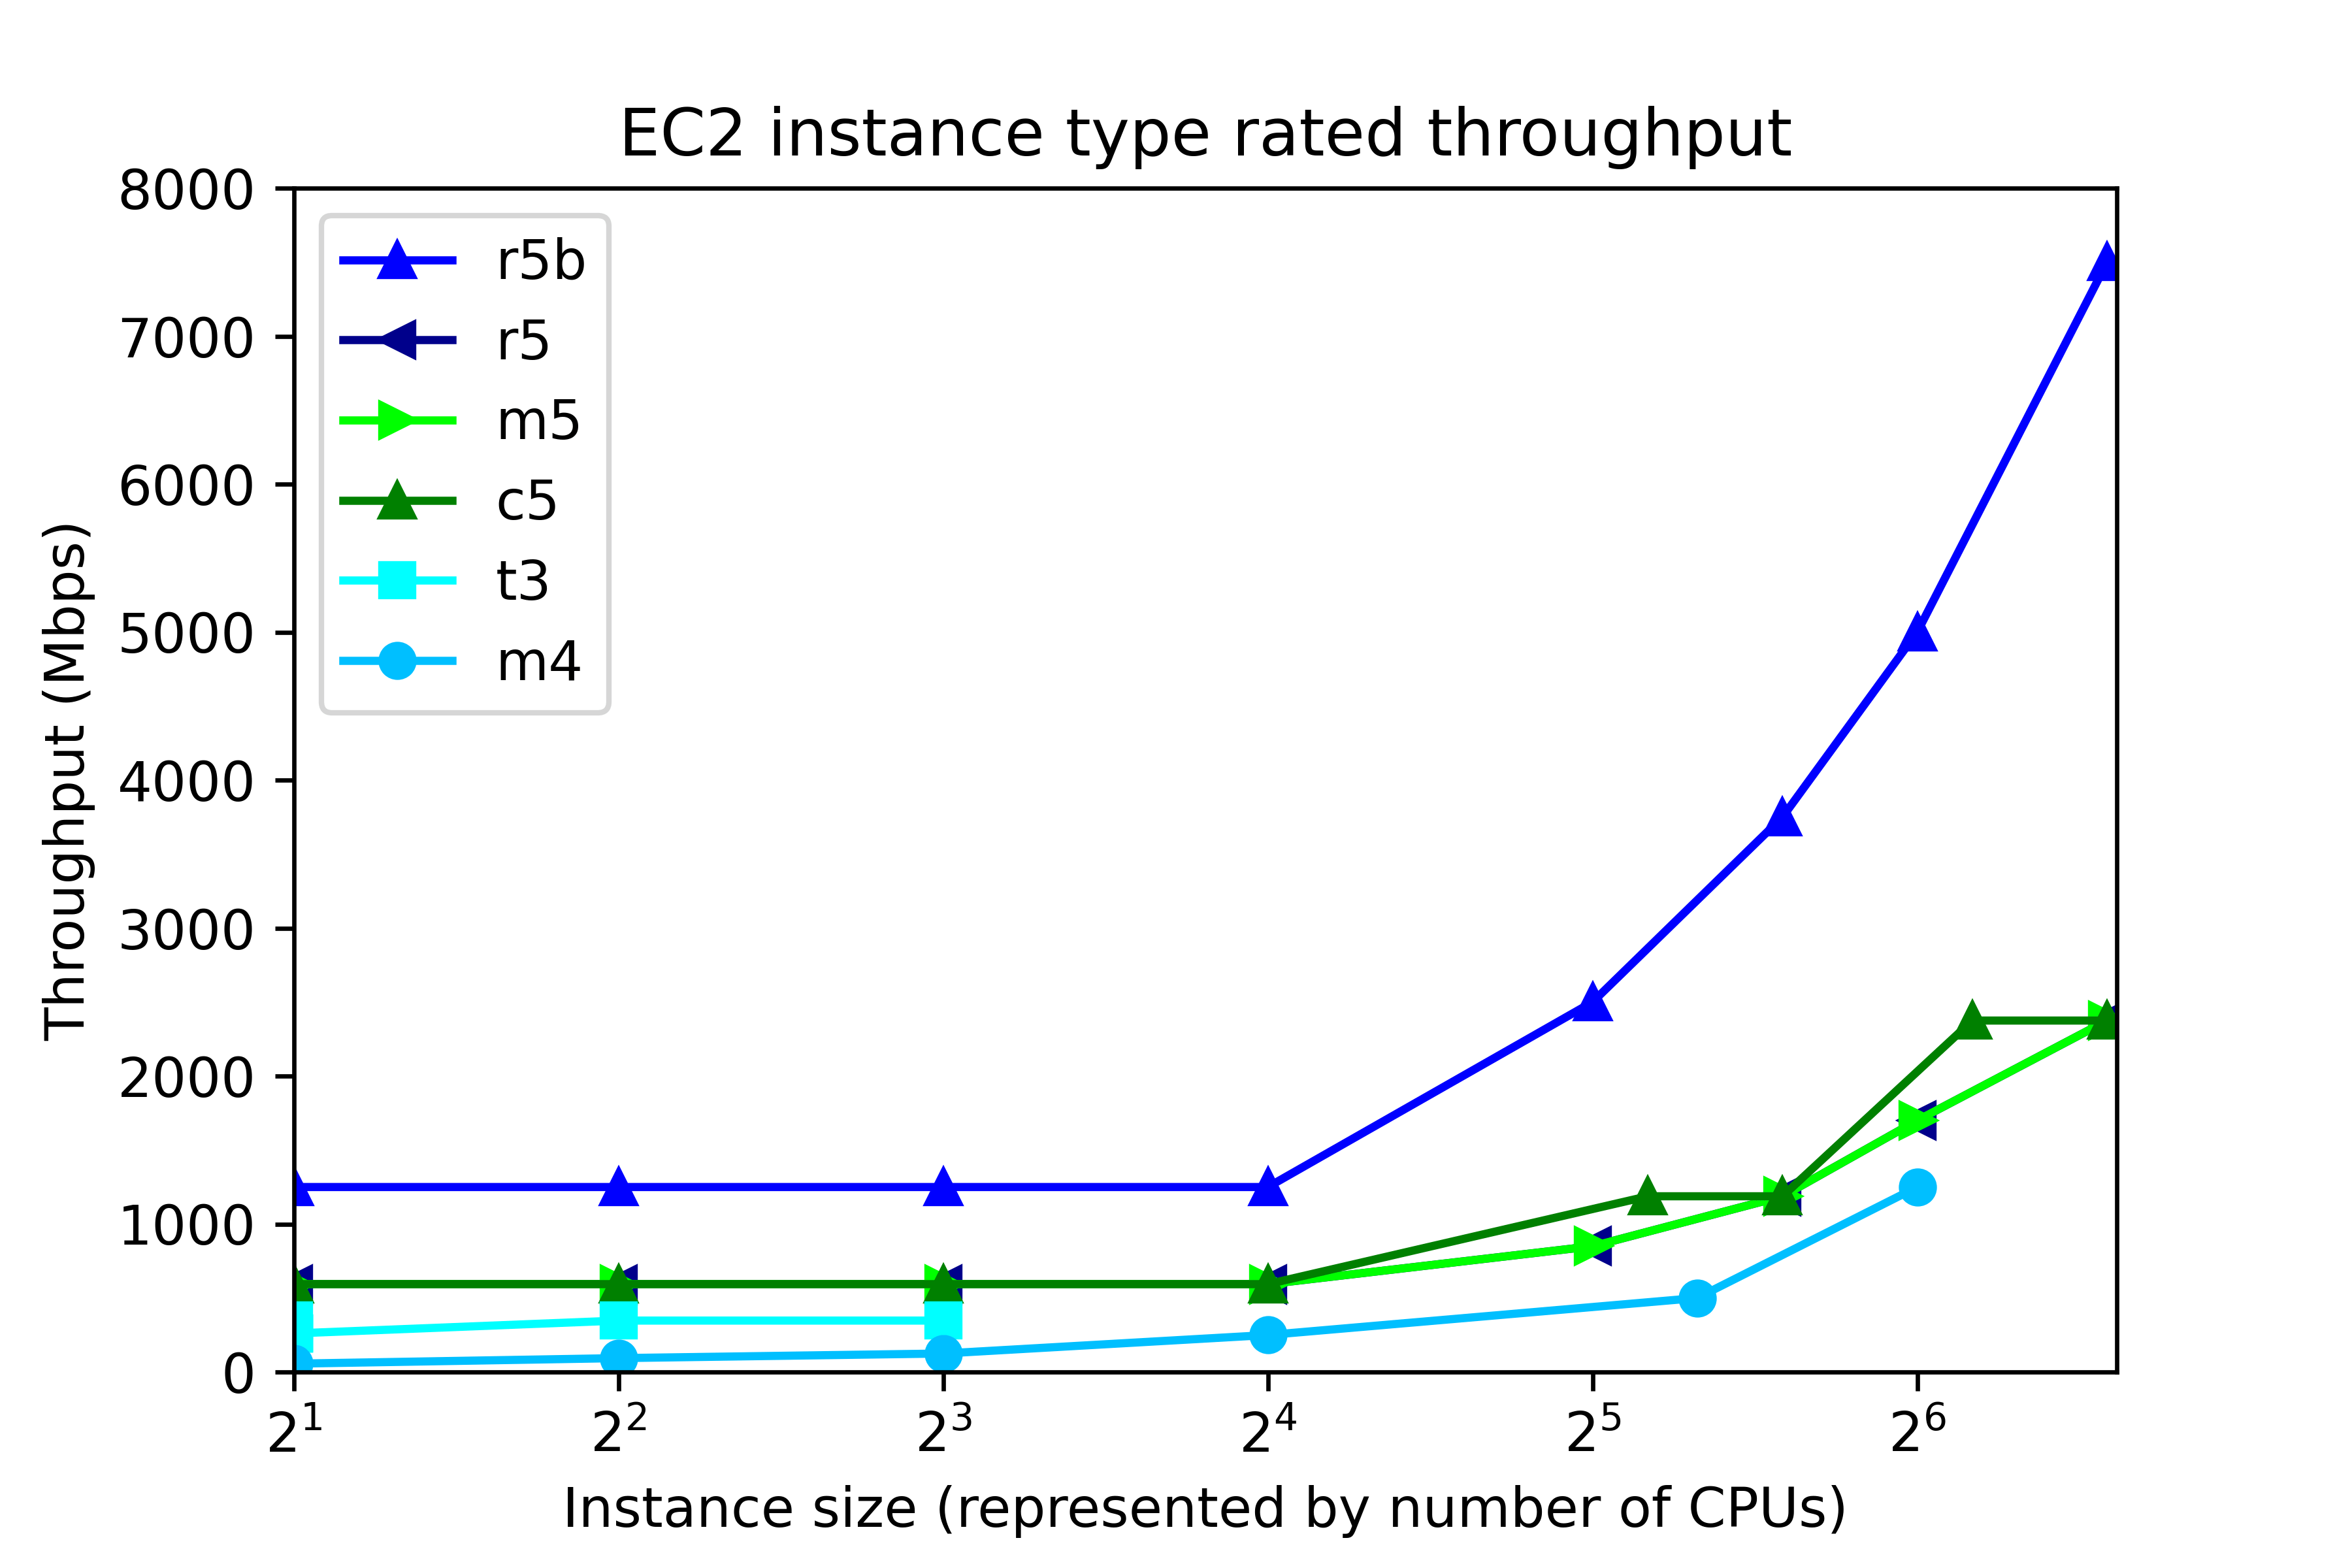
At the low end, up to 4xlarge, throughput is capped at a single value, regardless of instance size. That cap depends on instance class. In r5b, the cap is 1250 Mbps, but for c5, m5, and r5, throughput is capped at 593.75 Mbps. Other instance classes have lower throughput caps. At the high end, 8xlarge and up, throughput depends on the instance size. The r5b instance class tops out at 7500 Mbps. m5, c5, and r5 classes have throughput that ranges from 850 Mbps to 2375 Mbps, depending on instance type.

By now we have described the available volume types and instance types. So let’s pose this question. If we configure 8 gp3 volumes at 1000 Mbps each, then the system should deliver 8000 Mbps throughput, right?

Wrong.

No EC2-EBS-Linux system today delivers 8000 Mbps throughput. You will get, at best, the throughput offered by the EC2 instance type. For example, if you build an m5.4xlarge instance, then the highest possible throughput will be 593.75 Mbps, as I mentioned. Also, 593.75 Mbps is the most you will get. Actually achieving that requires configuring multiple volumes.

Operating system description

The test system is an Amazon AWS EC2 instance running Red Hat Linux 7.9. The test software is orion, which is found in the Oracle home. The number of CPUs, the amount of memory, and the device controller interface depend on the EC2 instance type. For example, the m5.xlarge has 4 CPUs, 16 GB RAM, and a non-volatile memory express (NVMe) device controller interface.

Test description

100% write I/O was tested with orion. General purpose volumes (gp2 and gp3), and the lower cost st1 storage were tested with large writes. I/O optimized storage (io2) was tested at small I/O. Each test ran from 4 to 20 minutes, depending on the number of volumes. For the throughput tests, “Maximum Large MBPS” was extracted from the summary.txt file. In the small I/O tests, “Maximum Small IOPS” and “Minimum Small Latency” were extracted.

Instance type and volume type

In this section, the influence of instance type and volume type in investigated. The new I/O-optimized r5b instance type was tested with gp3 storage. General purpose m5 instance class was tested with gp2, gp3, and io2 storage. Additionally, the lower cost, burstable t3 instance class, and the previous generation m4 instance class were tested. The number of CPUs ranged from 2 to 96. As a rule of thumb, the amount of memory for the m5, t3, and m4 instance classes, in GB, is four times the number of CPU. Eight 125-GB volumes were tested in every run. In all, there were 31 test runs.

Throughput testing

General  purpose storage was tested for throughput. gp3 storage was configured for 1000 Mbps throughput per volume (the maximum) and 4000 IOPS The results are displayed here.Each point represents the maximum throughput obtained in a single test. The dark blue line, for example, displays Orion throughput results for 6 tests on r5b.large, r5b.4xlarge, r5b.8xlarge, r5b.12xlarge, r5b.16xlarge, r5b.24xlarge, The test points above 24 are results of separate tests on r5b.4xlarge, m5.4xlarge on gp3 volume type, m5.4xlarge on gp2 volume type, t3.4xlarge, m4.4xlarge, and m5.4xlarge on st1 volume type. Again, each point is a separate test, not Orion data points from a single test.

The figure shows actual system throughput for 8 volumes. We already said that just because you configure 8 1000 Mbps volumes does not mean that the observed throughput will be 8000 Mbps. Instead, the throughput is limited by the instance type.

The key points to notice in the throughput testing are:

  • The observed throughput is level across instance types up to 4xlarge (24 CPUs), just like the documentation says.
  • Starting at 8xlarge, (25 CPUs), gp3 throughput scales up with the instance size, reaching 7330 Mbps on the r5b.24xlarge instance type, and 2330 Mbps on m5.24xlarge, again, just like the documentation says.
  • Like gp3 on the m5, gp2 throughput is level at 580 Mbps for instances up to 4xlarge.
  • From 12xlarge and up, gp2 throughput is level at 1015 MPBs.
  • For t3.xlarge and up, throughput plateaus at 335 Mbps.
  • In older instance class m4, throughput ranges from 55 Mbps to 240 Mbps.

Notice that in high-end instance types, r5b throughput is better than 3x the m5 throughput. This is one example where actual observations match the marketing materials: New – Amazon EC2 R5b Instances Provide 3x Higher EBS Performance

By using the number of CPUs on the horizontal axis, we do not mean to imply that CPUs have a significant influence on system throughput in EC2. In fact, during ORION testing, CPU workload tends be low, and the same can be said for memory footprint. Plotting vs “Number of CPUs” is just meant to be a convenient method for having plotting I/O numbers vs instance size. AWS throttles throughput depending on instance type and size, separately from the number of CPUs.
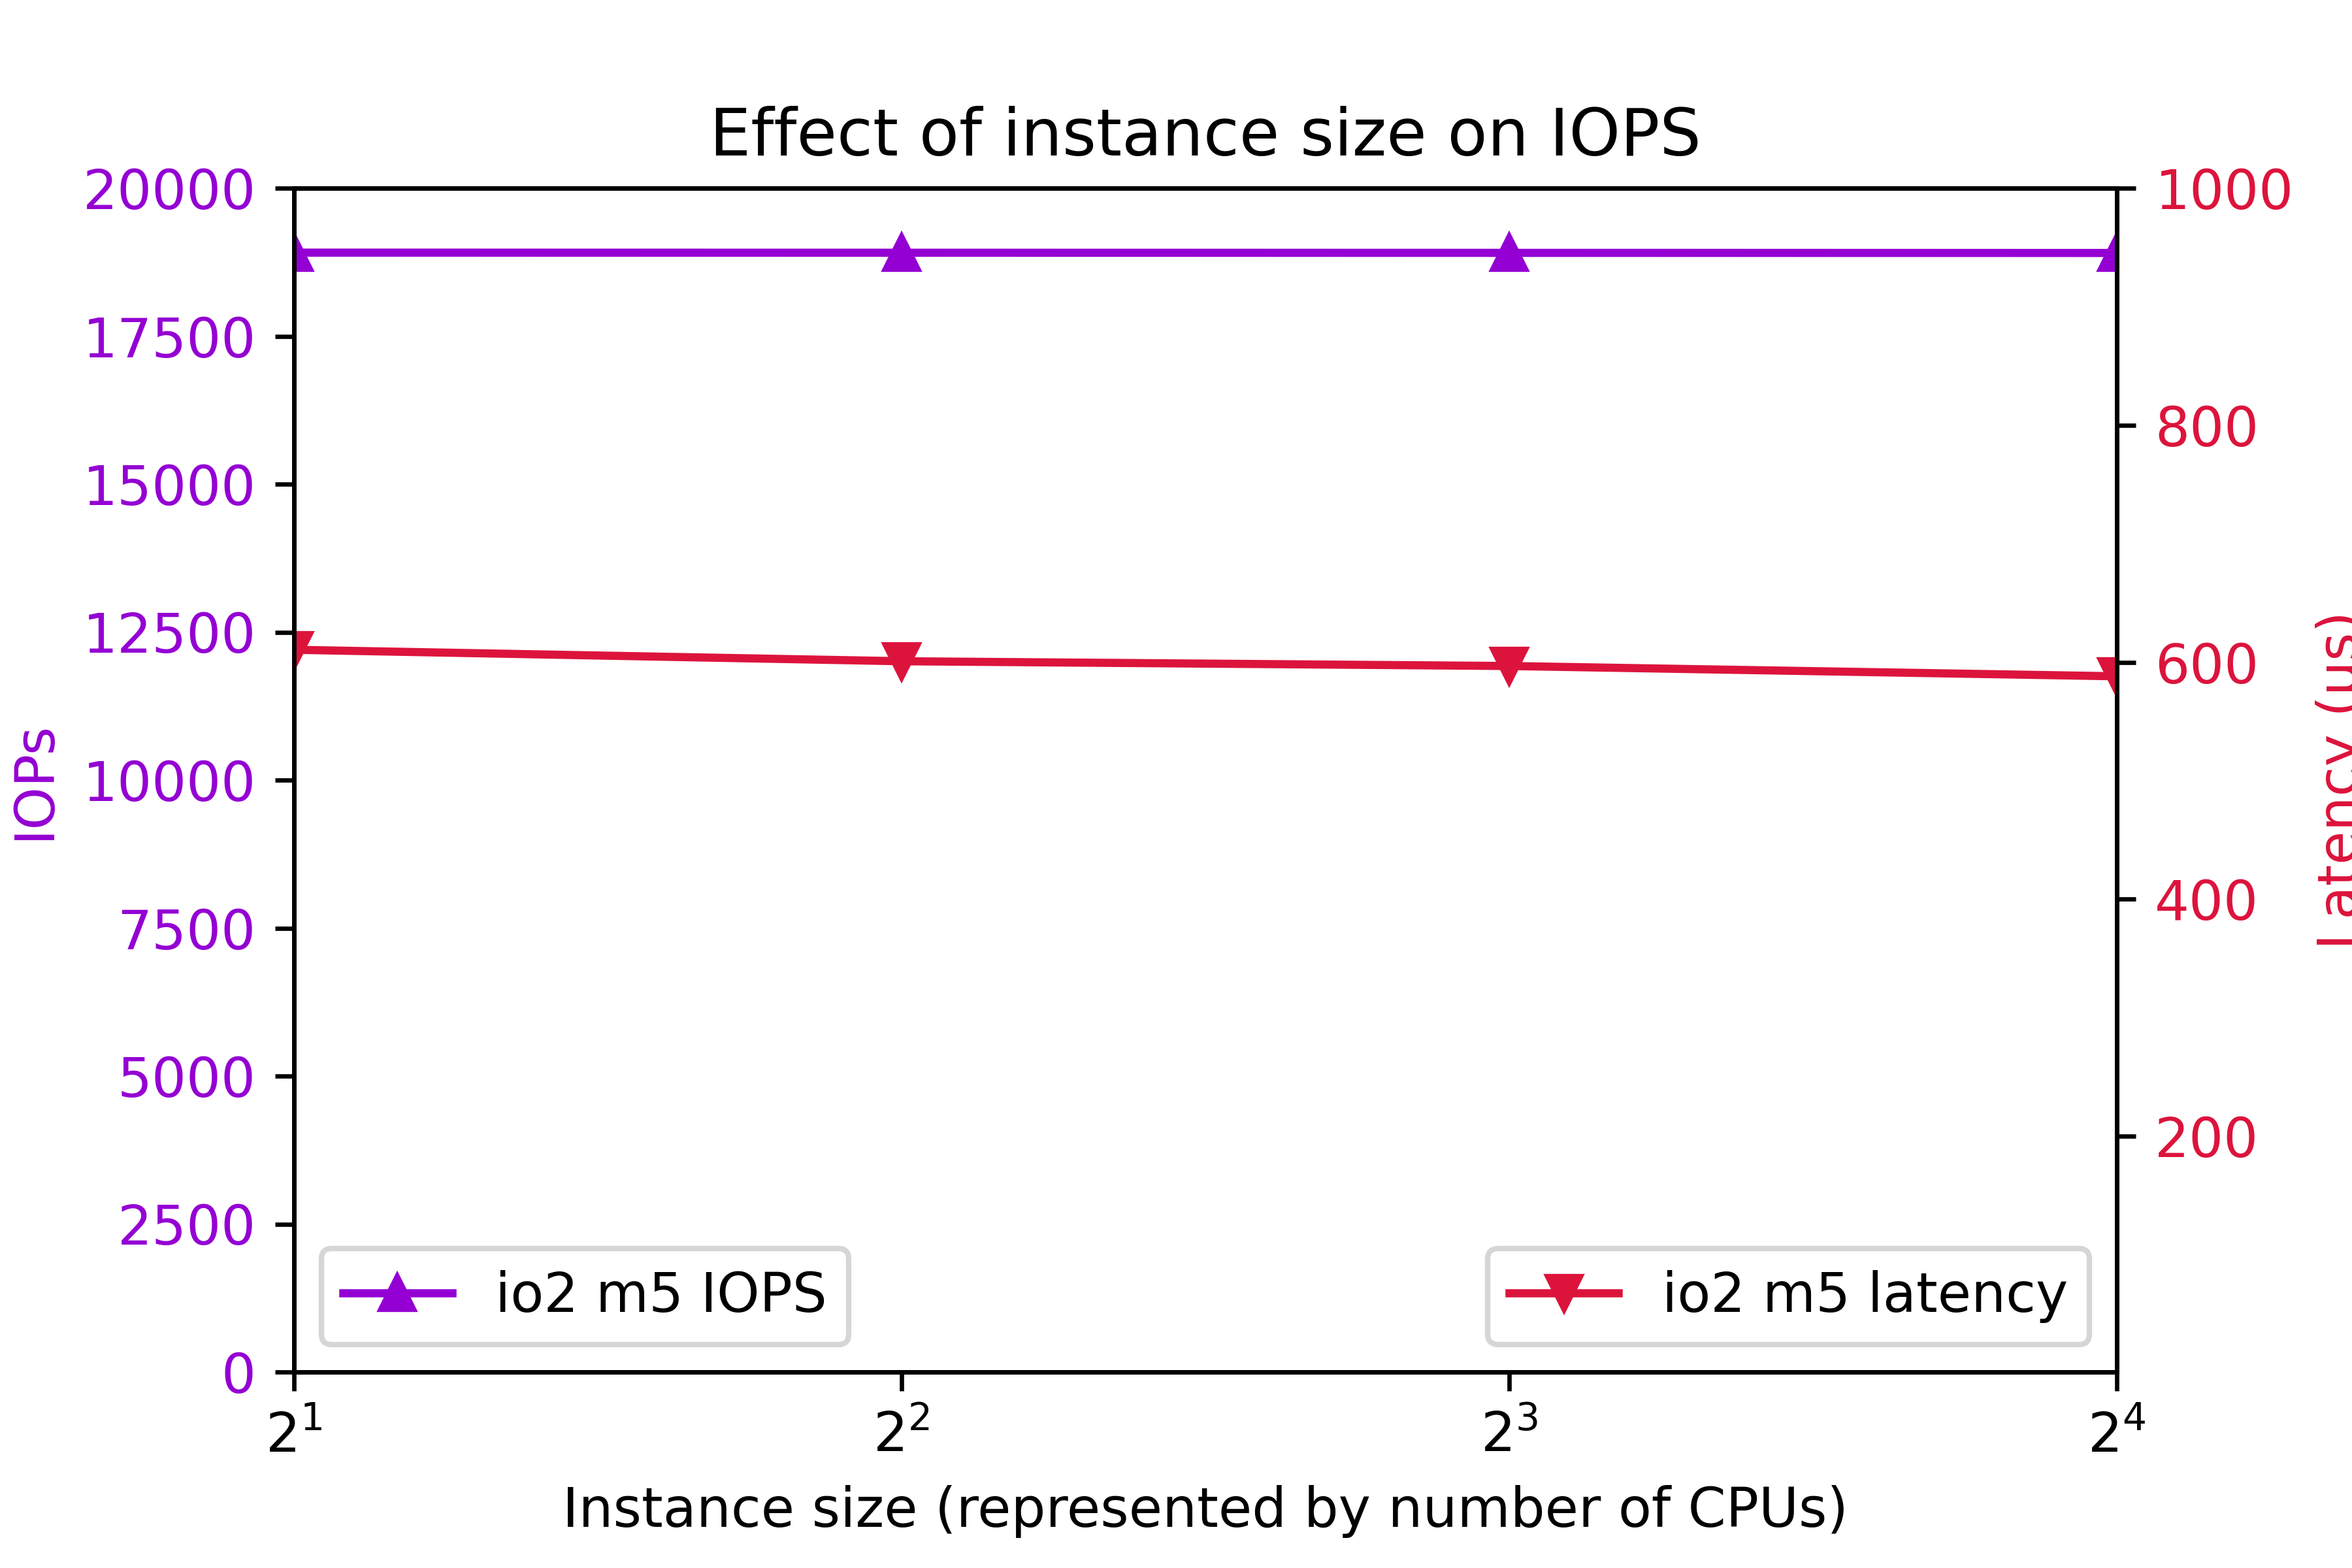
IOPS testing

I/O Optimized storage io2 configured for 7000 IOPS per volume on the m5 class was also tested. 8 volumes were tested.Again, to clarify, configured IOPS for each volume was 7000. You might think that configuring 8 volumes are 7000 IOPS per volume should deliver 56000 IOPS. As you can see, actual IOPS is less.

The key IOPS testing observations are:

  • IOPs is flat at 18905.
  • Latency is flat at 600ms.

Conclusion

  • r5b throughput outperforms m5 by better than 3x.
  • I/O performance is level up to 4xlarge.
  • Starting at 8xlarge, throughput ramps up with instance class.
  • 24xlarge delivers the highest throughput.
  • t3 write throughput lags m5, and m4 write throughput lags t3.
  • The observed system I/O rate is much less than you would expect if you calculated I/O rate based on the volume configuration.

This section was an overview of the capabilities of various EC2 instance types and volume types with eight volumes. As we are about to see, tuning the number of volumes is crucial to optimizing instance performance.

Number of volumes

The influence of the number of volumes on I/O was tested for various instance types. The number of volumes ranged from 1 to 16. Throughput was tested on general purpose volume types gp2 and gp3. The gp3 storage was configured for 1000 Mbps and 4000 IOPs per volume. The results are shown in the following figure:Additionally, IOPS was measured on on I/O optimized volume type io2. IOPS was set at 7000 per volume. The results are shows here:The key findings are

  • For improved throughput, I/O should be distributed across multiple volumes.
  • In r5b.24xlarge, throughput increases all the way out to 7300 Mbps at 16 volumes.
  • In r5b8xlarge and m5.24xlarge, throughput levels off around 2400 Mbps at 8 volumes.
  • On m5.large, gp2 and gp3 throughput levels off at 580 Mbps at four volumes.
  • On m5.large, io2 IOPs plateaus at 18905 IOPs at four volumes.
  • io2 latency tends to remain below 625ms.

Be aware that the EC2 device attachment limit is 28, including the network adapter and up to 27 volumes, including the system disk. A practical Oracle ASM system could consist of two diskgroups and four or more disks per group.

In conclusion, one can expect improve I/O by implementing four volumes. In high end systems, configuring eight or more volumes is beneficial. Exercise prudence on the number of volumes, because throughput and IOPS charges are per-volume.

Configured volume throughput

So far, we have tested volumes that are over-provisioned, meaning that measured throughput turned out to be much less than rated throughput. You don’t get what you pay for. So how much throughput should you actually be configuring?

In this section, we investigate the effect of configured throughput versus actual throughput on gp3 volumes. gp3 volumes were configured at 3000 IOPs and a throughput range from 125 Mbps to 1000 Mbps. Various m5 and r5b instance types were tested. The results are shown here.In the m5.large, m5.24xlarge, and r5b.8xlarge cases, setting volume throughput to 375 Mbps achieves the maximum possible system throughput. Setting volume throughput higher than that leads to no further gains in performance. In r5b.12xlarge and r5b.24xlarge, performance can be maximized by setting throughput to 500 Mbps. In conclusion, although gp3 throughput can be adjusted to 1000 Mbps, there is no benefit to setting gp3 throughput above 500 Mbps, and only in rare cases is it beneficial to set gp3 throughput above 375 Mbps.

Intel vs. AMD

AWS offers a choice of Intel or AMD processor on Red Hat EC2. AMD EC2 prices are 10% lower than Intel. Rated EBS throughput on the AMD systems is less than on Intel.

AMD
Intel
instance type throughput (Mbps) instance type throughput (Mbps)
t3a.medium t3.medium
m5a.large 2880 m5.large 4750
m5a.24xlarge 13570 m5.24xlarge 19000

The test system configurations were:

Instance type CPUs Volumes Storage Throughput IOPS
t3[a].medium 2 4 st1
m5[a].large 2 8 gp3 375 3000
m5[a].24xlarge 96 8 gp3 375 3000

“t3[a].medium” refers to a comparison of a t3a.medium (AMD) system to a t3.medium (Intel) system, and so on, for m5[a].large and m5[a].24xlarge.At the low end instance types, AMD and Intel performed equally. At the high end, Intel edged AMD.

Systems for different purposes

Recommendations for three different type of systems are presented here. The target system is Oracle Database on top of Grid Infrastructure on Red Hat. Only systems with at least 2 CPUs and 4 GB RAM are considered. A “system” could refer to an ASM diskgroup, such as DATA, RECO, or REDO.

Low cost

You might need a low cost system for light development, well-tuned reports, archiving, etc. Use the t3a instance class and st1 storage.

General purpose

For general purpose production systems, use the m5 class. If you want to halve the memory, substitute c5 and save 9% to 11%. To double the system memory, use r5 and pay 24% to 30% more. Configure four or more gp3 volumes per ASM diskgroup at 125 Mbps to 375 Mbps throughput and 3000 IOPS.

High throughput

For highest large write throughput on EBS, use r5b.24xlarge, and at 16 gp3 volumes configured at 500 Mbps.

Example systems and cost

Example of the three types of system are presented in this table. This time, we present CPU and storage cost, assuming Red Hat Linux and on demand pricing in region us-east-1, as of 7/24/2021.

Purpose Instance Type Vol type Num CPU Vol Size Num Vols Thr IOPS Actual Mbps EC2 EBS Total
Low cost t3a.medium st1 2 125 8 245 $71 $45 $116
General purpose m5.large gp3 2 250 4 125 3000 497 $114 $80 $194
High throughput r5b.24xlarge gp3 96 1000 16 500 3000 7330 $5316 $1522 $6838

Do not waste money

Follow this guidance to avoid wasting money

  • Avoid io2 EBS for general purpose Oracle databases. The cost is prohibitive.
  • In gp3, configure throughput at 500 Mbps or less, and configure 3000 IOPS.
  • For good, economical performance, configure gp3 at 125 Mbps and 3000 IOPS.

Workload

This article offers guidance on configuring the AWS EBS at 100% write. The findings apply to any diskgroup, particularly to redo diskgroups and to databases with high throughput requirements, such as ETL systems. The information is among many factors to consider when specifying a practical database system. Orion is also capable of simulating a 100% read workload, and a mixed workload. Mixed workload Orion results could be used to look for further cost reductions. Actual database application performance depends not only on storage throughput, but also on processor design, amount and speed of memory, and table design.

ASM diskgroup layout

Oracle makes ASM diskgroup layout recommendations: RAC and Oracle Clusterware Best Practices and Starter Kit (Platform Independent) (Doc ID 810394.1).

Oracle recommends a minimum 4 disks per diskgroup:My own test results show that a minimum of 4 LUNs per diskgroup lead to optimal throughput. Configuring 4 or more LUNs per diskgroup is extremely important.

Oracle recommends no more than 2 ASM diskgroups:Benefits of no more than 2 ASM diskgroups:

  • Simplified administration.
  • High throughput in all diskgroups.
  • Avoid approaching the EC2 attachment limit.

If you configure more than 2 diskgroups, you could find yourself making design compromises at exactly the wrong places. For example, online redo logs are critical, high throughput components. If you configure separate REDO diskgroups in EC2, then you may find it difficult to keep to 4 disks per diskgroup, and still allow for expansion and remain within the attachment limit. Or you may find that so many diskgroups leads to a manageability issue.

Conclusion

The r5b instance class with gp3 storage delivers the highest performing I/O. m5, c5, and r5 instance classes make well-performing, general purpose systems with high throughput. The t3a instance class with st1 storage makes a fair-performing, low cost system. Each ASM disk groups should be configured with a minimum of 4 disks and more than 4 disks for high throughput r5b systems. For optimal throughput, gp3 EBS should be configured at 3000 IOPS and no more than 500 Mbps.

No disk groups mounted after Grid 12.1 upgrade to 18c

Introduction

After an apparently successful upgrade from Grid 12.1 to 18c, the ASM disk groups failed to mount.

Scenario

An upgrade from Grid 12.1 to 18c happened. The DBA had used gridSetup.sh.

After the upgrade, no disk groups were found to be mounted. There had been no warnings before this happened.

Other application groups were waiting, so there was pressure to bring up the system.

Symptoms

  1. No disk groups got mounted.
  2. This error appears in the ASM alert log:
ORA-15032: not all alterations performed
ORA-59303: The attribute compatible.asm (11.2.0.0.0) of the diskgroup being mounted should be 11.2.0.2.0 or higher.

Notice that tools that refer to disk groups will not work

asmcmd lsdsk –discovery shows ASM disks, but no disk groups.

$ asmcmd lsdsk --discovery -g
Inst_ID  Path
      1  ORCL:ASM_DATA_VOL1
      1  ORCL:ASM_DATA_VOL2
      1  ORCL:ASM_DATA_VOL3
      1  ORCL:ASM_DATA_VOL4
      1  ORCL:ASM_DATA_VOL5
      1  ORCL:ASM_RECO_VOL1
      1  ORCL:ASM_REDO_VOL1

Mount with force option will not work. Ex:

asmcmd mount -f DATA1

This will not work:

SQL> ALTER DISKGROUP DATA1 SET ATTRIBUTE 'compatible.asm' ='11.2.0.2.0';
ALTER DISKGROUP DATA1 SET ATTRIBUTE 'compatible.asm' ='11.2.0.2.0'
*
ERROR at line 1:
ORA-15032: not all alterations performed
ORA-15001: diskgroup "DATA1" does not exist or is not mounted

This will not work:

SQL> alter diskgroup DATA1 mount;
alter diskgroup DATA1 mount
*
ERROR at line 1:
ORA-15032: not all alterations performed
ORA-59303: The attribute compatible.asm (11.2.0.0.0) of the diskgroup being
mounted should be 11.2.0.2.0 or higher.

Notice that the ASM disks are ok

asmlib:

$ oracleasm listdisks
ASM_DATA_VOL1
ASM_DATA_VOL2
ASM_DATA_VOL3
ASM_DATA_VOL4
ASM_DATA_VOL5
ASM_RECO_VOL1
ASM_REDO_VOL1

kfed:

$ kfed op=read dev=/dev/oracleasm/disks/ASM_DATA_VOL1
kfbh.endian:                          1 ; 0x000: 0x01
etc..
kfdhdb.dskname:           ASM_DATA_VOL1 ; 0x028: length=13
kfdhdb.grpname:                   DATA1 ; 0x048: length=5
etc.
kfdhdb.compat:                186646528 ; 0x020: 0x0b200000

The ASM disk and ASM group name look good.

Hex b refers to oracle version 11. The zeros following the 2 apparently mean that the disk group version is 11.2.0.0.0.

Cause

Oracle 12.2, 18c, and 19c binaries cannot mount a compatible 11.2.0.0.0 disk group. The manual states:

Starting with Oracle ASM version 12.2.0.1, the minimum and default settings for Oracle ASM disk group attributes are:

  • COMPATIBLE.ASM = 11.2.0.2

If you are reading the Oracle grid upgrade manual, you might not notice any checks that could prevent this mistake. The Oracle 19c Grid Upgrade manual checklist hints at the problem:

Our 18c gridSetup.sh as patched (18.3) does not check for this, and lets you start the upgrade, which leads to the problem.

Approach (with a downside)

Downgrade grid to the previous version (12.1).

In the 18c grid home, attempted this step from the 18c manual:

# cd crs/install
# ./rootcrs.sh -downgrade
Using configuration parameter file: /ora_local/apps/oracle_grid/product/18.0.0/grid_18c/crs/install/crsconfig_params
The log of current session can be found at:
  /ora_local/apps/oracle/crsdata/evp003-eldb/crsconfig/crsdowngrade_evp003-eldb_2021-01-20_10-48-42AM.log
2021/01/20 10:48:44 CLSRSC-457: Oracle Restart is currently configured and cannot be deconfigured using this Oracle Clusterware deconfiguration command.
Died at /ora_local/apps/oracle_grid/product/18.0.0/grid_18c/crs/install/crsdowngrade.pm line 260.
The command '/ora_local/apps/oracle_grid/product/18.0.0/grid_18c/perl/bin/perl -I/ora_local/apps/oracle_grid/product/18.0.0/grid_18c/perl/lib -I/ora_local/apps/oracle_grid/product/18.0.0/grid_18c/crs/install /ora_local/apps/oracle_grid/product/18.0.0/grid_18c/crs/install/rootcrs.pl -downgrade' execution failed

Did instead:

# cd crs/install
# ./roothas.sh -deconfig

This step wipes out ocr.

In the 12.1 grid home

# cd crs/install
# ./roothas.sh

Now grid is running on 12.1 with just the basics, but not cssd.

Downside

roothas deconfig wipes out your crs. You will have to manually start cssd and re-add your ASM and database resources.

Workaround

Start cssd, etc.

# crsctl start resource -all

Start ASM

To get things rolling, you could create an ASM pfile. Remember that ASM needs to know which disk groups to mount, so be sure to configure asm_diskgroups

init+ASM.20210120

large_pool_size          = 12M
instance_type            = "asm"
remote_login_passwordfile= "EXCLUSIVE"
asm_diskgroups =  DATA1,REDO1,RECOVERY1
asm_power_limit          = 1
diagnostic_dest          = "/ora_local/apps/oracle"

start

SQL> startup mount pfile='init+ASM.20210120'
ASM instance started

Total System Global Area 1136934472 bytes
Fixed Size                  8666696 bytes
Variable Size            1103101952 bytes
ASM Cache                  25165824 bytes
ASM diskgroups mounted
ASM diskgroups volume enabled

You can successfully create an spfile, with this error message:

SQL> create spfile='asmspfile.ora'  from pfile =  'init+ASM.20210120';
create spfile='asmspfile.ora'  from pfile =  'init+ASM.20210120'
*
ERROR at line 1:
ORA-29786: Oracle Restart attribute GET failed with error [Attribute 'SPFILE'
sts[200] lsts[0]]

Add asm to crs

$ srvctl add asm -spfile asmspfile.ora

Start databases. Details omitted for brevity. Start with sqlplus. configure in crs with srvctl add database.

Final state

  • Grid 12.1 is up
  • ASM is up with all disk groups mounted.
  • Databases up

Follow up steps

To reattempt the Grid 18c upgrade:

  • In all disk groups, change compatible.asm 11.2.0.2.0 or higher
  • Retry the Grid 18c upgrade

Conclusion

During an upgrade from Grid 12.1 to 18c, the step to upgrade the disk groups to compatible 11.2.0.2.0 got missed. As a result, the 18c software could not mount the disk groups. kfod revealed that the ASM disks were intact, though.

The downgrade step found in the manual, rootcrs.sh -downgrade, failed, so I ran roothas.sh -deconfig, followed by roothas.sh in the 12c grid home. That worked, but I had to start cssd manually, and register ASM and the databases.

Launch AMI by name in terraform

By Brian Fitzgerald

Introduction

Using Terraform, you can launch an AWS EC2 instance from any account and any region using a public AMI identified only by image name. Because you do not need to lookup the image id each time, your code can be simplified.

Approach

Red Hat account number

In the AWS console, notice that the Red Hat, Inc. account number is 309956199498.


AMI name

Find the Red Hat AMI image by name. In the console, navigate to EC2 Images AMIs. Filter on Owner: 309956199498, Architecture: 64-bit (x86), Virtualization type: HVM.

For example, “RHEL-7.9_HVM_GA-20200917-x86_64-0-Hourly2-GP2”. You could also search using the AWS command line:

$ aws ec2 describe-images --owners 309956199498 --filters "` cat filters.ami.json `" --region us-east-2

where filters.ami.json contains:

[
    {
        "Name": "architecture",
        "Values": [
             "x86_64"
        ]
    },
    {
        "Name": "virtualization-type",
        "Values": [
             "hvm"
        ]
    }
]

Terraform data source

Define a Terraform aws_ami data source.

ami-rhel.tf

data "aws_ami" "rhel" {
    most_recent = true
    owners = [
        "309956199498"
    ]
    filter {
        name   = "name"
        values = [
            "RHEL-7.9_HVM_GA-20200917-x86_64-0-Hourly2-GP2"
        ]
    }
}

aws instance resource

Use the data source in your Terraform aws_instance resource

provider "aws" {
    region      = var.region
}

resource "aws_instance" "your-ec2-rsrc" {
    ami           = data.aws_ami.rhel.image_id

and so on . . .

Launch the ec2 instance

Run “terraform apply”. Terraform determines the AMI ID. For example, ami-0d2bf41df19c4aac7.

Conclusion

By using the Terraform AWS AMI data source, you can launch a public AMI from any account and region. The AMI ID is different for each account and region.

aws lambda publish-layer-version fails silently

By Brian Fitzgerald

Introduction

aws lambda publish-layer-version fails silently. Out of memory is the root cause. Changing the instance type fixes the problem.

Symptoms

aws lambda publish-layer-version produces no output. The exit status is nonzero.

[root@ip-172-31-62-89 layers]# aws lambda publish-layer-version --layer-name oracle-instant-client-layer --zip-file fileb://oracle-instant-client-layer.zip  --compatible-runtimes python3.7


[root@ip-172-31-62-89 layers]# echo $?
255

Investigation

Investigation using strace reveals an out of memory condition

[root@ip-172-31-62-89 layers]# uname -a
Linux ip-172-31-62-89.ec2.internal 4.14.186-146.268.amzn2.x86_64 #1 SMP Tue Jul 14 18:16:52 UTC 2020 x86_64 x86_64 x86_64 GNU/Linux
[root@ip-172-31-62-89 layers]# strace -f -o tr aws lambda publish-layer-version --layer-name oracle-instant-client-layer --zip-file fileb://oracle-instant-client-layer.zip  --compatible-runtimes python3.7
[root@ip-172-31-62-89 layers]# grep ENOMEM tr
3576  mmap(NULL, 272371712, PROT_READ|PROT_WRITE, MAP_PRIVATE|MAP_ANONYMOUS, -1, 0) = -1 ENOMEM (Cannot allocate memory)
3576  mmap(NULL, 272502784, PROT_READ|PROT_WRITE, MAP_PRIVATE|MAP_ANONYMOUS, -1, 0) = -1 ENOMEM (Cannot allocate memory)

The instance type is t2.micro. Physical memory is 983 MB

[root@ip-172-31-62-89 layers]# curl -X GET http://169.254.169.254/latest/meta-data/instance-type                                                  t2.micro[root@ip-172-31-62-89 layers]#
[root@ip-172-31-62-89 layers]# free -m
              total        used        free      shared  buff/cache   available
Mem:            983          63         742           0         177         784
Swap:             0           0           0

Solution

Change the instance type to t2.small. Re-run the command, The normal json output appears. The exit status is 0.

[root@ip-172-31-62-89 layers]# aws lambda publish-layer-version --layer-name oracle-instant-client-layer --zip-file fileb://oracle-instant-client-layer.zip  --compatible-runtimes python3.7
{
    "LayerVersionArn": "arn:aws:lambda:us-east-1:999999999999:layer:oracle-instant-client-layer:2",
    "Description": "",
    "CreatedDate": "2020-08-02T21:03:38.787+0000",
    "LayerArn": "arn:aws:lambda:us-east-1:999999999999:layer:oracle-instant-client-layer",
    "Content": {
        "CodeSize": 51069060,
        "CodeSha256": "B1DGnA385aL50A8mrKoq1FOsIsEtMerbhdYCwd485YA=",
        "Location": "https://prod-04-2014-layers. etc."
    },
    "Version": 2,
    "CompatibleRuntimes": [
        "python3.7"
    ]
}
[root@ip-172-31-62-89 layers]# echo $?
0

Physical memory us 1991 MB.

[root@ip-172-31-62-89 layers]# curl -X GET http://169.254.169.254/latest/meta-data/instance-type
t2.small
[root@ip-172-31-62-89 layers]# free -m
              total        used        free      shared  buff/cache   available
Mem:           1991          63        1712           0         215        1788
Swap:             0           0           0

Conclusion

An AWS CLI on EC2 produced no output and exited silently. Investigation uncovered an out of memory condition, which was fixed by upgrading the instance type.

EC2 maximum number of volumes

Introduction

The documented AWS EC2 EBS volume attachment limit is 27. The attachment limit affects the maximum number of Oracle ASM disks.

EC2 volume limit

Amazon AWS documents a 27-volume attachment limit. I have found that a t2 type creation attempt with 28 EBS volumes will abort.

error.png

Attempting to create an m5 (Nitro)  with 28 or more volumes will hang.

creating

The attachment limit is 28, including network interfaces, volumes, and instance store volumes. EC2 instances with one network interface can have up to 27 volumes attached.

EC2 instances with more than 27 volumes

I am aware of t2 EC2 systems with as many as 44 volumes attached. I have no information about how this was done, and what the customer’s support expectations are. I would be concerned about how such a system would respond to a change of instance type.

Oracle Database

In planning an Oracle database installation, you may need file system mounts as well. /u01, for example. The underlying volume counts against the maximum attachment count.

In laying out an ASM setup, consider a simple design, with as few ASM disks and ASM disk groups as needed.

Conclusion

Based on the available public information, I recommend limiting the number of EBS volume attachments to 27. Oracle database administrators might want to simplify their ASM implementation.

AWS RDS Oracle parameter values

Introduction

Amazon AWS has set values to certain Oracle Database parameters. You can refer to this blog post if want to know ahead of time what the values will be before you create the instance.

Parameters that have values

Oracle Database parameters that AWS RDS has set to values are listed here. The values come from parameter group default.oracle-ee-19:

ParameterName ParameterValue
archive_lag_target 300
audit_file_dest /rdsdbdata/admin/{dbName}/adump
compatible 19.0.0
control_files /rdsdbdata/db/{dbName}_{DBUniqueNameSuffix}/controlfile/control-01.ctl
db_block_checking MEDIUM
db_create_file_dest /rdsdbdata/db
dbfips_140 FALSE
db_name {dbName}
db_recovery_file_dest_size 1073741824
db_unique_name {dbName}_{DBUniqueNameSuffix}
dg_broker_config_file1 /rdsdbdata/config/dr1{dbName}.dat
dg_broker_config_file2 /rdsdbdata/config/dr2{dbName}.dat
diagnostic_dest /rdsdbdata/log
enable_pluggable_database FALSE
filesystemio_options setall
heat_map OFF
job_queue_processes 50
local_listener (address=(protocol=tcp)(host=)(port={EndPointPort}))
log_archive_dest_1 location=”/rdsdbdata/db/{dbName}_{DBUniqueNameSuffix}/arch/redolog”, valid_for=(ALL_LOGFILES,ALL_ROLES)
log_archive_format -%s-%t-%r.arc
max_string_size STANDARD
memory_max_target IF({DBInstanceClassHugePagesDefault}, 0, {DBInstanceClassMemory*3/4})
memory_target IF({DBInstanceClassHugePagesDefault}, 0, {DBInstanceClassMemory*3/4})
open_cursors 300
pga_aggregate_target IF({DBInstanceClassHugePagesDefault}, {DBInstanceClassMemory*1/8}, 0)
processes LEAST({DBInstanceClassMemory/9868951}, 20000)
recyclebin OFF
sga_target IF({DBInstanceClassHugePagesDefault}, {DBInstanceClassMemory*3/4}, 0)
spfile /rdsdbbin/oracle/dbs/spfile{dbName}.ora
standby_file_management AUTO
undo_tablespace UNDO_T1
use_large_pages {DBInstanceClassHugePagesDefault}

Variables

Notice that some parameter values depend on variables.

The list of variables is:

DBInstanceClassHugePagesDefault

Depends on RDS size. RDS uses hugepages for RAM 16 GB and up.

DBInstanceClassMemory

The amount of RAM, in bytes, in the EC2 instance type that you select.

DBUniqueNameSuffix

Usually “_A”

EndPointPort

1521, for example

dbName

The value that you specify, or ORCL.

Actual memory-related parameter values

Here are some actual, observed memory-related parameter values:

Host memory
db.t3 instance size small medium large xlarge 2xlarge
RAM 2 GB 4 GB 8 GB 16 GB 32 GB
Parameter Name
memory_max_target 1328 MB 2768 MB 5670 MB 0 0
memory_target 1328 MB 2768 MB 5670 MB 0 0
pga_aggregate_target 0 0 0 2 GB 4 GB
processes 187 392 815 1663 3359
sga_target 0 0 0 12 GB 23 GB
use_large_pages FALSE FALSE FALSE ONLY ONLY

Generally, you should not set these parameters to your own values. You should not create parameter groups that set these values. Doing so defeats the simplifying design of RDS.

RDS disables hugepages, and memory management is AMM, for RAM size 8 GB and smallerl however, RDS enforces hugepages, and memory management is ASMM, for RAM size 16 GB and up. If you modify the instance size, the memory-related parameters get changed.

Files

Control files

Control files are not multiplexed. Example:

/rdsdbdata/db/ORCL_A/controlfile/control-01.ctl

Data files

Tablespaces are bigfile. Example datafile:

/rdsdbdata/db/ORCL_A/datafile/o1_mf_users_hbl3j3yn_.dbf

Log files

Logs are not multiplexed. Example logfile:

/rdsdbdata/db/ORCL_A/onlinelog/o1_mf_1_hbl3kbbx_.log

Example tempfile:

/rdsdbdata/db/ORCL_A/datafile/o1_mf_temp_hfdtzrr6_.tmp

Operations

Because parameters db_create_file_dest and db_unique_name are set, tablespace creation is simplified. This command:

create tablespace TSQ;

results in creating a datafile such as:

/rdsdbdata/db/ORCL_A/datafile/o1_mf_tsq_hffymmyr_.dbf

Services

Out of the box, RDS boots with two services, namely db_name and db_unique_name. For example, ORCL and ORCL_A.

There are at least two ways to create additional services. Grid infrastructure tool srvctl is not be available to manage services in RDS.

SID

Your db_name is also your SID, and it is registered with the listener as a service. Check your SID:

select sys_context('userenv','instance_name') from dual;

or

select instance_name from v$instance;
ORCL

db_unique_name

Check your db_unique_name:

show parameter db_unique_name;
NAME TYPE VALUE 
-------------- ------ ------ 
db_unique_name string ORCL_A

You could override the default db_unique_name by creating a parameter group with your new value.

Managing service_names

You could create a new AWS RDS parameter group and set service_names there. If you do that, you may find over time that you have created an unmanageable number of parameter groups.

Running dbms_service

You can create and start a service using dbms_service.

begin
dbms_service.create_service(
        service_name => 'ESB',
        network_name => 'ESB'       
    );
end;
/
begin
dbms_service.start_service(
        service_name => 'ESB'      
    );
end;
/

However, the service state would not survive a restart. To start the service automatically, you could try creating a database trigger.

create or replace trigger
system.start_svc
after startup on database
begin
dbms_service.start_service(
        service_name => 'ESB'      
    );    
exception when others then
    if sqlcode != -44305
    then
        raise;
    end if;
end;
/

However, you will get this error:

ORA-20900: RDS restricted DDL found: CREATE TRIGGER SYS.START_SVC

In case you set db_domain

Suppose, because of a tradition, you decide to set db_domain. You could create a new parameter group and set db_domain there.

pargrpdb

Then you could apply the parameter group to your RDS instance. Now you have two connection options:

host:port/orcl

or

host:port/orcl_a.its.gvu.edu

If you try:

host:port/orcl.its.gvu.edu

you get:

ORA-12514: TNS: Listener does not currently know of service requested in connect descriptor

This means that all your connections need suffix “_a.its.gvu.edu”. If you head down this road, your environment is going to be cluttered with “_a.its.gvu.edu”. “_A” is for “_Appendix”, a vestigial organ that serves no current purpose, and can cause pain at unexpected times. If you don’t want so much clutter, do not set db_domain in RDS.

Services conclusion

Services were useful on on-prem deployments for managing or monitoring workload. Configuring services in AWS RDS is impractical.

I have these recommendations regarding services:

  • Do not set db_domain
  • Do not attempt to manage extra database services
  • Connect using host:port/sid

AWS RDS is not very service-friendly.

Conclusion

Amazon AWS RDS sets certain Oracle Database initialization parameters. Memory and file-related parameters depend on RDS variables, which depend on variables. Memory-related variables are adjusted proportional to the amount of EC2 RAM. RDS sets parameters that control file creation locations. RDS does not support the service functionality that you could be accustomed to with on-prem.